how to crochet the loop stitch
I’m so glad people liked my crocheted i-cord video tutorial! Putting my voice up on YouTube for anyone to listen to was a bit (okay, a lot) out of my comfort zone, but I’m starting to get used to it… In time, I’d like to make a whole crochet tutorial video library (and if you have requests for video tutorials you’d like to see, please let me know and I’ll add them to my list, although I can’t promise exactly when I’ll have time to make them – nobody’s paying me to make them!)
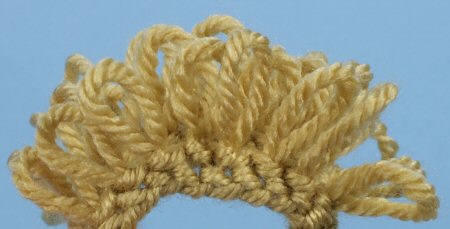
Today I have another little crochet video tutorial for you. Loop stitch (aka fur stitch) is a decorative stitch similar to single crochet but with an added long loop of yarn formed on the back of the work. You can make the loops as long as you’d like, depending on your application – just wrap the yarn around something to create each loop so that all the loops you form are consistent in size. (I use my finger in my video tutorial, but you could use a wider piece of cardboard to form longer loops.)
I’ve seen at least 4 methods for creating loop stitch; my demo shows the method I find most effective, as, unlike the other methods I’ve seen and tried:
- It doesn’t distort the size of the ‘single crochet’ part of the stitch
- It locks the loop firmly into place
- The loops formed stand up nicely away from the work
Once you’ve finished crocheting with loop stitch, you can leave the loops as is for a curly, furry effect, or snip through the top of each loop to create straight strands of yarn sticking out from your work. It’s not a subtle look, but, in the right pattern, can be used to great effect!
And now to the video tutorial (in right- and left-handed versions, of course):
Crochet loop stitch (right-handed)
Click to watch this video on YouTube.
Crochet loop stitch (left-handed)
Click to watch this video on YouTube.
Note: as the loops are formed on the back of the stitches, you can’t use it while crocheting amigurumi unless you keep any pieces using loop stitches turned ‘inside out’ (see my tutorial Which is the ‘Right’ Side?).
You can put this tutorial (as well as my previous crocheted i-cord video tutorial) into practice with my new pattern, coming very soon…
Do you find my tutorials helpful? If so, please consider making a contribution towards my time so I can continue to create clear and concise tutorials for you:
Thank you so much for your support! Now click below for loads more crochet video and photo tutorials (and do let me know what else you’d like me to cover in future tutorials…)


Denise said
After making rows of loop stitches on cabbage patch hat, do you then turn hat inside out to wear?
June said
This is not my pattern, but, as I say in the tutorial above, the loop stitches are formed on the back of your work as you crochet, and this side should be the right side of the finished piece (unless your pattern specifically states otherwise – and I can’t imagine why it would!)
Lisa Taylor said
YOu should ch 1 and turn your work as you begin the loop stitch row….so the wrong side will be facing you as you work….then when you turn your work around to see the outside,,,,there are your loops!
Carol Sherwood said
Just wanted to say thanks. I have done a loop stitch before but your method was by far the easiest and the best. Thanks again and if I ever need a refresher on a stitch method I will be sure to look for your tutorial.
aurora capasso said
ho trovato cose stupende, ed
Nikki said
I did the loops originally the easy way but didn’t think it was brilliant, learnt the way on your video and the result was 100% better… Thank you! Would love to post you both pics so you can see the difference, the first wasn’t even and had holes esp on the decrease.
June said
I’m glad you found my way to be better, Nikki! I tested 4 different methods, and the one I demonstrate gives a far better result than any of the others I tried 🙂
Cristina said
Thank you so much for your clear and comprehensive tutorial! I came across your website while searching the internet for methods to make “fake fur” using regular yarn.
E said
June, your a doll!
Thanks for this tut! It has totally saved my little [left-handed] life! <3
Pabkins said
Awesome could you do one that shows how to start it off as an amigurumi magic circle? I’m having the hardest time!
June said
That does sound quite tricky, Pabkins – lots of loops to wrangle at once! I only make tutorials to demonstrate techniques I use in my patterns, and I try to keep my patterns simple to crochet, so I’ve avoided using a loop stitch magic ring so far. I’ll make a video demo if/when I need it for one of my designs 🙂
Putty said
Dear June, really happy with your Loop Stitch. I made hair for the Mascot doll with it. It turned out great. You’re the best! xxx Putty
Birdie said
Hello
I am 11 years old
I love crochet
Your patterns are easy to follow, thank you!
This tutorial and the others were very nice!
I love your voice!
I made the tiny whale, and I am planning to use the i-cord to make a tusk to attach to the whale so that it will be a narwhal.
I like learning new fancy stitches, not the very basic ones, like slst,sc,hdc,dc,and tr!
THanks so much!
Resmi said
Hi June,
This tutorial proved very helpful when I was doing a project. Thanks. I have posted the project on my blog at www.flowersncolors.blogspot.com and also have mentioned about your tutorial there. Thanks again!
Muk said
Thank you June for your very nice and kind.You are such a talent and genius person.
Bri said
I wish I had found this sooner! I just made a doll with loop hair from another tutorial, and it made my stiches a little bigger than the regular single crochet. Your way seems so much better looking! Just a question: when making amigurumi with loop stitch, do I do loop stitch in both sc’s of increase, or just loop stitch one, sc the other? I’d really like to know the answer, as I’d like to make more loopy crochet! Thanks for the awesome tutorial, yours are THE best on the net!
June said
Hi Bri – yep, that’s one of the reasons I like my method – I assume you were pulling both sides of the loop up through your stitch? It does make the stitch bigger that way.
As for increases, it’s really up to you. I’d probably do a loop in both stitches, to make the hair look fuller (especially if there are a lot of increases in your pattern), but if you find it tricky I’m sure you could get away with looping the first st and sc-ing the second. As you can see from my video, when you work in rows, you only loop st every other row, and the sc rows in between only show if you part the rows, so one stitch of sc every now and then when you increase shouldn’t be a problem at all.
Bri said
Ok, thanks! I was wondering about that…..I’m making an Irish Dancer doll, and I’m crocheting a wig for her now =) I’ll be posting her on my Ravelry, I’m excited to be finishing her!
Rose said
This is really cool! BTW I really like your voice. (I know that sounded weird but I’m serious, its very calm and sweet).
Jana said
Neat technique! It will be handy for “hair” on dolls! I may use it for YOUR doll pattern from your fantastic book! 😀
I LOVE the lion and lioness! Awesome! Of COURSE, I will be getting the patterns! 😀
jun said
thank you for this tutorial. It was easy to follow, like all your other tutorials. thanks:)
Caroline said
Hi June! Thank you soooo much for publishing such a clear, visually as well as, verbally explanation of the loop stitch. Keep up the good work!