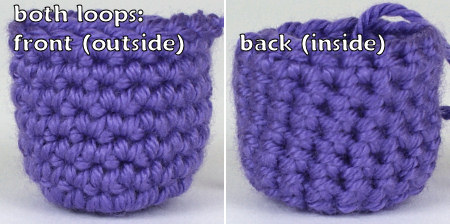
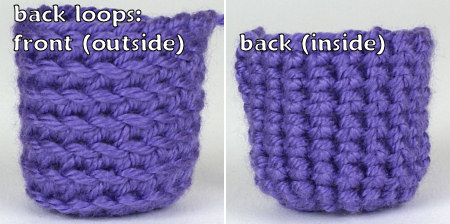
front loops, back loops, both loops…
The humble single crochet stitch may be the simplest of crochet stitches, but it’s still open to interpretation, as it can be worked the standard way (into both loops of the stitch below) or modified by working into only the front or back loop of the stitch below. Today I’m going to delve into the differences you’ll see from working into front loops, back loops, or both loops, starting with a video tutorial in case you’re not clear about which loops are which.
Keep reading beyond the video and we’ll take a thorough look at the differences through one of my scientifically-approached crochet investigations into the results of using each of the different loops 🙂
Loops Matter!
In amigurumi, there are specific reasons for using back loops or front loops at certain places in a pattern: turning a sharp corner in either direction; using the unworked loops as attachment points to crochet back into later; using novelty yarns where the stitches will be hidden by the fuzzy yarn; or for visual or textural effect, especially in a colourwork piece.
If you’re following a crochet pattern, it’s important to work each stitch as the designer intended if you want to achieve a good result. Working into different loops not only gives your stitches a different appearance, but also changes the overall shape of the piece.
The same crochet pattern, worked in different loops, looks totally different!
I’m not convinced that people really grasp the impact of these differences, as I’ve seen many people working my patterns in back loops only and ending up with a very thin, extra-tall amigurumi as a result, without knowing why. Or working one of my fuzzy patterns (designed to be worked in back loops only) in both loops, resulting in a very squashed, short looking amigurumi. Let’s demystify this once and for all, so you can make the best amigurumi possible!
Video: Front, Back, Both Loops (right-handed)
Click to watch this video on YouTube.
Video: Front, Back, Both Loops (left-handed)
Click to watch this video on YouTube.
Note: The videos may look a little small embedded in the blog: if so, you can fullscreen them or click through to YouTube to watch them full-sized 🙂
A Loopy Investigation
Let’s look at this scientifically, so we can really appreciate the differences in the crocheted fabrics. For our comparison, I’ve crocheted the same sample piece three times, once in the standard both loops, once in front loops (FL) only, and once in back loops (BL) only.
To keep things fair, I kept everything else constant for each sample:
- The same hook (E/3.5mm) and yarn (worsted weight, Caron Simply Soft)
- The same style of crocheting (single crochet in a continuous spiral without joining or turning)
- The same crochet pattern (i.e. the same number of stitches and rounds, with increases and decreases in the same places)
Here are the basic fabrics created by working in the round without turning [Note: I turned each of them inside out briefly to take the back (inside) photos, so you’ll know what to expect if you’re accidentally crocheting with the wrong side facing out]:

And now we’ll do a comparison of the three.
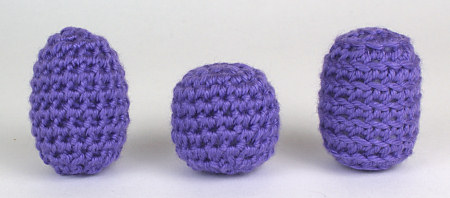
Stitch Shape
The overall shapes of the samples will clearly show any difference in the shape of the stitches: a wider sample means wider stitches, and a taller sample means taller stitches, as each sample is formed from the same number and position of stitches.
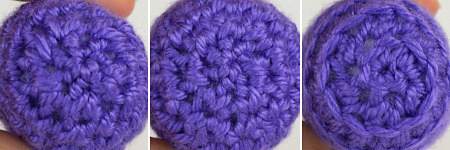
Unstuffed: We’ll compare the straight sides of each sample, where the stitches are all single crochet, with no increases or decreases.
L-R: front loops only, both loops, back loops only
As you can see, all the pieces have a comparable width. The FL piece is very slightly shorter than the regular piece, but looks quite similar, but the BL piece is considerably taller and looks completely different from the outside.
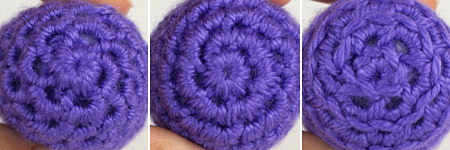
Stuffed: Now look what happens when you stuff the pieces. [Note: to keep things fair, I didn’t cram in as much stuffing as I possibly could; I used the same level of stuffing in each sample: enough to hold its shape, but still be squashy to the touch.]
L-R: front loops only, both loops, back loops only
What you may not have expected is that, with stuffing, the FL sample stretches out so it no longer looks similar to the standard piece – it stretches to be the same height as the BL sample! Now just imagine that you’re following one of my patterns and these samples are supposed to be the round head or body of an animal – you can see why working in either FL or BL only is going to give you a completely different, stretched-looking animal…
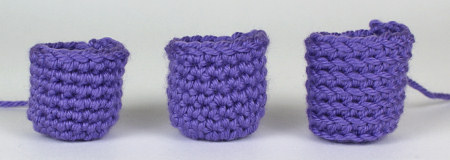
Base Fabric Characteristics
Let’s compare the fabrics formed where the stitches are worked 1 to 1, with no increases or decreases:
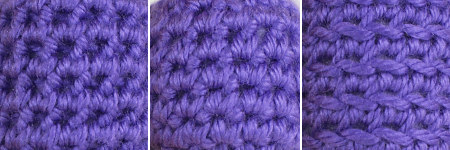
L-R: front loops only, both loops, back loops only
Crocheting into one loop only instead of both changes the characteristics of the fabric formed: it makes it less rigid, more fluid and flowing, and either more stretchy (FL only in my samples) or thinner and more open (BL only in my samples). Many crocheted garment patterns utilise these properties to great effect – when you’re making clothing, a more flexible fabric that can drape on your body is far more flattering than a stiff, thick boxy fabric.
But the opposite is true for amigurumi: here we are aiming for a solid stiff fabric that holds its shape with as few gaps as possible. Crocheting into both loops gives us this fabric: it has very little stretch, and the fabric is thick and firm, so it holds together when it’s stretched by the stuffing.
As the stitches are held further apart by working into either single loop, there is naturally a larger gap at the base of each stitch. (You don’t see it in the FL sample until you stuff it, because the FL fabric is stretchy but relaxed and only stretches when the stuffing is inserted.) The unworked loops help to partially obscure the resulting gap by covering the top inside edge of the FL sample, and the bottom outside edge of the BL sample, but the remaining hole (the area below each stitch where you can see right through to the stuffing) is still larger in either case than with the standard sample. You’d expect this, because working into both loops keeps the stitches pulled together, so those large holes never form.
Increasing and Decreasing
At the points where you increase and decrease, you’re either forcing 2 stitches into 1 gap, or pulling 2 stitches together to form 1. Both these cases lead to larger holes in the surrounding fabric than with normal stitches, so it’s important for us to examine both ends of the stuffed samples, to compare the end with the increases and the end with the decreases for each sample.
Decreases: I should mention that, for my standard sample, I used the invisible decrease (invdec), one of the most essential techniques for amigurumi as it practically eliminates the holes or bumps from decreasing. As this technique can only be used with standard single crochet, I couldn’t apply it to the other samples, so I was already expecting an inferior result.
L-R: front loops only, both loops, back loops only
As I suspected, neither of the single loop samples could compare with the invdec. The BL only sample in particular has very large gaps where the stuffing is clearly visible, but neither FL or BL gives what I’d consider to be a satisfactory result.
Increases: Although I do have an invisible increase (invinc) technique, I don’t regard it as an essential (as the standard increase isn’t terribly gappy to begin with), so I didn’t use it for my sample, to give a fairer test. It should be noted, though, that invinc could be used to further improve the increase results (of the standard sample only).
L-R: front loops only, both loops, back loops only
Again, neither of the single loop samples had small enough gaps to keep the stuffing hidden. The FL only increase stitches are very pretty – it looks like a flower! -and the loops on the inside do mostly hide the stuffing, but not in every stitch, so the end result is a bit uneven. The unworked loops of the BL only sample are so far below the increases above that they do nothing to hide the holes, which are very large.
If you look at my samples, you can see that the more open fabric formed by FL or BL only leaves much larger gaps with both increases and decreases. The unworked loops still help to fill the holes slightly, but only cover 1/3 or less of the hole, so the remaining gap is still much larger than in the standard sample, and there’s no technique comparable to the invdec or invinc that could be used to reduce those holes without distorting the surrounding fabric.
Summary
A firm fabric with minimal holes is the ideal for amigurumi. You can’t use my invdec/invinc techniques unless you work in standard single crochet; the thinner, stretchier fabric made from working into one loop only naturally has larger gaps and couldn’t hold the kind of shaping you see in my designs; and any shaping stitches would look gappy due to the larger holes seen when you increase and decrease.
For non-amigurumi crochet projects such as garments or accessories, you can use the special properties of BL or FL only crochet to their advantage. But, for the reasons I demonstrate above, I recommend that you always work in both loops for amigurumi or any other stuffed crocheted work, unless you have a specific reason to do otherwise.
Final thoughts:
- If you’re following a crochet pattern, remember that sc and sc in BL/FL only are never interchangeable!
- If you’re creating your own design, use the most appropriate stitches for your design to give you the best results.
- If you’re writing a crochet pattern, be sure to specify anywhere that you use non-standard stitches (i.e not worked into both loops).
Do you find my tutorials helpful? If so, please consider making a contribution towards my time so I can continue to create clear and concise tutorials for you:
Thank you so much for your support! Now click below for loads more crochet video and photo tutorials (and do let me know what else you’d like me to cover in future tutorials…)


Ash said
THANK YOU SO MUCH! I found your blog from a link on reddit for beginner crocheters. This is something I didn’t know about and hadn’t seen discussed. So helpful! You lay things out very clearly.
nutter butter said
Thank you. I have been stitching the in the back loop only (beginner). I will have to give both loops a try.
Crystal said
Ahhhh…thank you for the video on front loop vs back loops vs both.
I’ve seen many videos, and yours is the most concise – I gave up trying both front and back loops as I thought it pertained to different “v’s” instead of the same V. Yay!
Love your patterns 🙂
Thank you thank you!
Mai said
Thank you for the tutorial it was very helpful to me early on. In one of the first how to videos I came across the woman said that a lot of patterns said to crochet in both loops but she only crocheted in front loops and that it made no difference. That was a lot easier and my first few pieces were done that way. I came across your site and this tutorial before I could form a bad habit. 🙂
I was wondering what might be the reasons for crocheting in front or back loops only for amigurumi. You mentioned the back loops only for fuzzy yarn but I have a pattern of yours that calls for a row of back loops only and I wondered what that accomplished. A sharper curve perhaps?
Thank you again for the tutorials, patterns and book. 🙂
June said
Mai, some of the common reasons why back loops or front loops only may be used in a specific part of a pattern are: to turn a corner; to leave a decorative ridge; and/or to leave free loops that will be worked back into at a later point in the pattern.
Mai said
Ah, I think in the pattern I was doing it was for turning a corner. 🙂
I am now trying to make my first original amigurumi and I wanted him to have a very flat bottom for sitting. The edge from the bottom into the body isn’t as sharp as I had originally envisioned but on the upside I can now crochet a nice pear.
Thank you for the extra details. 🙂
Melissa said
Can you please direct me to some help? I’m a remedial crocheter, and I frequently make cases (phone cases, glasses cases, camera cases, beer cozies, etc). In your post, under the title Stitch Shape: Unstuffed, there is a picture of the three pieces using the same pattern through different loops. That picture demonstrates my problem perfectly (although I tend to use double crochet stitches).
The top of my cases look the same as your pieces in that picture. They’re crooked, slanted, and not leveled. And for the projects I attempt, this isn’t really the finished look I’m aiming for.
I know I can get the the straightness I’m looking for if I choose to go with seams, but that’s just trading one undesirable look for another.
I don’t know the technical term, which is probably why I’m going mental trying to look up tips or solutions. I’ve been using your tutorials for months, so I know how skilled and knowledgeable you are in the crocheting world. I would really appreciate it if your could give me some advice, terminology, or some links that you think would be helpful.
June said
Melissa, you need my Invisible Finish tutorial – however, I demonstrated it with single crochet in a spiral. For a dc spiral, you’ll need to step down (1 hdc, then 1 sc) to get the start and end of your row to the same height, then use the Invisible Finish.
Melissa said
Thank you so much. That’s exactly what I was looking for.
All of your tutorials are explained so well and the step-by-step pictures save me from questioning myself every single step.
I especially love your page of basic stitches and their abbreviations. I refer to it frequently whenever I try a new pattern.
Your’e so skilled and I really appreciate you sharing your knowledge!
Emma said
Hi June, love your website! I’m new to crochet and really enjoy making amigurumi. I’ve noticed that turning things inside out really makes them look better, but I’m struggling on items that need stuffing and then more rounds of stitches. How do I get the stitches to look the same? I’m basically finishing the ‘wrong way’, but I can’t see how to continue the right way without having to do it left handed! Any tips would be greatly appreciated! Thanks
June said
Emma, you don’t need to do anything differently after you turn the pieces inside out – watch my Which is the Right Side? video tutorial to see this in action 🙂
Chrisie said
So if I were to make a ‘fuzzy’ pattern, I could use FLO with regular yarn?
June said
You could! I wouldn’t recommend it, but only because I find FL much more difficult to work into than BL; you could definitely try using FL instead of BL and see which you prefer. (Just don’t switch within a piece or you’ll have a problem.)
Chrisie said
I don’t mind FLO… if I do give it a go sometime, I’ll let you know how it works. 🙂
TuesdayFortnite said
First of all thanks for a great, well written, article on Flo and Blo – I learnt a lot!
I also have a question though 😉 If the invdec is worked into the front loop only, why would it only work on the standard piece? surely it would also work on the Front Loop only piece as well – or is the tensioning changed somehow by the stitches either side being into both loops?
(and a quick note – the link to the invisible increase gives a 404 error – page not found)
thanks.
June said
Good question! You could certainly use the invdec technique with FL crochet, but it wouldn’t give you the same result, as the surrounding FL stitches are taller and less sturdy, so the effect would be different. I’ve never heard of anyone using anything other than a standard decrease with BL or FL crochet, which is why I used the standards in my investigation. The most invisible FL decrease may actually be a standard sc2tog worked in front loops only, or the invdec technique, or yet another technique, but that’d be a subject for another investigation!
(And thanks, I’ve fixed that invinc link.)
Kati said
I did a bunch of ferrets and guinea pigs recently and I can confirm that the invisible decrease technique works fine in both FLO and BLO items. 🙂 (I prefer the look of FLO even under the brushing so unless I forget, I use that for the amis originally designed with fuzzy yarn and BLO stitches) No idea if it’s the most invisible method possible, but it fits with the surrounding stitches, and since I work it without even thinking, that’s one less thing to remember. (I must remind myself to do proper decrease if working in rows – too many amigurumi I guess :))
June said
If you’re seeing a difference between BLO and FLO in my fuzzy patterns, Kati, you’re making them inside out! My fuzzy patterns were all designed to be worked with the ‘wrong side’ on the outside, because most of the ‘fuzz’ of a fuzzy yarn forms on the back of your work.
But if you’re using non-novelty yarn and you’re happy with the way you’re doing it, that’s fine. Until I tried this experiment, I didn’t know that the FLO stitches would stretch to the same size as the BLO stitches, so now I know you can use those stitches interchangeably in my fuzzy patterns (provided you flip the work inside out for one of them so you never see the ridges on the outside!). Personally, I find it much more difficult and fiddly to work into front loops only, as you don’t push the hook through to the back of the work – maybe FLO is easier with a tapered hook than with the inline hooks I prefer…
Kati said
Sorry, I mixed this up! I haven’t made a “real” fuzzy ami in a while, only ones from regular yarn to be brushed. I prefer to work those right side out – I tend to complicate my life with extra color changes and it’s so much easier if all the pesky yarn ends are hidden inside, and I can carry yarn for a few stitches. To me it’s worth the slightly more effort of working into the front loops. 🙂
Amis from novelty fuzzy yarns should always be worked wrong side out and BLO, just as you write in your patterns.
June said
Gotcha – that makes sense 🙂
Mia said
Hi June,
Your tutorials are fantastic. I just started learning how to crochet to keep my hands busy in order to calm by busy mind. I am using your tutorials. So far I have learned the single crochet stitch and figured out why I was losing stitches after each turn. This loopy investigation lesson is a bit over my head right now, so I tried it in a row instead of a circle, as I have not mastered the circle yet. I saw the difference after a few rows. Thank you so much for posting these. I am now learning the half double crochet stitch. It’s not going too well, meaning I have no clue if I am doing it right, however so far I am not losing stitches. The plan is to make one of your lovely scarfs one of these days. Take care. PS Ian sends his greetings.
Merry Thornsburg said
What a great tutorial June! You really explain things so thoroughly! Thanks for sharing these great tips! It’s kinda fun that you can have a variety of ways to make your stitch, depending on what you are making!
Thanks again,
Merry ?
pam said
This is fantastic! So, so helpful especially for a beginner like me! Thank you 1 million times for all the time and effort and thought that you put into this post.
lea said
thanx – although I knew the differences I didn’t know how they affect the end result – great info
Judy Carlson said
Thanks again for your thorough investigation of crochet stitches!