PlanetJune by June Gilbank: Blog
PlanetJune Craft Blog
Latest news and updates from JuneMop Top Mascots
© June Gilbank 2009
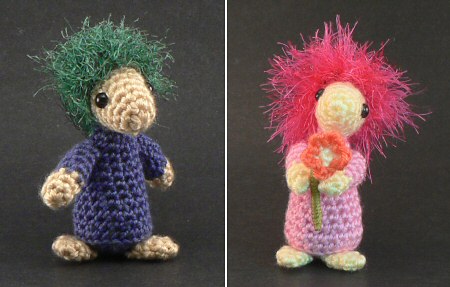
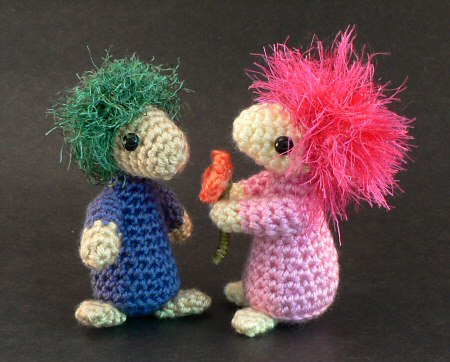
Mop Top Mascots are a fun way to use up scraps of yarn. They stand about 4″ tall, and the real joy of them is that they are so easy to make, and easy to customize with funky colours or embellishments. Who wouldn’t appreciate a little mascot like these?!
This pattern is Donationware – the pattern is available for free, but if you like it please consider sending me a donation to show your appreciation:
Send me a donation and receive the easy-to-print PDF version of the pattern as a thank you!
The PDF pattern also contains advice and suggestions for making the accessories to convert your mascots into Lemmings 🙂

Donations of any size are much appreciated. Just add the amount you wish to donate, and, once you have checked out and paid, your pattern will instantly be available to download from your PlanetJune account.
The complete pattern and instructions are available below, regardless of whether or not you choose to pay for them 🙂
This is a PlanetJune original crochet pattern. Feel free to use items made from this pattern however you wish, but I’d appreciate credit as the pattern designer. Please do not reproduce the pattern anywhere else; instead post a link to www.planetjune.com/moptop
Not ready to make it yet? Add it to your Ravelry queue: 
Terminology
| ch | chain |
| invdec | invisible decrease Note: If you prefer, you may use a standard sc2tog decrease in place of each invdec. |
| sc | single crochet (double crochet for UK/Aus) |
| sl st | slip stitch |
| st | stitch |
You will need…
- E US/3.5mm and H US/5mm crochet hooks
- Small quantity of worsted weight yarn in two colours
- Small quantity of eyelash yarn for hair
- Stitch marker
- Yarn needle to weave in ends
- Polyester fibrefill stuffing
- Eyes, approx 8mm diameter
Notes
- Do not join at the end of each round; rounds are worked in continuous spirals.
- Fuzzy yarn stitches are worked in back loops only; worsted weight yarn stitches are worked in front and back loops (unless otherwise specified).
- Use a stitch marker to mark the beginning of each round. Move the marker up each time you start a new round.
- Working with fuzzy (eyelash or novelty) yarn can be a challenge until you get the hang of it. See my Fuzzy Yarn tips for my advice.
- Use worsted weight yarn and E hook unless instructed otherwise.
Colour code
A: the yarn colour of the face, hands and feet
B: the yarn colour of the body
Head
worked from nose back
With A, make a magic ring, ch 1.
Rnd 1: 6 sc in magic ring. (6 st)
Rnd 2: (2 sc in next st, sc in next st) three times. (9 st)
Rnd 3: sc in each st around. (9 st)
Rnd 4: (2 sc in next st, sc in next 2 st) three times. (12 st)
Rnd 5: sc in each st around. (12 st)
Rnd 6: (2 sc in next st, sc in next 3 st) three times. (15 st)
Rnd 7: sc in each st around. (15 st)
Note: If using animal (safety) eyes, insert them now (roughly between Rnds 5 and 6) and attach the backs.
Rnd 8: (invdec, sc in next 3 st) three times. (12 st). Stuff head through hole.
Rnd 9: invdec six times. (6 st). Fasten off and weave in ends.
Body
worked from bottom up
With B, make a magic ring, ch 1.
Rnd 1: 6 sc in magic ring. (6 st)
Rnd 2: 2 sc in each st around. (12 st)
Rnd 3: (2 sc in next st, sc in next st) six times. (18 st)
Rnd 4: (2 sc in next st, sc in next 2 st) six times. (24 st)
Rnd 5: in back loops only, sc in each st around. (24 st)
Rnd 6: in both loops from now on, sc in each st around. (24 st)
Rnd 7: (invdec, sc in next 2 st) six times. (18 st)
Rnd 8: sc in each st around. (18 st)
Rnd 9: (invdec, sc in next 4 st) three times. (15 st)
Rnds 10-11: sc in each st around. (15 st)
Rnd 12: (invdec, sc in next 3 st) three times. (12 st)
Rnds 13-14: sc in each st around. (12 st). Stuff body through hole.
Rnd 15: (invdec, sc in next 2 st) three times. (9 st)
Join with sl st to next st. Fasten off, leaving long end of yarn to attach body to head.
Foot (make 2)
worked from toe back
With A, make a magic ring, ch 1.
Rnd 1: 6 sc in magic ring. (6 st)
Rnds 2-4: sc in each st around. (6 st)
Join with sl st to next st. Fasten off, leaving long end to attach foot to body.
Arm (make 2)
worked from hand to shoulder
With A, make a magic ring, ch 1.
Rnd 1: 6 sc in magic ring. (6 st)
Rnds 2-3: sc in each st around. (6 st)
With B:
Rnds 4-8: sc in each st around. (6 st)
Join with sl st to next st. Fasten off, leaving long end of B to attach arm to body.
Hair
With eyelash yarn and H hook, ch 2.
Rnd 1: 6 sc in 2nd chain from hook. (6 st)
Rnd 2: 2 sc in each st around. (12 st)
Rnd 3: (2 sc in next st, sc in next 3 st) three times. (15 st)
Rnd 4: sc in each st around. (15 st). Join with sl st and fasten off, leaving long yarn end to attach hair to head.
Finishing
Place the head on top of the neck opening. Using a yarn needle and the long yarn end from the body, sew the body to the head all around the open end of the neck.
Position the arms at each side of the body so that the top of the shoulder is 2 rounds below the top of the body. Using a yarn needle and the long yarn end from each arm, sew the arms to the body all around the open end of the arms.
Flatten both feet, then position them at the front of the body, so the toes peek out from beneath the body. Using a yarn needle and the long yarn end from each foot, sew the feet securely to the body.
Position the circle of hair over the top and back of the head. Using a yarn needle and the long yarn end from the hair, attach the hair to the head by sewing all around the edge of the circle. Fluff out any clumps of lashes that are trapped by the stitches by raking over the hair a few times with the yarn needle.
Add accessories as desired to give your new friend some personality!
I hope you enjoy this pattern. Please leave me a comment below if you do, and consider leaving me a donation. Thanks!
Quick Links: Crochet

Quick Links: Crafts


Welcome to PlanetJune!
Hi, I'm June. Welcome to my world of nature-inspired crochet and crafting. I hope you enjoy your visit!
If you'd like to get in touch, you can contact me here.


Leave a Reply