I made a polymer clay egg out of leftover clay of various colours marbled together, and needed a way to sand it smooth after baking. Previously, I hand-sanded the ballon in my pig ornament but it took sooo long and I didn’t really want to repeat the process for my scrap clay egg. I heard that you can make an electric sander from an electric toothbrush, so I thought I’d give it a go. Here are the instructions:
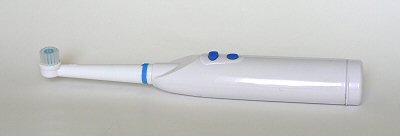
- I started with a cheap battery-powered toothbrush (reduced to $1 at WalMart).
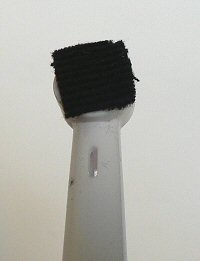
- Use pliers to remove all the bristles from the brush head. Grab a section of bristles firmly with the pliers and wiggle them from side to side until they pull out.
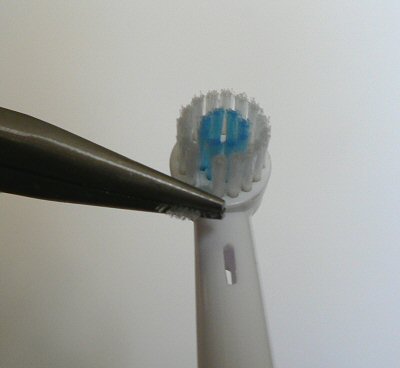
- Repeat until the brush head is bristle-free.
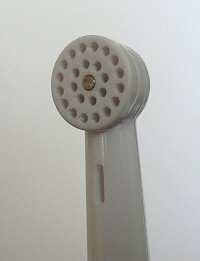
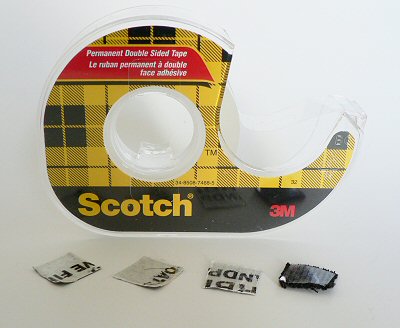
- Cut a small square of sandpaper just large enough to cover the face of the brush head.Tips for cutting the sandpaper to size:
- I wasn’t sure what sandpaper would do to my scissors, so I folded the sandpaper back and forward along the line I wanted to cut, and then it tore easily along that line.
- Make sure you label the back of every little piece of sandpaper you cut, or you will get into a muddle!
- Stick a square of double sided tape to the back of the sandpaper square and attach it to the brush head.
- Turn on the toothbrush and get sanding!
- If your brush comes with extra heads (mine came with 2 heads), you can attach a different grade of sandpaper to each head. If you do this, remember to mark up each head differently, so you know which is which! Otherwise, you can just pull off each square when you’ve finished with it, and tape a finer grit in its place. I’ve been doing this and it works very well. I have sandpaper in 220, 320, 400 and 600 grits.
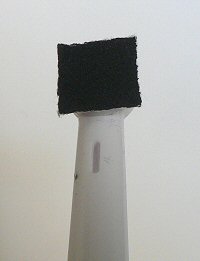
- When your piece is sanded nicely, you can also make buffing heads by attaching a square of sturdy fabric to the brush head in the same way. I used a piece of thick corduroy.

Here’s my finished egg. It’s really smooth and softly shiny, although I couldn’t capture that well in my photo.


MikeBowlin said
Thank you for sharing this great idea!!
ChezlowYezz said
thank you from the bottom of my heart
Mike Hawk said
Thank you so much for this! I have very severe arthritis and can no longer sand by hand…you’ve just made it possible for me to keep going! Thanks
Leo said
Muchas gracias por compartir esta excelente idea. Me pondré manos a la obra enseguida, quiero hacerme uno cuanto antes. Gracias.
Bad Boy Batch said
Excellent idea i have my old toothbrush waiting and willing , if you buy a small detail sander it would cost a small fortune,its simple DIY and so cost effective
Deb Halldow said
This is a super great idea!!! I already use one for cleaning small areas. I do glass etching with a dremel and even those need some cleaning out with a soft brush.
Jo said
Nice tip but you just have to watch what you get. My mom actually sent me one of these in a box of odds and ends at Christmas, she got it from Walgreens. It takes batteries but the head does *not* spin, the whole brush merely vibrates. While that might still work to do some sanding, I would imagine the ones that actually turn (Crest Spinbrush?) might be better.
Carol said
Good point. The electric toothbrushes I’ve had just move back and forth. One that spins would be ideal. I’ll have to see if the Spinbrush you mentioned works that way. Thanks!
Dennie said
This is GENIUS! Thank you so much. I can’t wait to make me one. AND…having extra heads for different sanding grades, WOW.
Anon E mus said
Pro jeweler. Been doing the bristle route with rouge with these for years, nice simple and portable hand finishing that doesn’t kill my wrists. Hadn’t thought of this as a sanding method, tried and and improved it. Using rechargeable batteries is cheaper and greener too.
Improvement: for production use, instantly make perfect circles of sandpaper by punching with a leather punch on a plastic cutting board or carefully use a scrap booking circle punch. 10 minutes and 6 sheets of sandpaper == more tiny sanding disks than you can use in a year. I don’t write on them but flip them upside down onto newspaper and lightly spray-paint different colors on the back for each grit. Also store discs of each grit in separate bags or tiny dollar store containers until use.
Sorry for the name but I get enough spam already.
Enjoy!
June said
Thanks for the tips, Anon! And, just to set your mind at rest, while there’s no need to share your name or email address, I guarantee that only I can see your email address, and I’d never spam you or share your email with anyone else, so it’s perfectly safe to post your real details in future, if you want.
Darlynn said
This is a great post. Don’t know why I never thought of it. Instead of fabric to polish your item try a piece of brown paper sack attached to the tooth brush.
vivienne reid said
Fabulous idea!!!! Going out to buy electric toothbrush!! Thank-You!
Mary said
Great idea! Thanks.
Iva said
That’s so awesome. I’ve just try it out !
Thank you so much ! 🙂
Joni LeBlanc said
Great idea, I have a Dremmel, but how much smaller and more convenient to do this. You are a genius.
vanesa said
Es para pulir verdad?
Norma Bennett said
This is a great idea, adding it to my Pinterest tutorials board because I think many other’s will be interested in it too. Thanks for posting about it!
Diana said
Great idea. I need something a bit larger, so I think I can adapt your idea to a cheap facial cleaning electric brush.
The StarShine Company said
I love this tutorial! I make polymer clay beads in my spare time and was sick of hand sanding… I’d end up with my fingerprints completely sanded off! I followed your instructions and made my own toothbrush sander and I love it!! And my finger tips thank you for it! 🙂
Oh and I save time with the toothbrush sander… which is also important! 🙂
sillylittlesheep said
I think it is a great idea, wow!! Well done! I used to varnish my beads, but sanding them before couldnt relly hurt.
the egg looks awesome too.
Irina said
oh, thnx, thank u very much, i’m so happy 🙂
i’ll be do that, yeah, yahooo^^
_
aww, sorry, i’m russian, and so crazy.) yay!)
Catherine said
If you are one of the truly lazy (like me) you could even use your own toothbrush- just dedicate a head to this, not the whole brush! And you don’t need batteries!
Jenny said
Thanks for such a great, useful tutorial! Do you mind if I share it on my blog??? I really like yours and would like to share it!-Jenny at www.CraftTestDummies.com
Stephanie said
omigosh!! that’s perfect!!! I have eczema & my hands don’t like water too much – this will be perfect!!! btw, scissors on the sandpaper will work fine – it actually helps to sharpen the scissors . . .
LOVE that pig!!!!!
Thanks millions!!!
Steph
Lunes said
Wow what an excellent invention! I can’t wait to try it!
Lisa said
Awesome! Just what my aching hands needed!
Mary Lou said
wow! wow ! wow ! thank you thank you thank you !!!!!!
vickie said
I have found this very useful I couldn’t afford the sander I found on the web but had an old rechargable toothbrush which I adapted and it works like a dream. Thank you. :o) plus the rechargable saves on batteries too.
My aching wrists thank you too.
milo said
pure genius! thanks a zillion :o)
Sandra said
I love that pig! It is adorable! You do wonderful work.
Miriam said
Wow! E’ un’idea magnifica!!! BRAVA, BRAVISSIMA!!!
Squirrel said
Hi June, this is a great idea! I’d never thought of that, but I’ll try as soon as possible. I was looking for an electric buffer that I could use to sand beads as well, so I needed it to be submergible. I couldn’t come up with an idea, but here it is!
Thank you soo much for sharing. Wish I’d read this back in January.
I hope you don’t mind if I blogged about this here: squirrelart.blogspot.com/2007/09/sanding-and-buffing-2.html
Dedee said
idée géniale!! au moins cela me laissera un peu d’ongles sur les doigts!! faut que j’essaie cela rapidement!!! merci pour ce petit truc bien pratique!!!
beth said
What a brilliant idea! You don’t even have to dedicate the toothbrush handle to crafts — just recycle the old heads by adapting them to sander and buffer heads. I had been thinking of converting my son’s neglected rock tumbler for polymer clay sanding, but this idea is much more instant gratification. thank you!
Rebecca said
This is a wonderful idea!!! I have large hands and have trouble sanding smaller items. Thanks so much.
Hadad said
what agreat idea!!!