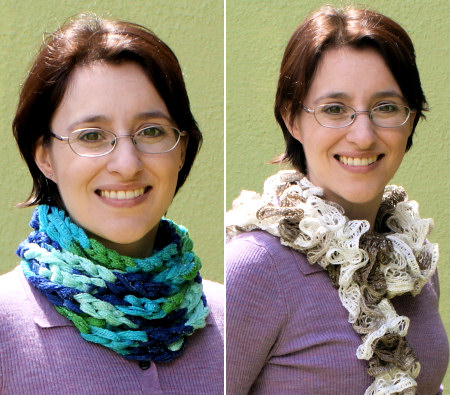
Archive for Reviews

my book: The Complete Idiot’s Guide to Amigurumi

I can hardly believe I’m finally getting to write these words: my crochet book, The Complete Idiot’s Guide to Amigurumi, is out today!* It’s been a very long process that’s taken me to this point, and part of me still doesn’t believe it’s real, although I do have this proof:

The Complete Idiot's Guide to Amigurumi by June Gilbank
Yay! Look what I made – it’s really real!

I’ll be sharing more information about the book over the next few days/weeks, but, as there seems to be a lag somewhere between the publisher and Amazon’s website (their current description is about a year out of date!), I’ll share the correct ‘blurb’ copy that should be there:

Amigurumi (pronounced ah-mee-goo-roo-mee) is Japanese for “crochet (or knit) stuffed toy.” Although the concept originated in Japan, the amigurumi craze is taking over the world in waves of crocheted cuteness! From adorable fuzzy critters, to sweet-looking fruits and vegetables, to quirky comic book and cartoon characters – if you can imagine it, you can crochet it!

Whether you’re an experienced crocheter or have never taken hook to yarn, The Complete Idiot’s Guide to Amigurumi shows you everything you need to know to hook your own delightful amigurumi. This helpful guide includes:

  • A primer on the yarn, hooks, and stitches best for amigurumi, plus fun embellishments you can use to personalize your ami.
  • Easy-to-follow tutorials for getting started, increasing and decreasing, working in the round, changing colors, and more.
  • Expert advice on adding eyes, hair, jointed limbs, clothes, and other fun accessories to your ami.
  • Tips for following an amigurumi pattern, plus four start-to-finish patterns to give you a head-start on designing your own.
  • A full-color insert with inspirational photos of the finished ami patterns featured in the book – and more!

I’ve spent the past few days making a fun (and deceptively time-consuming to produce!) little book trailer for your viewing pleasure:

Click through to see a larger version of my book trailer at YouTube :)

All the amigurumi you see in the video are made from the patterns in the book. These are exclusive patterns that I created for the book – you won’t find them anywhere else.

All along, my plan for this book was to create the definitive reference guide to amigurumi techniques, not just another pattern book, and I hope that’s what I’ve achieved. I’ve put a lot into this book, and I hope that you’ll get a lot out of it, whatever your skill level or experience with amigurumi. It’s the only book of its kind, and I really hope you’ll enjoy it – and please let me know if you do!

If you haven’t ordered a copy yet, they should be in bookstores any day now, if not already, or you can order online from such fine retailers as Amazon.com, Barnes & Noble, or Amazon.ca.

Yay!

* UK folks, looks like you’ll have to import a copy or wait till December to get your hands on a copy :(
I expect the delay is while they translate it (back) into British English and into UK crochet terms – just guessing…

Comments (29)

Facebook Advertising redux

You may recall that I wrote a review of my experience advertising on Facebook last November. My advertising budget was $150 and I only made around $70 in direct sales – ouch. I concluded:

I love that you can specifically target the people who are your potential customers. But the advertising costs are just too expensive for smaller businesses to justify… Personally, I won’t be advertising with FB again unless I can find another promotional voucher for free credit – it’s just too expensive for my budget.

Well, now I have just that opportunity – a promotional voucher for $25 of Facebook ad credit, so I thought I’d try another FB advertising test, using what I learnt from last time, and trying to tweak things to give me better results. And once again, I’ll share my results with you, so you don’t have to waste money to discover what I’ve already found out!

The Ad Setup

(If you’re interested in advertising on Facebook, I recommend you read my previous report first, and then come back here – it gives a good overview of the FB advertising experience which I’m not going to cover again today.)

advertisement on Facebook
This is what an advertisement on Facebook looks like – I’ve circled the ad in purple

With only $25 (which I know from prior experience is very easy to blow through in a single day!) I set my daily budget at $12.50, so I could try different things on 2 days and compare the results.

I chose a CPM (pay per thousand views) bid, not CPC (pay per click), as I found that much more successful last time round.

Last year’s ad was a Christmas ad, so I had to change the image this time. That means I can’t directly compare the results to the previous experiment, as I’m sure the choice of photo plays a part in my success (or lack thereof).

PlanetJune Ad 2 on Facebook PlanetJune Ad 4 on Facebook
L-R: the old ad and the new one

I also excluded people who are already a fan of PlanetJune on Facebook, as the goal of this test is to see if I can attract new customers with this advertising.

Phase 1
I targeted all crocheters (around 150,000 people). I checked realtime stats in my shop throughout the day, and I could clearly see that customers who actually completed a purchase clicked all over my site and typically viewed 20-80 pages before completing a purchase. The Facebook clickers, however, typically looked at only 1 or 2 pages before leaving.

Phase 1 verdict: $12.13 spent, 99,000 views, 51 clicks, 0 sales.

Phase 2
I targeted only people who had listed amigurumi as an interest. This gave me a far more focused target, but only 2000 people have amigurumi listed as an interest. Could I get them ALL to click through? Or would anyone who lists amigurumi as an interest already know me, and not bother clicking?

My money went a lot further in phase 2, because I was targeting so few people. I actually managed to advertise for 5 full days using my remaining budget! A higher percentage of people clicked through (again not surprising, as many people who list crochet as an interest aren’t interested in amigurumi/toys) and people looked at an average of 5 pages before leaving.

Phase 2 verdict: $12.89 spent, 120,000 views, 207 clicks, 1 sale.

Conclusions

Targeted marketing
By focussing on only people who like amigurumi instead of crochet in general, I saw a 20x improvement in the number of people who clicked my ad. Assuming each person only clicked the ad once, over 10% of my potential audience clicked through! Targeted marking is a powerful tool. But it still didn’t lead to sales.

Saturation
In Phase 1, 150,000 people could have seen my ad – it could have potentially been seen by a different person each time it was displayed. In Phase 2, however, only 2000 people (at most) could see my ad, so that means that each person, on average, saw my ad 60 times! By day 5, the clickthroughs had dropped from about 50 to only 19, and that doesn’t surprise me: if you’ve seen an advertisement 59 times and chosen not to click each of those times, why would you click after seeing it for the 60th time?!

Return on investment
As before, I made less money in direct sales than I ‘invested’ into the advertising – here, a $10 return on $25. (Although, also as before, this doesn’t account for new people who may have found me through the ad and may become customers at a future date.)

Casual clickers vs shoppers
The one big thing I’m taking away from this experience is that Facebook users appear to be casual clickers; that is, they may click on an ad out of a vague curiosity, but not be interested enough to really explore my shop or make a purchase. This is a very different behaviour from people who find me through a google search and are actively looking for crochet patterns: these shoppers are in a ‘buying’ frame of mind and while they may come to my shop looking for, let’s say, a “sea turtle crochet pattern”, they tend to look through my entire shop before buying, and often end up buying far more goodies than they were originally searching for.

Of course, I could have seen more success if I’d managed to create a more appealing ad, but who knows?! Maybe I’d have seen more clicks, but the fact is that the people who did click didn’t follow through and make a purchase, so I could have multiplied the number of clicks with a better ad and still seen the same result.

Based on this, I’m really not sure there’s any value in my paying for advertising. People who are prepared to buy something can easily find me through Google, and that costs me nothing. I’ll stand by my conclusion from last time: it’s just not worth the money.

Over to you…

What’s your experience? Have you tried advertising, on Facebook or elsewhere? (I also tried a $100 Google AdWords advertising experiment – would you like me to report on that experience too?) Have you found something that actually works for you? I’d love it if you’d share in the comments!

Comments (36)

review & giveaway: Crochet for Bears to Wear

Let’s get this out of the way first: I was given a copy of this book to review. But I’m not being compensated for this review in any other way, and the following is based on my honest opinions!

crochet for bears to wear

Crochet for Bears to Wear: More Than 20 Perfect Projects for Your Favorite Teddies and Friends is the new book by Amy O’Neill Houck. A totally original concept, this is a book of crochet clothing patterns in teddy bear sizes. Amy has previously written the companion book Knits for Bears to Wear, so it was about time we saw a crochet version!

In this review, I’ll cover an overview of the book, my experience in making one of the garments for my Fuzzy Bear, and keep reading to the end, because I’ll be giving away a copy to one of my readers!


Overview

Coincidentally, the first crocheted garment I ever attempted was one of Amy’s designs! (I still wear my Sweet Sweater around the house during the winter, although I added a few extra rounds to the bottom and sleeves since taking that photo, to make it extra snuggly.) I was impressed that the pattern was written so that, using a swatch, your own measurements, and some basic calculations, you can easily tailor the pattern to fit you perfectly. Although the patterns in this book are designed for standard 18″ tall bears and dolls, Amy uses the same approach here so that you can customize the garments to fit any favourite teddy, or even a small child.

What I like most about this book is that it uses the same crochet techniques and garment constructions that are used for real clothing, so it’s a great way to learn the basics without making the commitment of a full-sized sweater. If the thought of crocheting clothing intimidates you, seeing how a small, quick bear outfit comes together will hopefully give you the confidence to try crocheting something similar in a larger size for yourself!

It’s hard to be very critical of this book! My one comment would be that I had assumed that the ‘more than 20′ projects would mean there are over 20 outfits included. In fact, each item counts as a project, so, for example, the baseball jersey, cap, mitt and ball count as 4 projects. There are actually 13 individual outfits in the book, although contributions from guest designers Robin Chachula and Drew Emborsky and a real variety of styles and techniques ensure that there’s very little repetition, and every outfit your teddy bear could possibly need is represented.


Making a Garment: My Experience

Although it’s assumed that you’ll be making garments for purchased teddy bears and dolls, crocheting clothing for your own crocheted toys makes it extra special. My Fuzzy Bear, at only 11″ tall (standing), is far smaller than a standard 18″ teddy bear, so I thought that making a garment for him would really put the custom-sizing instructions in the book to the test! I chose the Gone Fishing Vest, although I used a silky acrylic yarn in a rich colour to give it a different look – Fuzzy Bear isn’t really the outdoorsy type ;)

choosing a pattern
Fuzzy Bear says “This one please, but in plum!”

As the book explains, before starting to crochet a garment, you always need to make a gauge swatch using your yarn and the recommended hook size. Everybody crochets differently, and if you don’t check that your measurements match the gauge in the book, you could end up with a piece that’s far too large or small. My first gauge swatch, using the recommended ‘light’ weight yarn (Bernat Satin Sport, in my case) and the recommended G hook, was far too small. I actually made 3 swatches (with G, H, I hooks) before I met the required gauge, so it’s a good job I checked!

Next, to take Fuzzy Bear’s measurements using the handy panel in the book, so I could calculate my starting chain length. Here I hit my first little problem: in the front of the book, it explains all the measurements you may need for all the patterns, including the Chest Circumference and Chest Width. But the sidebar for my pattern just told me to “Measure your bear’s chest at the widest point” – hmm, is that the circumference or width? At first I assumed width. The pattern doesn’t explicitly mention that you start crocheting from the bottom and work up, which would have made it easier for me to figure out that it actually means the chest circumference (as the vest is worked in one piece, and the starting chain runs all around the bottom). Note: most of the other pattern customization boxes don’t have this ambiguity, saying e.g. “Measure the circumference of your toy’s chest” instead.

Calculations complete, I started crocheting. I loved the granite stitch used in this pattern – it really adds visual interest while still giving a non-lacy fabric and being easy to crochet. I made the back and then started on the decreases for the first armhole and neck. Here I hit my second problem: as Fuzzy Bear is so much smaller than standard, I had far fewer stitches than the standard pattern. By the time I’d decreased for the armhole AND neck, I had no stitches left to make the top of the shoulder, even after I tried to tweak the pattern!

first attempt
That shoulder (top left) looks horrible – time to frog this attempt

Now, here’s where the customization panel gets even more useful. It takes different gauges into account: I could have stuck with my first swatch instead of trying to meet the gauge, and then used the customization panel to give me the size I wanted! This is a really useful feature if you want to make one of the patterns using a different thickness of yarn – even if your bear is exactly 18″ tall you can still customize the pattern to fit your yarn!

So I returned to my initial G hook (which, as an added bonus, actually gave me a far more even, less floppy fabric) and started over, using my own gauge and Fuzzy Bear’s measurements. I had no problem this time – the numbers all worked out perfectly and the piece came together easily. The instructions were all clear and easy to follow, and the main part of the vest worked up in no time!

main piece completed
A diagram showing that this is the shape you should end up with would have been nice

From there it was just a simple matter of sewing up the seams, and crocheting the patch pockets. The customization panel didn’t mention that I’d have to resize the pockets too, to match the scale of the vest (although that should have been obvious – silly me!) so I made one supersized pocket before I realised my mistake :)

I’m really impressed with the result. Considering that Fuzzy Bear is less than 2/3 of the size of bear the pattern was intended for, you can see that the customization panel really does work! And doesn’t he look adorable in his new vest?

Fuzzy Bear in his new vest
A perfect fit!

Fuzzy Bear in his new vest
I love this stitch pattern


Win a Copy!

Now for the fun part! I have a bonus copy of Crochet for Bears to Wear to give away to one of you! To be entered, simply leave a comment on this post before 6am 12 noon EST on Monday April 26, 2010. Make sure you give your real email address in the ‘email’ box (only I will be able to see it) so that I can contact you if you win! The contest is open worldwide. Good luck!

Comments (81)

Detail Stuffing Tool reviews

A little ‘newsy’ post today. The Detail Stuffing Tools are back in stock, and I aim to keep them in stock permanently from now on. Thanks to everyone who ordered one already; I mailed out all the backorders yesterday (unless you also ordered out of stock eyes in which case they’ll be on their way tomorrow; I just didn’t anticipate getting so many orders over the past couple of weeks!) This is what my poor Post Office lady had to deal with yesterday:


Eek! If only I could print postage online, I’d save hours waiting at the Post Office and writing out customs labels, but Canada Post in their infinite wisdom have decided that the ‘Light Packet’ rate can only be obtained in person at the Post Office…

Detail Stuffing Tool by planetjune

And the reviews of the stuffing tool have started to come in! I know my tool is now indispensible to me – I keep one with every in-progress crochet project – but it’s great to hear that other people like it too. Firstly, a review by Jessica (aka Plushroom Soup), a plush artist and one of the first people to snap up my new tool on launch day. She says:

This little number may not look like much, but boy is it handy! I’ve used everything in the book trying to more efficiently stuff tiny plush parts (tiny fingers and toes are the worst!)—chopsticks, knitting needles, wooden dowels, doll stuffing forks, the Stuff It tool, etc. But nothing had good enough grip for the stuffing; the tools would just slide right through. Wooden dowels were the closest to providing what I needed, but I still struggled. Especially because tiny dowels have a tendency to snap in half while I’m stuffing.

Enter the Detail Stuffing Tool! This neat tool makes quick work of stuffing tiny parts. It’s extremely easy to use and has excellent grip for the stuffing. No more slipping, and stuffing right where I need it.

You can read the rest of her Detail Stuffing Tool review at Plushroom Soup!

And secondly, did you know that March is National Crochet Month? It’s nice to see crochet getting more recognition, although I’d like to see an International Crochet Month next time… Silverlotus, a cross-stitcher and knitter, and novice crocheter (although you wouldn’t guess that from her work!) has written a lovely post about a certain crochet designer for National Crochet Month, including this little snippet about my Stuffing Tool:

Just this month June introduced her new detail stuffing tool, which helps make stuffing little amigurumi creations so much easier. And, my dear cross stitching readers, I know it would make stuffing biscornus and ornaments much, much easier too. I recommend it highly.

See her full review of me (*blush*) on her blog, Reflections in the Pond.

Yay, thanks so much, ladies! If you’ve bought my Detail Stuffing Tool, I’d love to know what you think of it too!

And if you’re still saying “huh? stuffing tool?” here’s my demo video so you can see what all the fuss is about:

Comments (5)

One Yard Wonders

I just received my contributor copy of the new sewing book, One Yard Wonders. I’ve been looking forward to getting my hands on it for months! It’s a lovely book, featuring 101 projects that can each be made from under 1yd of fabric – a great way to use up fabric that you may have lying around in your stash!

One Yard Wonders

They’ve done a really nice job with the book – it’s spiral-bound, so it will lie flat at the page you open it to, and it has an envelope in the front containing full-sized pattern pieces for all the projects that need them.

The projects cover the full range from clothing, aprons, and quilts, to bags, pillows and toys. It looks like a great book, and I can’t wait until I have time to look through it properly and find ideas for things I could make with some of my stash fabric!

*******************

Now, not to detract from the book at all (it really is great! you should definitely pick up a copy), but on a personal level, I am very disappointed.

I contributed a pincushion and matching needlebook to the book. I was given the cutest Japanese fabric covered in tiny hedgehogs, squirrels, chickies and mushrooms, and I spent ages making sure the print was centred nicely on my pieces, picking the perfect buttons to accessorize them, and making sure my sample pieces were as close to perfect as possible so they would photograph well (I still have several 99% perfect rejects sitting in my craft room!). These are my samples that I’ve been waiting for months to see in print:

pincushion and needlebook by planetjune
Sorry for the pic quality – these were taken over a year ago (as a personal record for myself before I shipped them off), before I got the hang of my lightbox.

Luckily I thought to snap these quick photos before sending them off, because when I looked for my projects in the book, they had been bundled with this sewing machine cover, and my projects had been remade in the same huge graphic print as the cover, which doesn’t suit their size at all. Plus there is only this one picture in the book, in which my designs are practically invisible:

One Yard Wonders - Sewing Tools Trio
Can you spot my designs in this picture?

One Yard Wonders - Sewing Tools Trio
There they are! A tiny part of a busy picture.

It’s okay. I understand why they did it this way – I guess they wanted to use up the entire yard of fabric, and that makes sense. But mine were so cute! And so neat! It’s just sad when you look forward to something and then it turns out to be so very different from what you imagined it would be. I’m still happy the authors chose my projects for the book; I just think they will be overlooked by most readers because they aren’t shown in their best light. Let’s have another look at my version of my projects, as this will be the only time they’ll ever be seen:

pincushion and needlebook by planetjune
Click to see them larger

They are cute, right? Please tell me they are. I need cheering up…

UPDATE May 2012: If you don’t have the book, you can now pick up my Offset Square Wrist Pincushion and matching Fabric and Felt Needlebook sewing patterns as donationware from my shop :)

Comments (28)

Next entries » · « Previous entries
  • Welcome to PlanetJune!

    June Gilbank Hi, I'm June. Welcome to my world of nature-inspired crochet and crafting. I hope you enjoy your visit!
  • Follow me

    RSS FeedLike me on FacebookFollow me on TwitterFriend me on Ravelry
    Watch me on YouTubeFollow Me on PinterestMy photostream on Flickr
  • Categories

  • Archives

  • Like me on Facebook

  • Follow me on Twitter

  • Meta