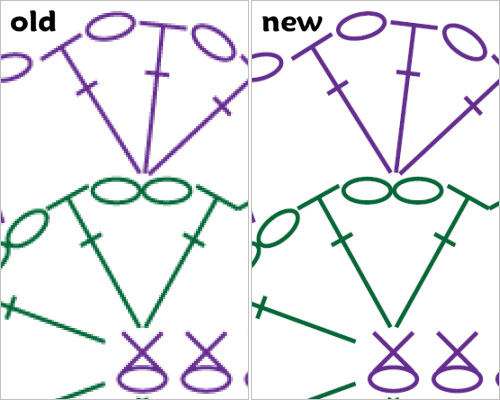
While working on my Paper Chains & Garlands ebook, I discovered a better way to import my illustrations into the finished document which allows for the ultra-high resolution of today’s tablets and smartphones. This technique will also make my stitch diagrams and illustrations look much cleaner in my future crochet patterns.
Of course, once I realised this was possible, I couldn’t just leave my back catalogue of patterns as-is, with the less-good charts and diagrams, knowing they could be better… So, I’ve just released new versions of all my patterns that contain a charted stitch diagram, illustration or diagram (see the list of patterns below).
(By the way, there’s nothing wrong with the old versions; they’ve always looked fine to view or print, but if you zoom in on a chart/illustration on your tablet now, the new diagrams will stay perfectly sharp, no matter how much you zoom.)
I doubt you’ll ever need to view my charts at this size, but now you have the option 🙂
Your pattern licence entitles you to free updates to any PlanetJune pattern you’ve purchased, so, if you’ve previously bought any of the following patterns, just log back into your PlanetJune account and you can save the updated version!
Tip: Go to this link to see an alphabetised list of all your pattern purchases, so you can jump straight to the right order(s) without hunting 🙂
October 26, 2015 @ 9:37 am
· Filed under Paper Crafts
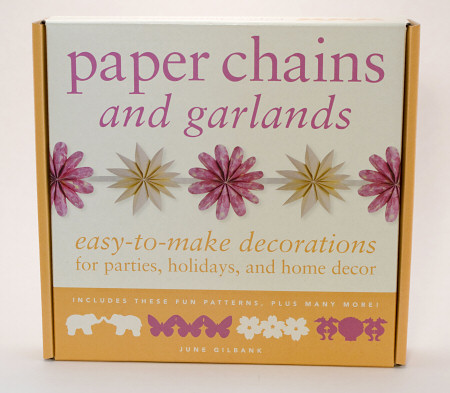
My first book, Paper Chains & Garlands, was published in 2009. It was released as a kit with several rolls and sheets of paper and was available exclusively through the US-based bookstore chain Barnes & Noble. This meant that it was only available within the US, and when it sold out within a year, Barnes and Noble chose not to reprint it, so it’s been unavailable since 2010.
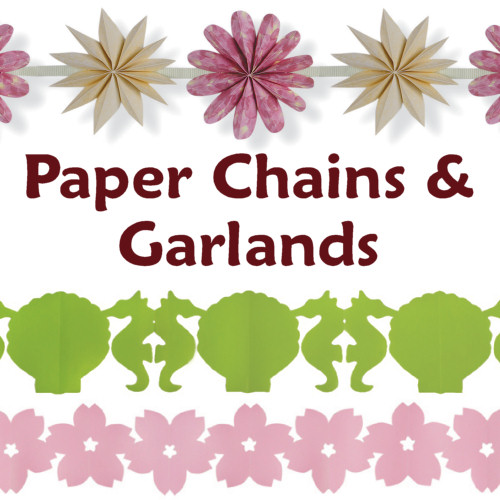
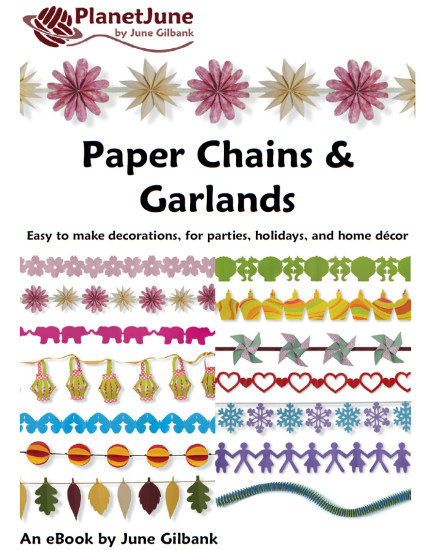
I’ve finally been able to re-acquire the rights to my content, and I’m very excited to announce that I’ve repackaged Paper Chains & Garlands as an ebook that you can buy as a PDF file, directly from PlanetJune!
Paper Chains & Garlands: Easy to make decorations, for parties, holidays, and home décor is an original ebook by June Gilbank.
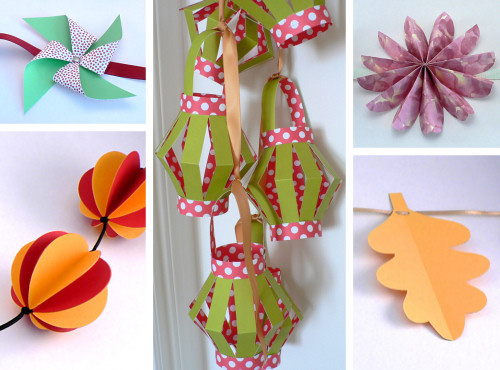
Turn your next celebration into a creatively crafted occasion to remember. Create delightful decorations on themes that range from the seasonal (snowflakes, autumn leaves, cherry blossoms) to the decorative (pleated flowers, pinwheels, elephants). The illustrated instructions by expert crafter June Gilbank show you how to fold, cut, unfurl, and string chains and garlands like a pro. With tips on how to cut simple paper dolls as well as elegant Chinese lanterns, Paper Chains and Garlands is the perfect craft book for expert crafters as well as beginners.
(Want more details? Click through to my shop to view the complete Table of Contents and reviews of the first edition.)
Second Edition: What’s New?
The new second edition ebook is even better than the original book, as I’ve fully revised and updated it, and it now includes bonus content and 10 pages of printable templates that are sized to print correctly onto either A4 or letter-sized paper and available in multiple sizes so you can easily create your paper decorations in a size you like.
Simply print the template you want, at the size you want, onto a sheet of cardstock and cut it out to create a long-lasting reusable template that you can draw around over and over again, to make as many decorations as you need!
Upgrade from the First Edition
Are you now kicking yourself because you bought the old, inferior, first edition? Don’t worry: if you can prove you bought my original Paper Chains and Garlands (email me a copy of e.g. your till receipt, a photo of you holding the book, or your order confirmation email from B&N) I’ll send you a discount code worth a massive 60% off the second edition – it’s definitely worth upgrading to have those printable templates and a handy PDF version!
Make Easy and Fun Papercrafts
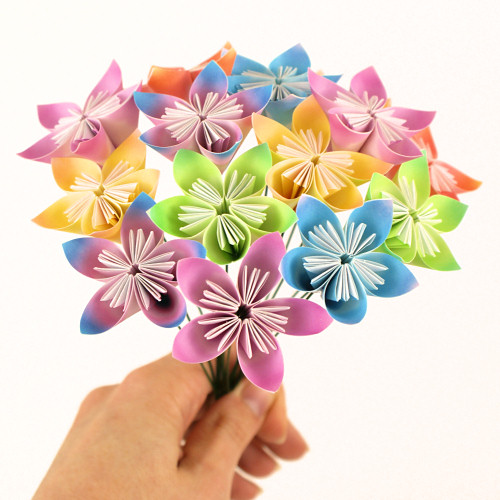
If you’ve been looking for some fun craft projects to try with the kids, inexpensive ways to decorate for parties and holidays, or just want an easy introduction to papercrafting, look no further. Try your hand at origami, papercutting, and a variety of other papercrafting techniques, all explained in my clear, easy-to-follow style with step-by-step illustrations.
October 20, 2015 @ 11:46 am
· Filed under Paper Crafts
I’m so happy to announce a new facet of the PlanetJune world today: PlanetJune Papercraft! My papercraft tutorials are an easy and fun way to make pretty, decorative items from little more than a few pieces of paper.
Unlike crochet, there’s no real learning curve to my paper tutorials – you can jump straight into any of them even if you’ve never made anything from paper before, and still get a great result. And you probably have all the basic materials – paper, scissors, glue – at home already!
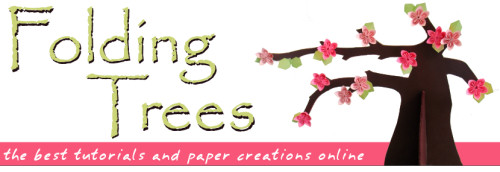
My paper background: Folding Trees
You may remember Folding Trees, the papercraft site I co-founded, together with my friend and colleague Eve Henley, in mid-2008, at a time when paper crafts were often neglected among modern crafters. We saw the need to showcase that paper crafting encompasses much more than just scrapbooking, and our goals were to collect the best tutorials, highlight inspirational paper creations from talented artists and crafters, and share our own paper crafts and tutorials.
We accomplished our mission to bring modern, stylish paper crafts to the world. Folding Trees played a significant role in the resurgence of papercrafting in the online crafting community and led to my first book deal (for the sadly long out-of-print Paper Chains and Garlands – which is soon to be revived in a second edition as a brand new ebook… watch this space for details).
Since we closed Folding Trees at the end of 2009, I’ve run it as an archive, but it’s taking time I can no longer justify spending, so we decided that now is the right time to close down the site for good. More and more of the tutorials we originally linked to have moved to a new URL or disappeared altogether, and maintaining the site has become a drain on my already limited time.
PlanetJune Papercraft
When one door closes, another opens…
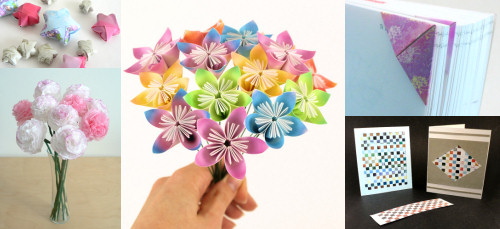
I’ve remade, revised and repackaged my best original tutorials from Folding Trees as PlanetJune donationware, so if you like papercrafting, or would like to try it out, take a look at my tutorials for some easy, fun and attractive paper projects!
And next week it’ll be even more exciting, when I’ll re-release my long out of print book Paper Chains & Garlands in a fully-revised second edition as a PlanetJune Papercraft-exclusive ebook!
It’s been fun getting back to my papercrafty roots over the past few months to get all this set up and prepared, and now PlanetJune Papercraft is here (and I’ve figured out a new and very easy to understand way to present origami-type instructions) I’m sure you’ll be seeing more paper tutorials from me in the future too!
I hope you’ll enjoy my paper tutorials – please click through to PlanetJune Papercraft to see what I have on offer. And if you’d like to see more PlanetJune Papercraft in the future, please leave a comment and let me know…
Before I start, I’d just like to say Happy Thanksgiving to my fellow Canadians!
This is sweater #7 of my ‘learn to knit by making a dozen self-designed sweaters’ project. (Here are links to #1, #2, #3, #4, #5 and #6, if you’d like to see my progress.)
This cardigan demonstrates the difference between being inspired by someone else’s design, and copying it. I’d seen a cardigan (Primavera by Sarah Cooke) and really liked certain aspects of it, namely the light fingering-weight yarn and the lace panel that runs right up to the shoulders.
I like the idea of combining a lightweight cardigan for summer with a more open stitch pattern, but the pattern I’d seen wasn’t a cardigan for me: the length is far too long for my short frame; the neckline is way too open; I don’t like decorative pockets; I prefer internal shaping to side shaping. So I just took the basic concept (v-neck fingering-weight raglan cardigan with a lace panel up each arm) and designed one using my own measurements and stitch patterns. If you compare my cardigan with my inspiration, you’ll see that it’s completely different; not a copy at all.
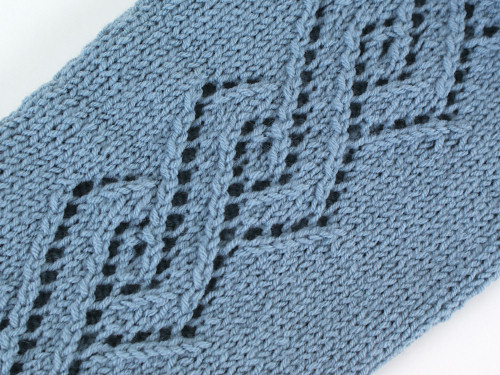
After the success of my small 5-stitch, 4-row lace panel on my purple cardigan, I decided to try being a bit more adventurous, and picked a 16-stitch, 16-row repeat lace panel to travel up the arms of this cardigan.
While beautiful, this was quite an eye-opener for me! I found myself utterly unable to memorize the stitch pattern, and had to refer to the pattern for every row of both sleeves. This was not the relaxing knitting I’ve been enjoying (although the end result is pretty spectacular, so it was worth it). I’d certainly tackle another project with lace panels, but I can’t see an all-over lace pattern in my future, unless the stitch pattern is much simpler so it’s easier to memorise.
As I’m still a relative novice, it took me a long time to be able to ‘read’ the stitches of the previous rows so I could recognise which row of the lace pattern I’d reached. Several times, I had to rip back a few rows when I realised I’d repeated a pair of rows and skewed the lace pattern. But worst of all was when I held up my two-thirds finished sleeve to admire how amazingly magical lace is, and suddenly noticed I’d repeated a pair of rows right down by the cuff..! I’m not the kind of person who can live with the knowledge of a massive mistake like that, so I gritted my teeth and pulled out hours of work so I could fix it.
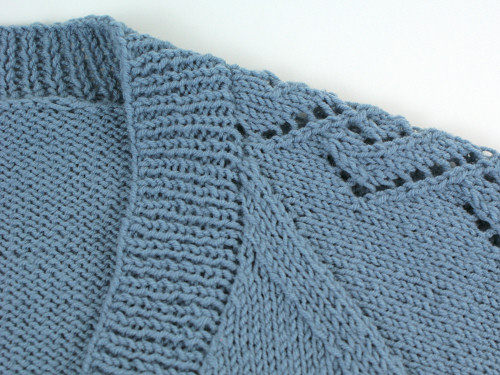
I’m not a fan of raglans, because they make it tricky to control the fit through the shoulders, but I really wanted to continue the lace panels right up to the neckband of this cardigan, and a raglan seam is the way to do that. On a whim, I decided to make the raglan seams a defined feature instead of trying to minimise them, forming strong diagonal bands from underarm to neck to contrast with the lace, and I quite like the result.
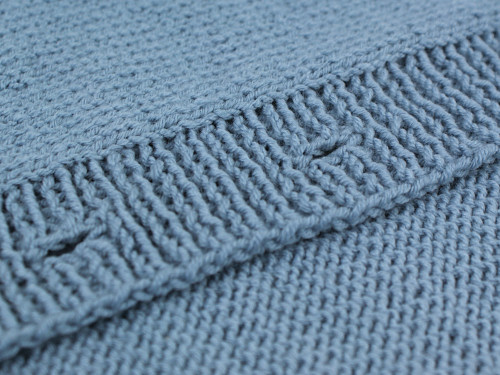
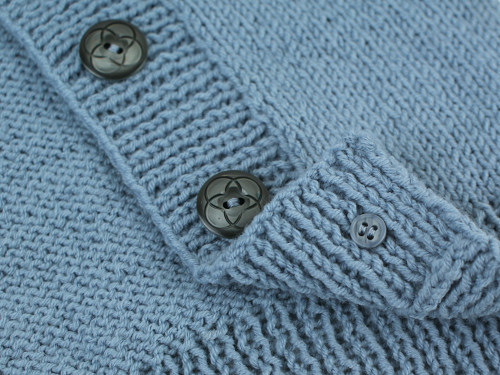
I worked 1×1 rib (first time!) bands from my provisionally cast-off cuff and bottom band edges, then picked up stitches (another first!) for the button band.
A left-handed aside…
Being a left-hander who knits right-handed, certain techniques in knitting don’t work properly for me, because I can’t do them with my right hand. My provisional cast-ons (done with a crochet hook) are twisted, so they can’t be pulled out cleanly – that’s because I have to hold the hook in my left hand instead of my right. I’m also utterly unable to pick up and knit by picking up from right to left; my right hand just doesn’t have the fine control.
As I spot these things, I can try to work out how to fix them so I have a way to knit that works for me and my limitations. I’ve discovered that I can pick up and knit with my left hand instead, then switch to right-handed knitting; I just have to concentrate so I remember to twist each stitch to the right-handed direction as I pick it up. Next I have to try to do the same for my provisional cast-on!
I tried one more new technique for this cardigan: Ysolda’s one row buttonhole. I’ll definitely be using this one again.
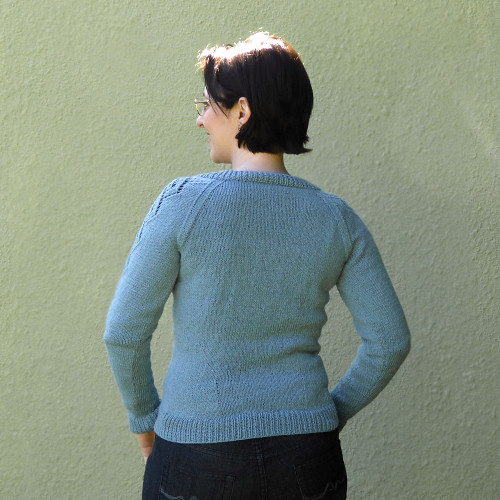
I’m not 100% convinced about my button choices here; I love the buttons, but they may not be the ideal choice for this cardigan – I think a faded blue might look better here. I’ll probably end up swapping the buttons eventually (I’ll keep an eye out for a better match, or make some from polymer clay) but I’ll keep these tiny anchor buttons I used on the back. I always seem to manage to find the perfect anchor buttons in my button stash. At last: I have a use for all those boring tiny buttons!
Keeping it real: another mistake photo, but the cardigan looks good! (My camera is remote-controlled by an app on my phone…)
Overall though, I’m very pleased with how this one turned out! I’ve finished it at the perfect time for spring in South Africa, so I can see this becoming my staple lightweight cardigan to throw on over a T-shirt.
This sweater knitting project was one of the best ideas I’ve ever had: I’m learning so much with every new piece, and becoming a much more confident knitter. There’s still a long way to go before I’d consider myself truly proficient, but I’m loving every step of this journey.
I hope you’re enjoying following along with my progress, and maybe I’ve inspired you to knit/crochet/sew a garment for yourself too? Give it a go!
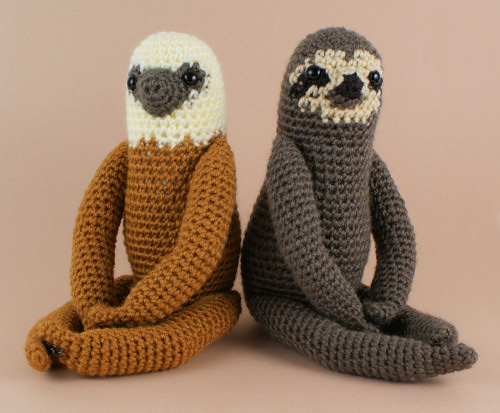
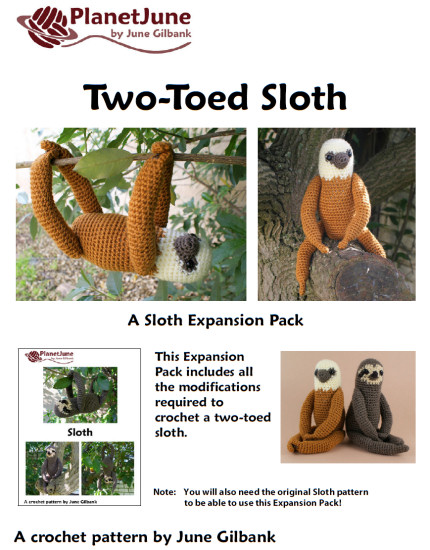
When I made my commissioned Sloth design, I had to decide between the two types of Sloth: Two-Toed and Three-Toed. I decided to go with the Three-Toed for my design, but I secretly wished I had time to make a Two-Toed as well…
Although my crocheted sloths don’t have any toes, the markings and nose shape of each type of sloth makes them look very different, although their basic body shapes are the same. This means we have an excellent candidate for a new Expansion Pack, to convert the standard Three-Toed Sloth into a Two-Toed Sloth:
If you aren’t too familiar with sloths – they are very strange creatures! – I refer you to my Sloth Fun Facts from my original Sloth blog post 🙂
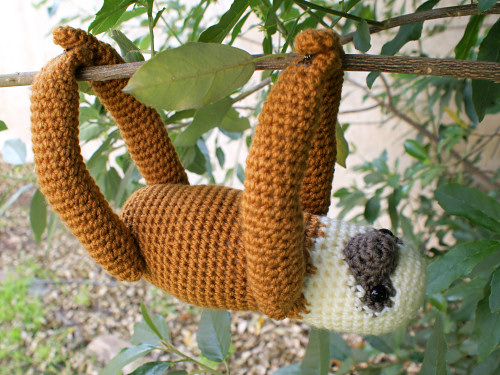
Just like my original Sloth, the Two-Toed has jointed limbs and feet that clip together so he can hang around:
And I have to admit it – this is the real reason I always wanted to make two sloths: when you have two sloths (a matched set, or one of each), your sloths can hug each other:
Awww! Cutest thing ever?
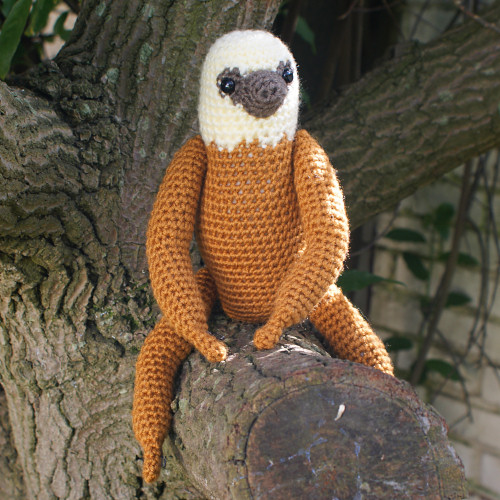
My Two-Toed Sloth uses a special technique to give him nostrils crocheted right into his muzzle – it’s subtle, but gives a nice effect that doesn’t rely on embroidery or any other embellishment techniques. As with the original Sloth, there are only 6 pieces to crochet, and the jointed limbs mean you only have one piece to sew on at the end – very satisfying!
What is an Expansion Pack?
An Expansion Pack is an add-on to an existing PlanetJune pattern.
The Expansion Pack lets you modify or add to the original pattern to create something else.
You cannot use the Expansion Pack alone – you must also purchase the original pattern in order to be able to complete the pictured items in the Expansion Pack pattern.
If you’ve already bought the original Sloth, you won’t be able to save that 50c. But, for 7 days only, add the Two-Toed Sloth Expansion Pack pattern to your shopping cart, together with anything else (totalling $5 or more), then use the code SLOTHLOVE at checkout and you’ll still get your discount! (Valid until next Tuesday: 13th October 2015.)
Note: If you don’t need anything else right now, this also applies to Gift Certificate purchases, so you can pick up a $5 gift certificate now, get your discount, and have $5 in your PlanetJune account ready for your next purchase, or to send to a crocheting friend!
I’m so happy to finally have a complete set of sloths. If you’re not ready to make your Sloth family just yet, don’t forget to heart and queue them on Ravelry so you don’t forget about them:
Three-Toed Sloth (original):
Two-Toed Sloth (new):
What do you think? Aren’t hugging amigurumi sloths just the cutest thing?!
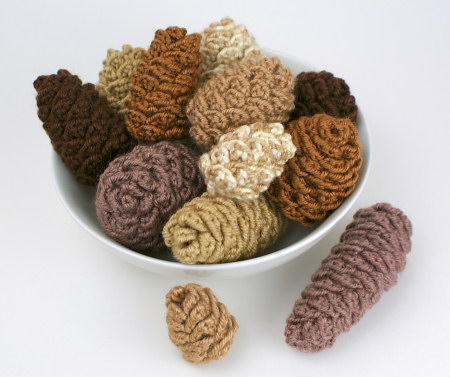
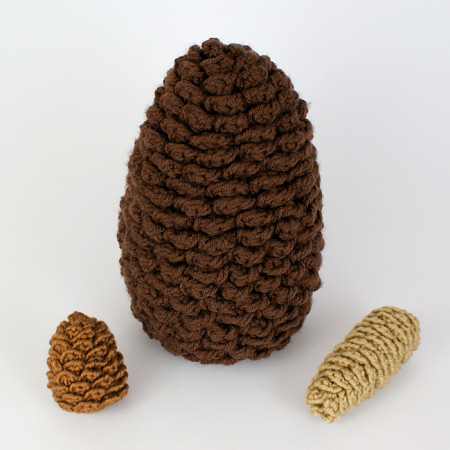
Simply Crochet magazine wrote about my Pine Cone Collection pattern in their October issue:
Are you pining for autumn patterns? Then you’ll love these simple little pine cones. We were astounded by how well these crochet creations capture the texture of prickly pine cones, thus proving that Pumpkin Spice Lattes aren’t the most exciting thing about autumn (maybe). The Pine Cone Collection PDF pattern is by talented designer and blogger June Gilbank. Just visit www.planetjune.com to find June’s blog and a vast library of free and paid-for patterns, as well as crochet tutorials. You could hook a bunch of them in natural tones this month to herald the arrival of autumn and they’ll also look brilliant come Christmas.
We had a huge variety of patterns chosen for this anything-goes CAL over the summer, and all the projects looked lovely! Here’s a sampling of the CAL entries (click the pic to see them all on Ravelry):
Ami Animals CAL
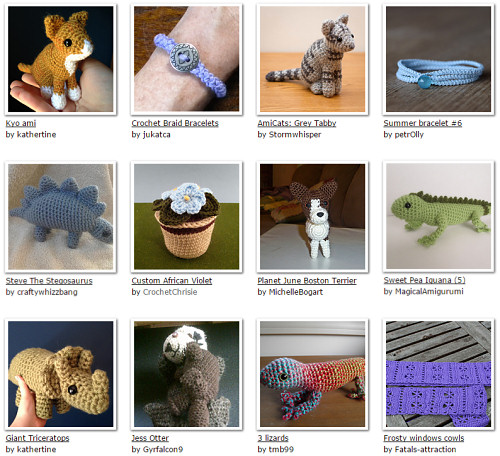
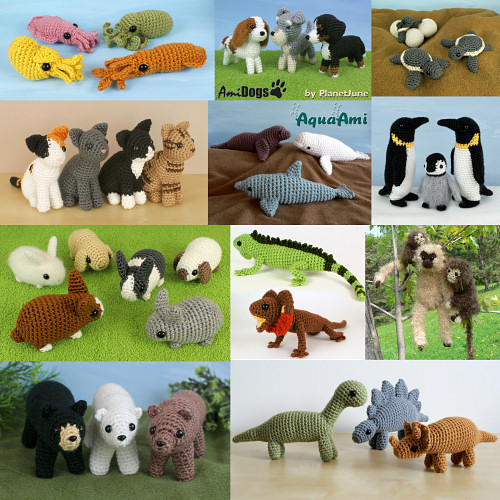
If you’d like to join the October PlanetJune CAL, the theme is animals, and I’ve got you covered with a massive range of 109 patterns to choose from! Whether you prefer cats and dogs, dinosaurs and lizards, cute pets or unusual wild animals, I’ve got something for you…
The photo above shows a small selection of your choices; to see them all, visit the animal crochet patterns page of my shop 🙂
You’re automatically entered in the next monthly draw every time you write a review for a PlanetJune pattern you’ve enjoyed – and you’ll also be helping future customers make an informed decision about patterns they are considering buying.
As I didn’t post a monthly update in September, I have two winners to announce today 🙂
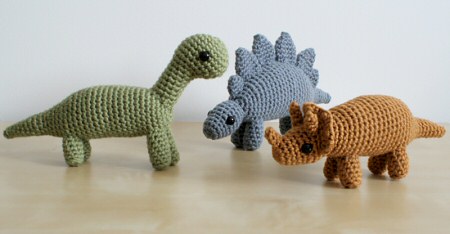
August’s winner is Katherine W‘s review of my Dinosaurs Set 1 patterns:
I’m a beginner at crochet and this was my first time using a pattern, and first time trying amigurumi. Had to learn half the techniques used! But thankfully the pattern was very clear and easy to follow, and Junes video tutorials were all I needed to make a super cute Brachiosaurus. Will definitely be making more 🙂
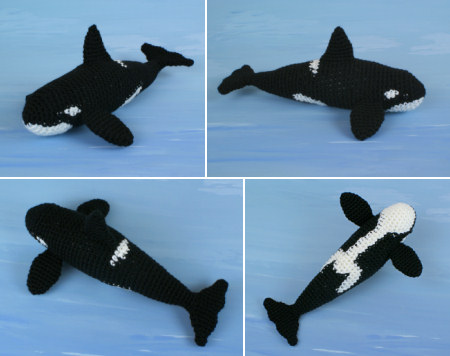
And September’s winner is Jaclyn M‘s review of my Orca (Killer Whale) pattern:
As soon as I saw this pattern, I knew that I had to have it…and I am very glad that I purchased it! If you are okay with color changes, this pattern is clear and easy to follow; even if you aren’t okay with color changes, June does a great job explaining how the color changes work for this pattern. The shaping of the fins is gorgeous and realistic!
Congratulations, Katherine and Jaclyn – I’ve emailed you both to find out which pattern you’d like as your prize!
What’s Next?
I have a cute new amigurumi pattern coming soon, and two new PlanetJune Accessories on their way, plus I’m working on my Christmas design to make sure it’s ready for you in plenty of time before that last-minute Christmas rush! So I’ll have plenty to keep me occupied over the coming weeks…
Or simply click through from my links before you shop at Amazon, Etsy, KnitPicks, LoveCrafts or Crochet.com, and I'll make a small commission on your purchase, at no cost to you! Start here: