March 31, 2013 @ 2:54 pm
· Filed under CAL roundups
This month we celebrated the return of spring, and Easter for those who observe it, with a special prize CAL featuring all my spring-themed designs. There were so many beautiful entries – looking through all these bunnies and flowers certainly make me feel springlike (even though it’s autumn here)! I participated myself with a new version of an old pattern (Fuzzy Chicks) and a brand new design (Shamrocks):
Now, roundup time! (And don’t forget to keep reading to the end for the April CAL details…)
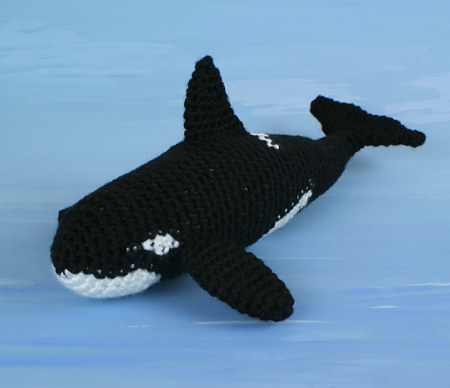
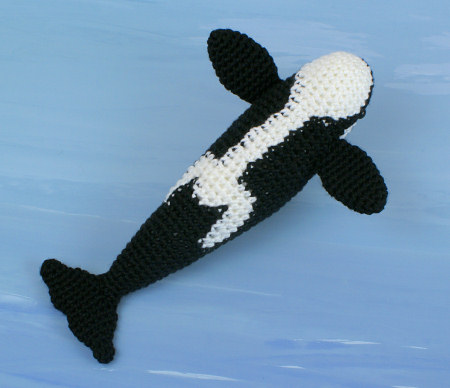
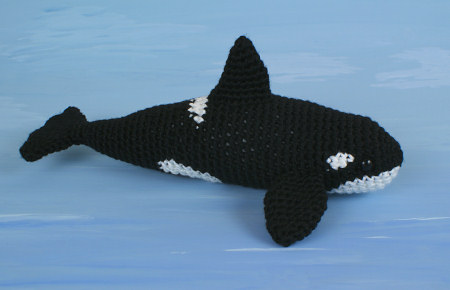
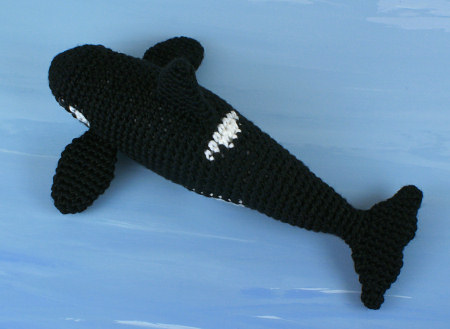
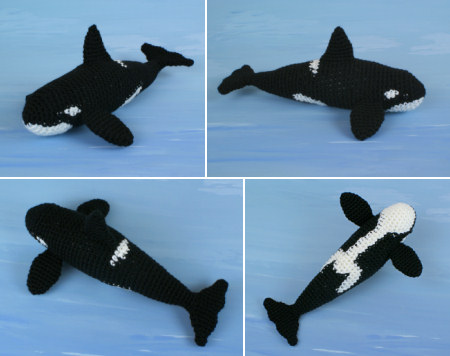
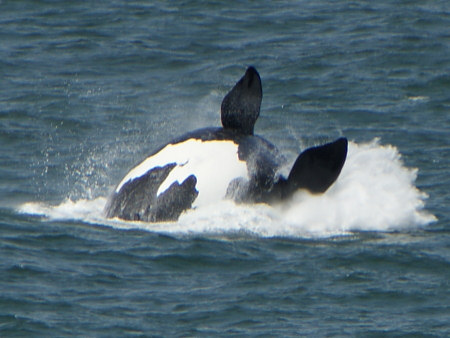
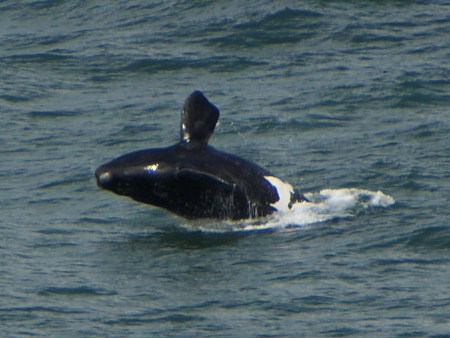
The Orca, or Killer Whale, was a design challenge I was looking forward to – the distinctive black and white markings weren’t going to be easy to replicate. Biased (slanting) stitches just wouldn’t cut it with this design, and neither would zig-zag colour changes, so I’ve spent weeks swatching to refine and improve my colour changing techniques to give smooth, symmetrical colour changes over practically the entire length of the orca’s body. Here’s the result:
I have to state right now that this is definitely an intermediate-level pattern: although it is worked in pure amigurumi-style (it uses only single crochet stitches with increases and decreases), it includes a lot of colour changing to create the beautiful smooth killer whale markings down the entire underside of the body. So, while it isn’t difficult in terms of crochet stitches, it is vital that you pay close attention to the pattern in every round that includes a colour change, and make the increases and decreases in the correct places, otherwise the colour pattern will shift. This is a pattern that requires concentration!
While we’re looking at details, I’m also debuting a new technique that makes a perfect whale tail – this one is really quite magical, and took me 5 attempts to perfect, but, if you just follow the pattern carefully, it’s easy to replicate this amazing shape.
If you’re up for the challenge, I think you’ll find this pattern is worth it – the end result has a level of detail in colour and shaping that makes it a truly special amigurumi. Plus, I think this orca is really cute; she’s definitely one of the nice fish-eating killer whales, not the scary seal-eating kind…
I’d like to thank everyone who commissioned this design – thank you for trusting me to do justice to something so complex! I hope you’re happy with the result and you’ll enjoy making your own spectacular orcas.
How about a little ravelry love? Click to favourite or queue my Orca design:
And, if you didn’t get in on the commissioning action but you’re ready to get orca-making, you can pick up the orca (killer whale) crochet pattern from my shop right now!
(The next design that was commissioned is the Red Panda, and I’ll be collecting the pledge monies shortly. I can’t wait to get started on that one; red pandas are adorable…)
As I told you in my wet blocking tutorial, children’s play mats make an inexpensive and easy to find alternative to dedicated blocking mats. BUT, I’ve discovered a problem that you need to know about if you use these mats – please read this and learn from my experience!
I’ve blocked all kinds of lace with these mats before with no problems, but my crocheted bamboo cardigan was a different story. My laceweight items felt practically dry by the time I pinned them to the mats, but thicker yarn retains much more moisture, so, even after rolling my cardigan in a towel to squeeze out as much excess moisture as possible, it still felt heavy and noticeably damp to the touch. It was still damp 24 hours later, and when I flipped it over so the underside could dry better, I was horrified to find areas of my beautiful cream cardigan were now bright, shocking pink.
I don’t have a photo, as my priority was trying to fix the disaster, not documenting it. Luckily, my story ended well; I’m not sure if it was because the yarn was still damp when I spotted the problem, or if the pink dye isn’t permanent, but after a few soaks in Soak wash, with some delicate but persistent agitation by hand in the sink, all the pink colour came out of my cardigan (phew). But you don’t want to take a chance that your mats may permanently dye your handiwork!
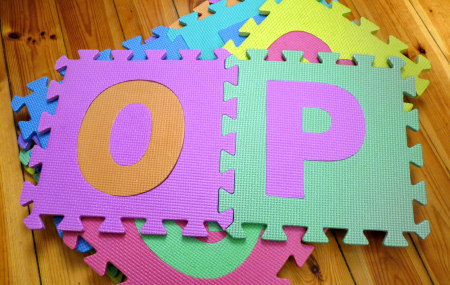
Looking back, I should have suspected that there may be a problem with colour transfer from the pink blocks – if you look at this photo from my blocking tutorial, you can see that some of the bright pink colour from a different mat has transferred onto the lower yellow block, at the right-hand side:
My cream cardigan also had this pink colour transfer before I managed to soak it all out!
Foam Mat Colour Transfer Experiment
Although I assumed this colour came from the bright pink coloured blocks – the same colour as the pink stain – to be safe, I decided to conduct an experiment to figure out which of the blocks are the culprits. (I’m very glad I did, because the results surprised me!)
Method
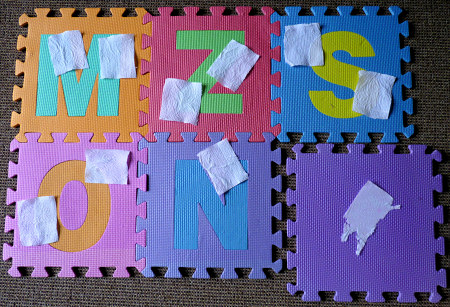
Select enough blocks to have a sample of each foam colour: orange, yellow, green, blue-green, blue, purple, light pink, dark pink. (I also tested a solid purple mat I bought from a different source.)
Lay a piece of paper kitchen towel over each colour of foam. Spray all the blocks with water until the paper towel squares are completely saturated.
Leave overnight to dry.
The setup for my experiment – wet paper towel squares on a sample of every foam colour
When the paper towel was completely dry, I numbered each piece as I removed it, so I could compare them with my reference layout photo (top row L-R: samples 1-6; bottom row L-R: samples 7-10).
Results
Samples 1 and 2 (orange and blue-green) were clear.
Samples 3 and 4 (dark pink and green) were stained in only the dark pink areas.
Samples 5 and 6 (blue and yellow) were clear.
Samples 7 and 8 (light pink and orange) were stained in only the light pink areas.
Sample 9 (purple and blue) was stained in only the purple areas.
Sample 10 (all purple) was stained all over.
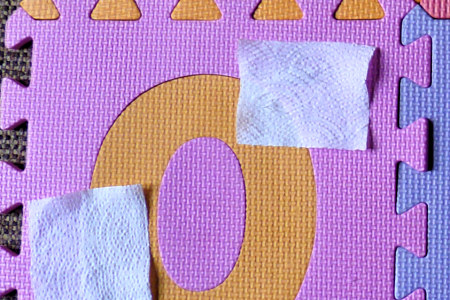
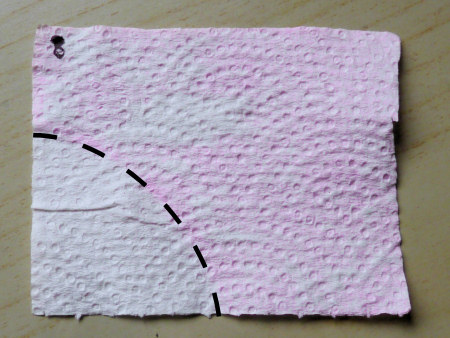
Example of my results: Sample 8 (top right in this photo) is mostly over the light pink foam, except the lower left corner which is over the orange O.
Sample 8 clearly shows that colour has transferred from the background pink foam, but not from the orange O (dotted line added for clarity).
Conclusions
My samples clearly show that pink dye leaches out of light pink, dark pink, and purple foam when wet. The colour transfer seems to be equal between all these colours. All the other foam colours (orange, yellow, green, blue-green, and blue) appear to be colour-fast when wet.
This surprised me – I thought that only dark pink would be the problem, and possibly the light pink. I never even considered that purple foam might also leave pink stains, and equally badly as the over-saturated bright pink blocks! Note: My set didn’t include any red blocks, but I suspect they would suffer from the same problem. UPDATE: see the end of this post.
My Recommendations
If you haven’t bought foam mats yet, you may prefer to look for some that avoid the problem pinks and purples (and, probably, reds). I’ve seen all-grey sets sold as utility mats, and individual coloured blocks sold at dollar stores. Grey, blue, green, yellow and orange should all be safe.
If you already own foam mats, I’d recommend that you replicate my simple kitchen towel experiment – it’s easy to do, and then you’ll know for sure, one way or the other. If you do have the problem, you have some options to get around it:
Prevention Option 1: Only use the blocks with ‘safe’ colours that do not contain pink (safe: orange, yellow, blue, blue-green, green). Do not use light pink, dark pink or purple. Note: If your mats are different colours or types, test them to see which of your colours are affected.
Prevention Option 2: Lay out an old towel over your blocks, so any colour will transfer to the towel, not your precious handiwork. You can pin straight through the towel and into the foam.
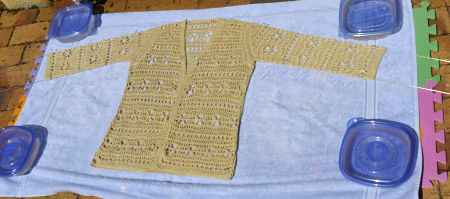
If there was any colour transfer when I blocked this cardigan (below), it doesn’t show against the dark grey yarn. Look at all the blocks that could have stained my yarn pink! Arrows mark ‘dangerous’ colours: light pink, dark pink, and purple.
Below, you can see the second blocking for my miraculously-unscathed bamboo cardigan – now safely protected from any pink transfer by the towel. The underside of the towel was stained pink after this, but it all came out in the wash. (And, in case you’re wondering, the plastic containers at the corners of the towel are filled with water – I used them as weights to stop the towel from blowing away while I dried the cardigan outside!) Cardigan protected from colour transfer by a towel on top of the foam mats.
If you’re blocking lightweight yarn and you roll it in a towel before blocking so it feels almost dry when you lay it out to block, you shouldn’t have a problem with colour transfer, but you may wish to err on the side of caution – my results may not always apply. For anything that still feels damp/heavy after a towel squeeze, you should definitely be careful of potential colour transfer, and I’d recommend you test your mats and/or use one of the prevention options above, especially if you’re using light-coloured yarn. Why take the risk?
UPDATE: Thanks to Andrea Giattini (@SpringSplndr) for this update! Andrea has a set of 8 of the larger 2ft square foam mats that come in red, yellow, green and blue, and are sold for use in garages, playrooms etc. She has been using them for 3 years and had never noticed any transfer.
Photo courtesy of Andrea Giattini
Andrea kindly agreed to try my test on her mats. She saturated white paper towels with water and left them to dry in the sun, as you can see above. She reports no colour transfer from any of these mats (even the red one, which I was most concerned about).
It appears that these red/yellow/blue/green mats are more colourfast than the sets that include purples, pinks, etc, which can bleed pink dye. However, I still advise caution – different brands may use different dyes, and manufacturing processes may change with time, so, for your own peace of mind, I’d still suggest you try the test on your mats too, just to be safe.
(If you’re not interested in reading this whole review, let me just mention now that I’ve added lots of exciting new design options to the Commissions List, so please click through to the list if you’d like to see what’s new, and maybe pledge towards one or more!)
It’s been a whole year since I launched my commissions model. In that time, I’ve designed 7 new patterns through this process, with the 8th almost completed. My Orca would have also been finished by now if my internet cable hadn’t been severed two weeks ago, making my life infinitely more difficult – I’m very relieved to be back online and back in action again today!
The good news: I have so many ideas for new designs that I need some way to choose which to make first, and the commissions system is working as a useful tool to see which designs may be popular and which definitely aren’t worth my time to create at present. (It’s like a vote, except that you can pay for extra votes if you have a strong opinion.)
The current situation: Right now, I’m in the wonderful, if somewhat daunting, position of having 6 fully pledged designs in my commissions queue, waiting for me to make them. I haven’t bitten off more than I can chew there as I was careful to set the rules: designs are made sequentially, in the order they were commissioned, and each may take 6-8 weeks to complete.
The bad news: This long waiting list tells me that I’m still not even close to reaching the balance point with this commissions model – at the last review, I had 3 designs waiting to be created, and now I have twice that many stacked up. Something has to change so the queue doesn’t continue to grow by 3 designs every 6 months – I don’t want to have people pledging towards commissions that I won’t be able to start for a year or more!
Model Review
I really like that my model gives me the freedom to make changes incrementally, and to see what works and tweak what doesn’t. I’m hoping that within a year or two of further adjustments to the model, I’ll have a stable system where the commissions come in at a rate I can handle, and there are never more than a couple in the queue.
The way I see it, I have 4 drastic options to make that happen:
Close the list until I’ve caught up with the waiting list.
Raise the minimum pledge amount.
Raise the total commission price.
Raise both the minimum pledge amount and the total commission price.
I know I definitely don’t want to close the list, so option #1 is out, but I don’t want to raise the prices too much and make them too high for my average customer to participate in this process. I’m going to tweak the system again and monitor how that plays out before I consider a drastic price increase.
Design Review
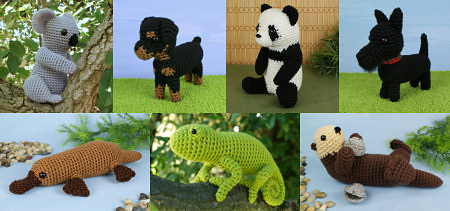
I’ve had one idea that may help to slow the rush and allow me to bring down the numbers of designs in the waiting list, while still letting people have the fun of pledging and getting excited about new design ideas. I’m dramatically increasing the number of options available – hopefully this will spread the pledges so the designs get pledged more slowly, at a rate I can handle.
So, to kick this off with a bang, I haven’t taken down any of the existing options, and I’ve added a whopping 25 new options to the list!
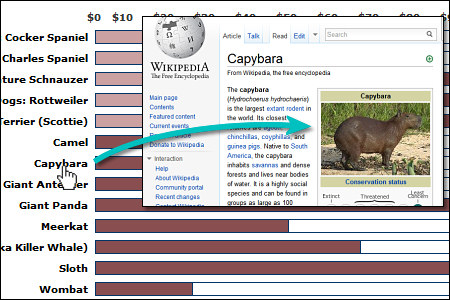
A note about the new designs: to keep it easy to use, I’ve just put the main animal name in the list. However, if there are several varieties of that animal and you want to know what I have in mind, just click its name on the pledge chart – it’ll open the Wikipedia page to the variety of the animal I’m planning to make:
e.g. when the list says Coati, I’m actually talking about a South American (Ring-Tailed) Coati (there are also White-Nosed and Mountain Coati species, and they look very different). Putting all that info on the list would be a bit unwieldy, but if you click ‘Coati’, you’ll go to the South American Coati page on Wikipedia and get a better idea of what I have in mind for my coati design 🙂
I really don’t know what’s going to happen with this huge new list of options… My hope is that it’ll filter out the strongest candidates for patterns, but I could end up with an even longer waiting list of commissions. And the new list is very long – it could be so overwhelming that it puts people off and the pledging dries up altogether. But I have to try things and see what happens!
Pricing Review
As I’m a little concerned that my plan could backfire and I could have 25 more fully pledged designs by tomorrow(!), I’m also making a small tweak to the pricing: I’m raising the total commission cost from $120 to $150. The minimum pledge amount is still unchanged at $6, so it’ll take 25 $6 pledges (or fewer people with larger pledges) to get a design fully funded.
The price increase will take effect immediately, but, for all six designs that had already been fully pledged at $120, I’m making up the difference with pre-pledges, so Orca, Red Panda, Sloth, Meerkat, Camel, and Armadillo are still all fully pledged. And for the AmiDogs, a $30 price hike is too much, so I’m upping their pre-pledges to $78 (so you can commission an AmiDogs breed for $72).
Long term, I’d like to add $3 increments above the $6 minimum, so you don’t need to jump from $6 to $12 to $18 if you want to increase your pledge. I just don’t have the time to code that at the moment, and it’s probably best to not change too many things at once anyway (so I can figure out what’s working and what isn’t), but intermediate pledge values may well be a feature I add at the next review.
Timeframe Review
This is a tough one. When I increased the time to 6-8 weeks per design, I didn’t think I’d actually need anywhere near that time to create the majority of the designs. I keep getting blindsided by circumstances beyond my control (health problems, loss of internet, etc) and I’m only just managing to keep within the 8 weeks at the moment.
I’m not going to alter the promised timeframe (as I can’t promise shorter and I don’t want to take longer), but I really hope that these external complications will lessen so I’ll be able to start to catch up on the pledged designs and shorten the waiting list by creating the patterns more quickly. It’s very frustrating, but I can’t go faster than my availability allows without a loss of quality in my designs and/or patterns, and that’s not a compromise I’d ever be prepared to make.
I am sorry that if you pledge for a design today, it will be many months before you’re asked to pay and still longer until you receive your pattern, but I hope you don’t let that deter you from pledging, if there’s a design you really want – the longer you wait to pledge, the more other designs could be funded before it, and then you’ll have to wait even longer for your pattern!
Go Forth and Pledge!
Please click through to the list if you’d like to see the 25 new design options, and maybe pledge towards one or more, if there are any you’d particularly like me to make! (And if you love all the ideas equally, please don’t feel obliged to pledge for everything – you can still support me just as well by buying the finished patterns from my shop as and when they’re ready.)
I’m really excited by all the new options – I can’t wait to see which turn out to be popular and which designs I’ll get to create!
This post is part of my occasional series of photoblog posts about the wildlife and nature I see while living in South Africa.
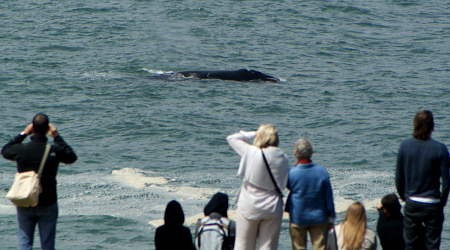
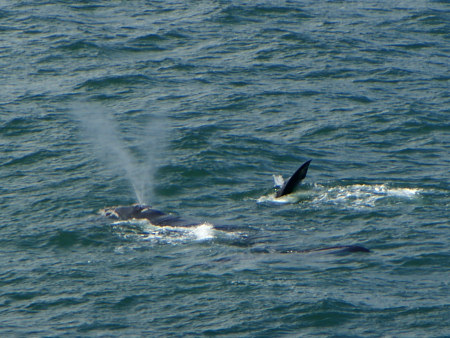
Whale photography isn’t easy. Even though whales are huge, they don’t typically come close to shore, and they don’t often reveal more than a small glimpse of their bodies above the water. The best time of year for whale-watching in South Africa is around September-October, when the Southern Right Whales come into False Bay (the large bay to the east of the Cape Peninsula) to calve in the safe, shallow waters. But, even then, and even with a decent zoom lens, your best photos will likely look like this: Yay – it’s a mummy and baby whale! (Yeah, you’ll have to take my word for that…)
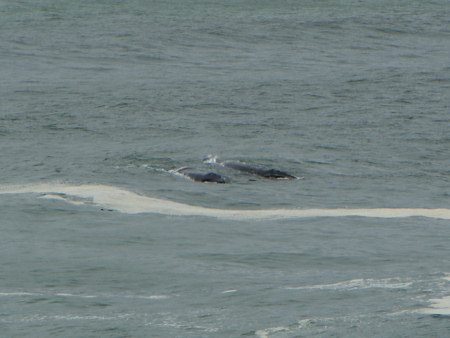
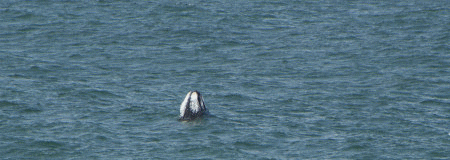
They sometimes leap out of the water, but, by the time you have the camera ready, they’ve gone again. Even if they come ridiculously close, like this, you’ll have an amazing experience, but your photos will just show a dark grey blob in the water: Is it a whale? A submarine? Driftwood?
You can see my first season’s attempt at whale photos in my previous post, but last year (our second whale season) we got very lucky with some very close-up views of the baby whales.
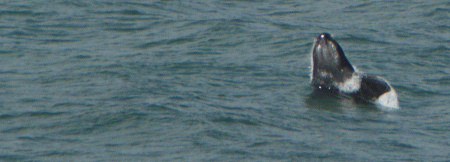
I could claim that these photos show a parent and baby, but I have no idea if that’s the case. Still, this is a baby whale tail:
…and this is a definitely a spouting blowhole!
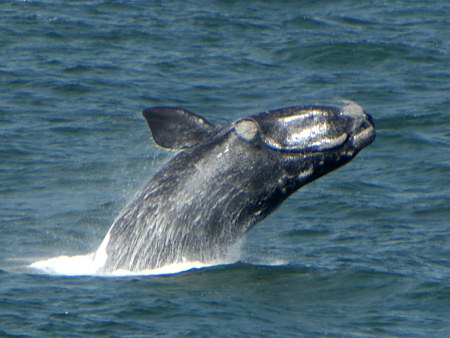
Then we went for lunch, and somehow snagged an upstairs open-air seaview table, so I had a great vantage point when one of the babies started playing, leaping out of the water over and over again! As the photos don’t give the full effect, I’ve also assembled a couple of my photo sequences into looped animations for you, so you can get a better idea of the exciting whale-watching experience:
Baby whale animation
It looks a bit like an orca (killer whale) with that black and white colouring, doesn’t it? (Which is topical, as I’m just putting the finishing touches on my orca crochet design – it’s really nice to have some real-life whale experience to inspire me!)
The orca resemblance ends with the colouring – the Southern Right Whale is more than twice the size of a killer whale, at an unimaginable 15m/50ft long! In fact, these babies I’ve shown you are already about the size of adult orcas when they are born…
A little Southern Right Whale trivia: this giant of the sea is a baleen whale; it has baleen plates instead of teeth, and feeds by filtering seawater through the plates, trapping thousands of tiny krill inside its mouth.
I don’t know if I’ll ever get better whale photos than these, but I’m looking forward to trying again this year when the next whale season comes around: even if my next photos are terrible, having the opportunity to see whales up close is something to look forward to every year. They’re so unbelievably huge, it’s hard to comprehend it, and seeing these graceful giants in their natural habitat is a real privilege.
I hope you’ve enjoyed this wildlife post! Please do leave me a comment if so – I do love to hear from you…
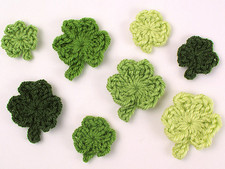
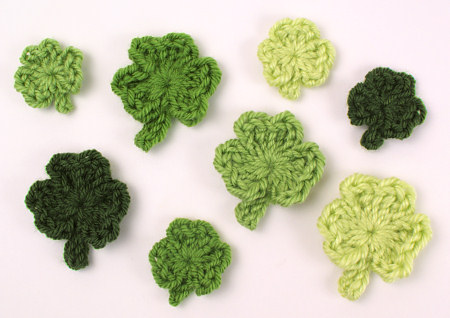
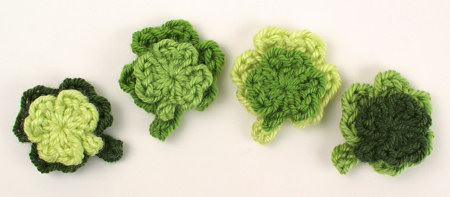
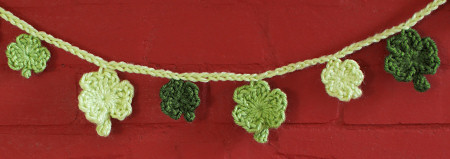
It’s Donationware time again! I’ve created a set of 2 beautiful shamrocks for you to crochet for St Patrick’s Day, or any time you want a splash of green in your life.
Shamrocks is a clever little pattern to make sweet shamrocks with a dimensional 3D effect, in two sizes: a realistically-shaped design, and a tiny miniature version. String them into a garland, attach one to a greetings card, add a pin back to make a cute brooch or lapel pin, or layer them for a novel look.
This pattern comes a few days later than I’d planned, thanks to a catalogue of disasters including broken internet at home (I’m currently in Dave’s office so I can actually post this!) but luckily, my shamrocks work up in minutes, so you still have plenty of time if you’re planning on some St Patrick’s Day decorations.
If you’ve made my ever-popular Love Hearts pattern, you’ll have no problem making Shamrocks – just like the Love Hearts, all the stitches of Rnd 1 are worked directly into the magic ring. The difference with the Shamrocks is that both sizes of shamrock are completed in just one round each, which makes them very, very quick to complete! I timed myself making the Mini Shamrock and it took 90 seconds (excluding weaving in the ends)…!
I really love this pattern – I hung the garland over my fireplace for this photo, but now I think I’m going to leave it up there for a while; it’s just so cheerful!
As I like to reward people who chose to donate for my donationware patterns, the PDF version of this pattern includes bonus crochet stitch diagrams for both shamrocks, in both right- and left-handed versions. As always, the pattern is free for you to use, and you need only donate if you’d like to thank me for my time in creating it, or if you’d like the easy-to-print PDF version.
And here’s a bonus – a Shamrock is a definite sign of spring, so that means you can enter your crocheted shamrocks into this month’s Spring/Easter CAL – and maybe win the Suncatcher Eyes CAL prize! Check the PlanetJune Ravelry group for all the details 🙂
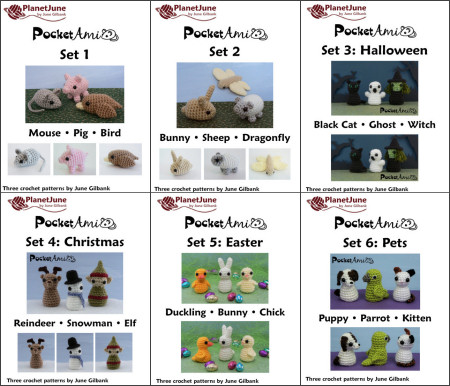
My pattern re-release project is making progress, and today the PocketAmi (individual Sets 1-6 and the multipack deal of Sets 1 & 2) are all available in the new format, and any you’ve previously purchased are ready for you to download! Log back into your PlanetJune account at any time in the next 2 weeks and you’ll see the download buttons for all your past PocketAmi pattern purchases have been re-enabled, so you can click and download the new versions.
If you have any questions about the pattern reformat project, or you received the patterns through a different mechanism (and so don’t have an order for them in the PlanetJune shop) but you’d still like the new versions, I’ve set up a Pattern Re-Release FAQ that should answer all your questions. I’ll keep it updated throughout this project and add any further questions that arise.
Craft Business Help
I’ve amassed quite a collection of helpful information posts on various aspects of running a craft business, but I just realised they aren’t too easy for you to find, as my Craft Business category also included posts about my own business. To solve this, I’ve separated the old Craft Business category into My Craft Business and Craft Business Help. Now you’ll easily be able to find my helpful articles! Craft Business Help includes my advice on:
…and more! So if you’d like my advice that may help you with your craft business, check out the Craft Business Help category from the Categories menu in the right sidebar, or the Blog > View by Category menu at the top of this page 🙂
Stash Replenishment!
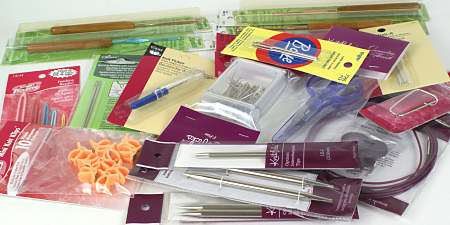
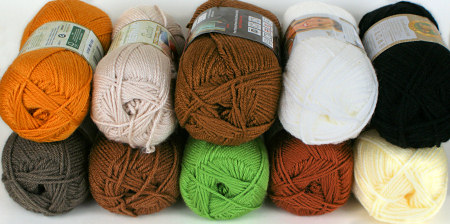
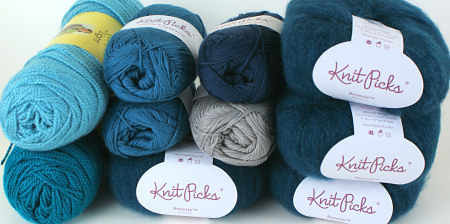
You may have guessed that one of the hardest things for me about living in South Africa is the lack of access to the craft supplies I’m accustomed to. So I took full advantage of my husband’s business trip to the US and restocked my stash a little – two years with no shopping is a very long time, so I had some catching up to do (within the limitation of suitcase size)!
Now I have new needles, hooks and notions to play with…
New yarn shades for future amigurumi designs…
And some yarn for new accessories…
Actually, the KnitPicks Reverie yarn (fluffy baby alpaca!) on the right is destined to become my next knitted sweater, but I don’t have any specific plans for the rest as yet. The funny thing is that I ordered my non-amigurumi yarn over several weeks from several different online shops, and I had no idea until I unpacked Dave’s suitcase that I seem to have something of a teal obsession going on – I picked all my yarn from the same colour family without realising it! I guess that means you can expect to see several new teal-coloured PlanetJune Accessories popping up over the coming months/years…
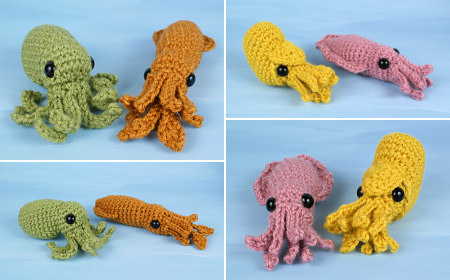
Baby Octopus & Squid are on the left in these photos.
These are so much fun!! Directions are clear with lots of pictures, and the finished products are adorable. They worked up for me in about an hour and a half, and they are the cutest cephalopods I’ve ever seen! I am very satisfied with these patterns.
Congrats Sara – I’ll email you to find out which pattern you’d like as your prize 🙂
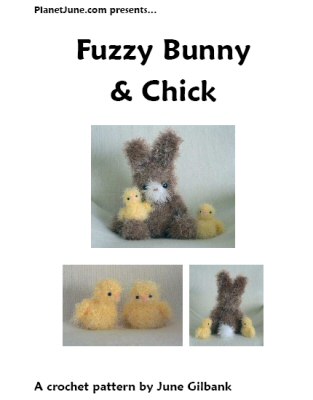
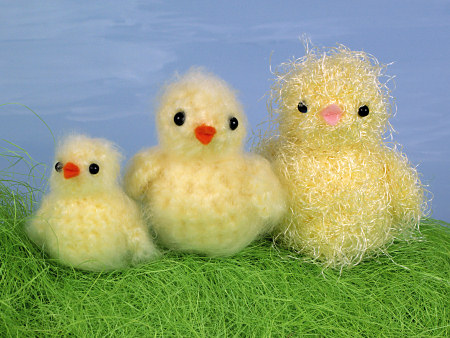
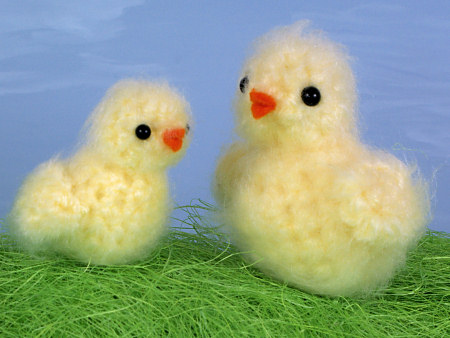
When I designed my Fuzzy Bunny & Chick pattern in 2007, I used Bernat Baby Lash yarn for the chick. It was perfect – a curly-lashed eyelash yarn with a thick yarn core in the perfect shade of chick yellow – but, of course, that yarn has long since been discontinued.
I stopped designing with novelty yarns in 2008: the frustration of yarn-specific patterns (yarn not being available to the majority of my customers worldwide, and then getting discontinued with no suitable replacement) means it’s very rarely worth the hassle of using an unusual yarn in a pattern.
Still, my Fuzzy Friends patterns are good designs, and I’ve always felt it’s a shame there are so few yarns that would be appropriate replacements to use with my sweet little Fuzzy Chick pattern. So, after a little experimentation, I’ve come up with two easy options so anyone can make a very, very cute Fuzzy Chick – maybe even cuter than the original, do you think..?
L-R: Tiny Chick, Medium Chick, Fuzzy Chick (original)
The best part is that the new Tiny and Medium chicks both use standard everyday worsted weight acrylic yarn, so you can just use the same yarn you do for normal amigurumi! (Specifically, I used Bernat Satin in Banana for both chickies.)
Tiny Chick is just over 2″ tall, and uses worsted weight yarn, an E US/3.5mm hook, and 4.5mm eyes. Medium Chick is 3″ tall, and uses 2 strands of worsted weight yarn held together, an H US/5mm hook, and 6mm eyes.
You can also use the above yarn/hook sizes as a starting point for any of my other Fuzzy patterns, if you don’t want to make them with a novelty yarn – this technique will work equally well with all of them!
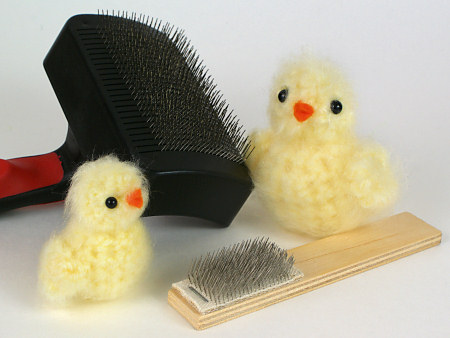
A Miracle Brush
Let’s pause for a moment so I can tell you about my new amazing amigurumi brushing tool. I’ve seen it called a Teasel Brush (UK), Nap Riser Brush (US), and Bunka Brush (Japan) – if you google each of these names you should be able to find a stockist in your country under one or other of the names. Basically, it’s a very small wire brush with stiff angled prongs, used for brushing out the seams of teddy bears, brushing pile fabrics, or creating brushed areas in needlework or (of course) crocheted or knitted fabric. Some of these brushes slip over your finger, and others are mounted on a small wooden handle (like mine, below), but the prongs are the same in both cases.
A small tool for a small job like a tiny chick makes all the difference – compare the size of my teasel brush (front) with the pet slicker brush (back).
Using one of these brushes follows exactly the same principle as using a wire pet brush to create brushed amigurumi, but, as it’s far smaller than a pet brush, it’s more suited to brushing detail areas and small amigurumi. I’ve left visible scratches in my thumbnail more than once when brushing my crochet with a large pet slicker brush, but, since I bought the smaller brush, I have finer control over where I’m brushing, and haven’t scratched up my nails once!
Of course, it does take longer to brush the same size area with a smaller brush, so, as usual, it’s your personal preference as to which type of brush is the best option. I’m happy to keep both in my toolkit now, and use the most appropriately-sized brush for the job at hand.
Making the Chicks
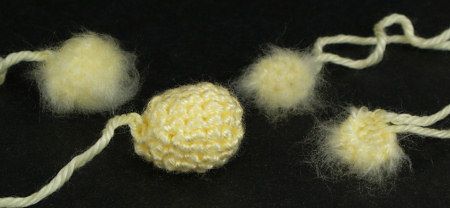
To make my chicks, I followed the original Fuzzy Chick pattern, together with the instructions from my Fuzzy to Brushed Crochet tutorial (you’ll have already received the tutorial as a bonus PDF if you’ve bought any of my Fuzzy patterns) but I brushed the chick pieces for longer than I did the bear in the tutorial, to get them nice and fluffy. This should give you an idea of the process:
L-R: Head (brushed), Body (unbrushed), Wing 1 (brushed side up), Wing 2 (brushed side down)
As you can see, the pieces are very small after crocheting them, but the fluffiness adds to the size considerably after they are brushed. After brushing, my double-strand-of-worsted chick is almost as large as the original chick.
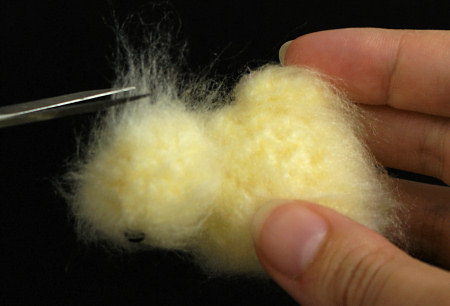
As the chicks are heavily brushed, I gave the fluff a little trim around the face (particularly the eye area) with a pair of small sharp scissors, to get rid of any extra-long fibres and neaten then up a bit.
It’d be a bit fiddly to brush such small amigurumi with a pet brush, so, if you feel like small brushed amigurumi might be something you’d like to add to your repertoire, I highly recommend you seek out a Teasel/Nap Riser/Bunka brush to make the task less perilous!
Now you know you can use any yellow yarn to make a Fuzzy Chick, how about making one – or a handful – of tiny chickies for the Spring/Easter crochet-along? The brushing probably takes longer than the crocheting, but with only 4 tiny parts, it’s still a very speedy project, and would be lovely for Easter…
Or simply click through from my links before you shop at Amazon, Etsy, KnitPicks, LoveCrafts or Crochet.com, and I'll make a small commission on your purchase, at no cost to you! Start here: