February 28, 2013 @ 4:51 pm
· Filed under CAL roundups
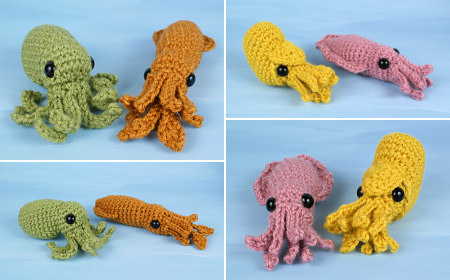
This month we took a trip under the sea with the Ceph-Along, featuring my new Baby Cephalopod patterns and their friends made from any of my other aquatic patterns.
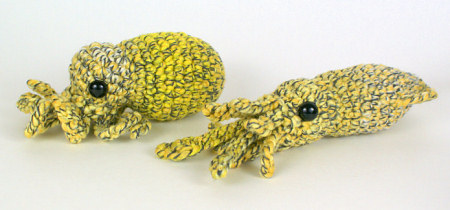
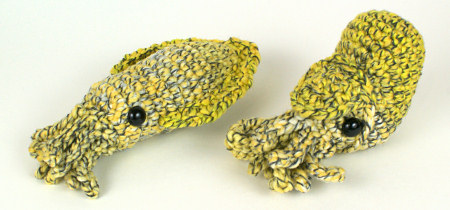
I decided to participate in this CAL myself with some crazy-cool variegated yarn I found. I wasn’t sure if the effect was going to be amazing, or just an amazing disaster, but it worked out as well as I hoped it would – you can almost see my baby cephs changing colour before your eyes…
The verdict seems to be that this was a perfect use for a very unusual yarn 🙂
Now, roundup time! (And don’t forget to keep reading to the end for the March prize CAL details…)
I’ve already written (in my Which is the ‘Right’ Side? tutorial) about how to tell the right side from the wrong side of your work when making amigurumi, and when it really matters which side you have facing outwards, but there’s value in showing it in video form too, so you can really see how a piece of amigurumi forms, and what your stitches look like from the front and the back.
(If you’re already comfortable with the right and wrong sides, when you can use whichever side you prefer, and when it really matters which side faces outwards, you can skip this video, if you like – there’s nothing extra that I didn’t tell you in my original which is the ‘right’ side discussion – but I’m building my crochet tutorials video library and that has to include the essential basics as well as clever tips and new techniques.)
And now to the video tutorial (in right- and left-handed versions, of course):
Which is the ‘Right’ Side for Amigurumi (right-handed)
Note: The videos may look a little small embedded in the blog: if so, you can fullscreen them or click through to YouTube to watch them full-sized 🙂
If you enjoy my crochet tutorial videos, please help to spread the word about them, and/or subscribe to the PlanetJune YouTube channel.
Do you find my tutorials helpful? If so, please consider making a contribution towards my time so I can continue to create clear and concise tutorials for you:
Thank you so much for your support! Now click below for loads more crochet video and photo tutorials (and do let me know what else you’d like me to cover in future tutorials…)
If you’d like to sell your own patterns or handmade goods online, there are many options open to you. It can be intimidating, especially if you’re just starting out, to figure out which venue is the best fit for you. As I’m always getting emails asking for advice about this, I thought I’d put together an overview of some of the major options, with the main positive and negative points of each.
For this post, I’m going to look at the pros and cons of online craft marketplaces (like Etsy), online pattern marketplaces (like Ravelry), a PayPal shopping cart on your own blog/website, and creating your own self-hosted shop from scratch.
Online Craft Marketplaces
Online craft marketplaces like Etsy were primarily designed for people to sell handmade goods, but you can also sell patterns through them. (In some cases this can be a disadvantage for pattern sellers: no matter how clearly you phrase your title and description, you’ll still receive orders from people who don’t read them at all and buy a pattern thinking they are going to receive a handmade toy…)
As Etsy is so popular, I’ll go into a little more detail with some pros and cons of an Etsy shop.
Pros:
Very popular, so you have access to a lot of traffic
Easy to set up listings and add photos
No setup fees: you only pay for each item you list
Can enable automatic re-listing for pattern sales
Possible digital file download service in future (currently in beta testing) or you can sign up for CraftHub as a digital download service
Cons:
Fee to list each item (currently 20c), whether or not it sells
Listing expires after 4 months, and you have to pay to relist it
Percentage fee on every sale (currently 3.5%)
With so much competition, it can be difficult to stand out
Listings get buried very quickly and are only found if someone is searching for that specific thing (e.g. “fox amigurumi pattern” has 73 results; “amigurumi pattern” has over 10,000)
Your potential customer needs to create an Etsy account in order to purchase from you
Automatic digital file delivery (for pattern sales) is only available for a fee
Other Marketplaces: ArtFire is similar to Etsy, but there are no listing or success fees; instead you pay a fixed monthly fee, no matter how many items you list and how much (or little) you sell. Customers can buy without creating an account. There’s no option for digital file delivery.
There are also other options, including BigCartel, Storenvy, Shopify, and many more. Each has a different fee structure, different customization options, and are suited to different types of products. Your best option is to shop around and read all the information you can on each before making your decision.
International Marketplaces:
The options I’ve mentioned so far have all been US-based, but most, if not all, welcome sellers from around the world. However, if you’re not based in North America, you may wish to consider opening a shop with an online marketplace located in your own country. You can receive payments in your own currency, and if you sell physical products, selling to locals keeps your shipping costs lower, which may make your products seem more attractive!
You’d need to find an appropriate marketplace for your own country or continent – here are a couple of popular examples:
Folksy trades in British pounds and is for UK-based sellers only.
DaWanda is available to worldwide sellers, but primarily caters for the European market, with payment in Euros and site translations in English, German, French, Spanish, Italian, Dutch and Polish.
Online Pattern Marketplaces
Ravelry and Craftsy both provide a marketplace exclusively for patterns. This can be an effective solution for many pattern sellers. It’s very low maintenance, as, once you’ve uploaded your patterns to their server, your customers can automatically download their patterns after paying.
Ravelry is for knitting and crochet patterns only. It gives you access to over 2 million Ravelry users, plus anyone else you bring in from your blog, social media, etc. It has a very reasonable sliding scale monthly fee structure (and it’s free if you sell under $30/month). Customers don’t need a Ravelry account to be able to buy from you.
Craftsy is for any kind of patterns and has zero fees at the time of writing. It is still new, so may not have a large customer base as yet – you may need to bring in much of your own traffic. Your customers will need to create a Craftsy account in order to purchase.
And an added bonus: as these venues are for pattern sales only, the chance of someone thinking they are buying a finished item instead of a pattern is much lower (although I hear it still happens, on Craftsy at least).
PayPal Shopping Cart
If you already have a blog, a PayPal shopping cart may be a good way to introduce for-sale items to your website and customers. (This is how I started out, in 2007!) You can either create a post or page for each item, or have one ‘shop’ page listing all your items. For each item, you’ll create a PayPal button that people can use to add it to a PayPal shopping cart, and then check out through PayPal.
It’s a good transitional move for a blogger – it’s easy to set up, and there are no fees (beyond the PayPal fees you’d also be paying with any of the other options in this post). However, if you don’t already have a blog and don’t want to start blogging anyway, I’d advise against starting a blog or website just so you can use a PayPal shopping cart.
Using a PayPal cart instead of a ‘real’ shop makes you look like a very small business, which may deter some people from buying from you. (If you already have an audience who trusts you, that shouldn’t be a problem though – and you can always move on to another option if/when things take off!)
I wouldn’t advise a PayPal cart as a long-term solution if you’re serious about growing your business and aren’t just selling a few items as a hobby business; as it’s just a shopping cart and not a full shop, it’s very limited. If your business is successful and/or your catalogue grows, you’ll get frustrated with having to create a new PayPal button for each item you create. You also have no way to track orders beyond your payment notification emails and PayPal account records, so you’ll have to download your PayPal transaction logs into a spreadsheet if you want to generate any reports about how well you’re doing, or get your sales totals for your tax return.
Self-hosted eCommerce Site
If you have your own website, you can install eCommerce software to create your own shop (Wikipedia has a comparison of many options). This option gives you the most control over your shop, and potentially costs the least (in money, at least) but requires a time investment or a cost to hire someone else to set up your shop.
I use Zen Cart for my shop, and I like it, but I’m not sure I’d recommend it to others. On the plus side, it’s completely free, and I can change it to look and work exactly the way I want it to – it works well for my needs. I can offer instant pattern downloads; I have sales reports at my fingertips; it costs me nothing except my monthly web hosting fee. But I don’t generally recommend it to other people for these reasons:
Time: It takes a lot of work to set up initially – it took me 2 weeks of full-time work to get my shop ready to launch. And every time I want to change something, I have to schedule in more time to make the changes (there’s a reason why my shop still isn’t branded with my logo, almost a year after the logo launch…)
Tech Skills: If you want to make tweaks and updates to your shop, you need to get more into the code side of things – it’s not very user-friendly. If you’re not familiar with HTML (the code that webpages are written in) I’d suggest you either find someone to help you with that side of things, or avoid Zen Cart.
You could get away with using default templates that come with the software and doing very little in the way of modifications, but then your shop won’t look like it’s yours, and branding is very important – you want your customers to remember you! Or you could hire a web designer/developer to create and install your shop for you (for a one-off fee), but that’s a steep investment if you’re just starting out.
So, if you’re not a very technical person or don’t have the time or inclination to delve into code, I’d recommend you use a simpler option like a marketplace store.
Alternatively, you could look into a best-of-both-worlds solution like Ecwid, that allows you to set up a store on your own domain without doing any coding. You’d get the advantages of having your own store, branding, and control, with the ease of an online marketplace for creating your listings. However, you do have to pay a monthly fee for this convenience.
My Experience
I can tell you that setting up multiple shops takes a lot of time, and maintaining shops on many platforms may take more in effort (and, potentially, in fees) than you get back in sales. If you’re spending time maintaining 5 shops, is that the best use of your time, or would it be wiser to free up more time to create more products?
You’d probably do better to concentrate your efforts on one shop, or two selling locations that make sense for your situation (e.g. one local and one international marketplace shop, or one marketplace shop and a shop on your own site).
This is my current situation:
I focus all my attention on my own self-hostedPlanetJune shop, and that’s where I see the bulk of my sales.
I maintain my Etsy shop, but only for advertising purposes, as many people search for patterns on Etsy and I want mine to show up in their searches. (I think of my Etsy fees as my advertising budget.)
My ArtFire shop is still open, but I don’t have time to maintain it and I’m in two minds about keeping it open – do I really need a third shop? (No.) But then, you can easily import Etsy listings into ArtFire, so I could update my shop relatively easily… I’m still on the fence about this one!
I closed my Ravelry shop, but continue to list all my patterns in their database with links back to my own shop, so my patterns show up in all the Ravelry searches, but I don’t have to maintain yet another shop.
I closed my DaWanda shop, as I just didn’t have time to add all my listings. Also, accepting payments in Euros was a hassle, and many customers didn’t speak English, which made communication difficult.
I haven’t set up a Craftsy shop, because my business strategy is to bring everyone to my own shop. The only thing Craftsy could offer me that I don’t already have is access to their customers, and for me, the work in creating and maintaining my presence there isn’t justified by the potential sales.
Those reasons make sense for me, but won’t necessarily apply to you if you don’t have a high-traffic website, you sell patterns but don’t have an instant download option, you don’t want to do any coding, you live in Europe, you just sell your work as a hobby, or countless other factors…
In Conclusion…
I hope you can see that there really is no one-size-fits-all solution here: every option has its advantages and disadvantages, and you need to decide what’s best for your unique situation, based on your business goals, your location, the type of products you sell, your technical ability, your budget, and the time you can invest – both initially, to create your shop(s), and then on an ongoing basis, for maintenance and processing orders.
Using an online craft/pattern marketplace has many advantages: it’s easy to get started and to list your items, and you’ll (hopefully) get lots of traffic via people searching that site. On the flipside, the costs are higher, people tend to associate their purchases with the site (“I bought it on Etsy/Ravelry”) instead of with you (“I bought it from PlanetJune”) so it’s harder to build brand loyalty, and you’ll have direct competition in the search results from other sellers who may offer similar products at lower prices.
Setting up a shop on your own site, with a simple PayPal cart or dedicated eCommerce software, means that you have fewer costs, less direct competition, and people know they are buying from you. The downside is that, if nobody knows about your shop, nobody will visit, so the onus is on you to spread the word. That’s really a subject for another post, but you can do this by: writing a blog with useful content that people want to read and share; making sure your site shows up in Google searches; being active on social media; handing out business cards with your web address; or countless other marketing strategies. The best-looking and most functional shop in the world won’t do you any good if nobody sees it…
Where and how you sell online is a big decision, and it’s worth taking the time to compare options and find the right platform for you before you delve into setting up your shop – it’s a lot of work to change to a different storefront and set up all your item listings again, and you don’t want to lose your existing customers by moving to a new web address.
If you’re considering selling online, or already have a shop but wonder what other options are available, I hope you’ve found this summary useful!
Have you used any of these options, or something different? What were the results? I’d love to know your online selling venue recommendations; for or against! Please feel free to share your thoughts and experiences in the comments…
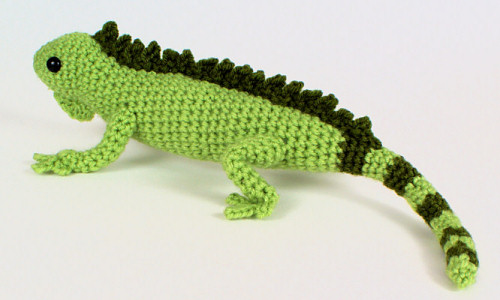
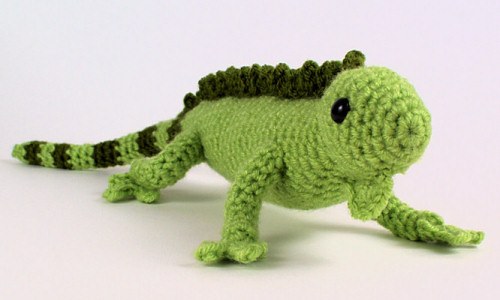
If you saw my chameleon photoblog the other day, you’ll know I have lizards on the brain. I’ve already designed a gecko and a chameleon though, so I needed a different type of lizard to complete my lizard crochet pattern trilogy. An iguana seemed like the obvious choice, with lots of fun details to include, so that’s what I’ve made:
Iguana Fun Facts
My design is based on the Green Iguana, which lives in rainforests in Central and South America (although if you change the colour you could make different types of iguana).
Other types of iguana are adapted for different environments, such as the Marine Iguana from the Galapagos islands (which eats seaweed and algae and is an excellent swimmer), and the Desert Iguana from the southern US and Mexico (which can withstand high temperatures and burrows into sand to keep cool).
The Green Iguana is about 2 metres long, and is easily recognised by its dewlap (the loose skin under its chin), the row of spikes down its back and its very long tail.
Despite its size and fearsome appearance, the Green Iguana, like other iguanas, is primarily a herbivore.
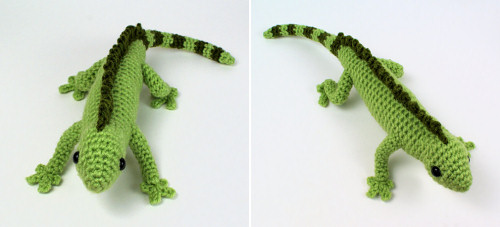
I think I struck a good balance with this design between realistic and cute, detailed and easy to crochet. He’s worked in two shades of green, although a single-coloured iguana would look nice too; you’d just lose the tail striping. He’s an incredible 15″ (38cm) long, although, don’t worry, most of that is tail – he’s only 9″ (23cm) long excluding the tail 🙂
Let’s look at that tail for a moment – it’s a perfect excuse to practice my seamless, jogless Perfect Stripes: No-Cut Join technique, although the pattern includes a standard jogless stripes technique for those who aren’t feeling adventurous and don’t mind a slight visible seam in the tail.
The realistic legs are wired with pipe cleaners, but the pattern also includes tips for omitting the pipe cleaners if you want your iguana to be baby-safe.
As with all my crochet patterns from now and going forward, any pieces not worked in simple amigurumi style include a stitch diagram in addition to the written instructions, so you can use whichever instructions work best for your learning style. And, as always, photos aid with every step of the assembly, so you can be confident you’ll be able to make a perfect iguana too.
I hope you’ll enjoy my latest pattern! If you’d like to jump right into iguana-making, you can pick up the Iguana amigurumi crochet pattern right now from my shop. Or, if you’re not quite ready to buy, why not favourite/queue it on Ravelry so you don’t forget about it?
I’ve renamed my nature photoblog series from ‘Cape Town wildlife’ to ‘South Africa wildlife’, to distinguish these new occasional posts from my previous month-by-month year of wildlife posts. It’s been a long time since I last posted nature photos (9 months!), so I have a lot of special things saved up to show you, when I have time to organise and edit my thousands of photos! I’ll ease back into the wildlife blogging with a study of one of my favourite local animals…
I like to play ‘spot the chameleon’ in my garden. It’s like a real-life version of Where’s Wally/Waldo, only with a much better reward: you get to watch the tiny adorably grumpy-faced lizard after you spot him, and, because chameleons don’t dart off in a split second like geckos do, it’s much easier to take good photos.
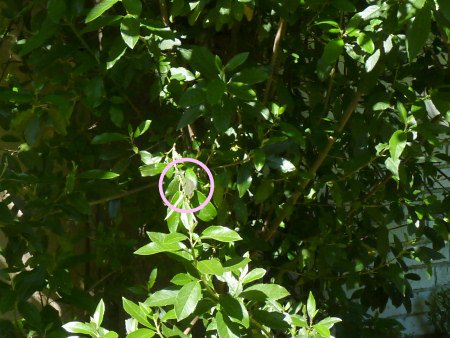
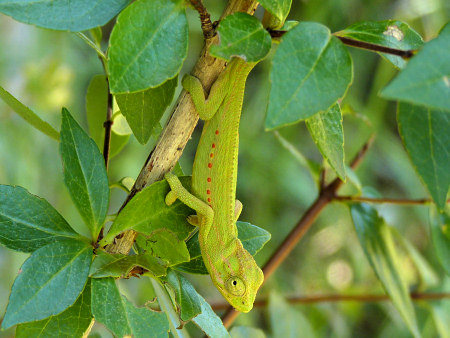
I have no idea how many Cape Dwarf Chameleons live in, or visit, our garden. My best guess is ‘several’, and I choose to believe that they are all babies of Kermy, the chameleon I used to watch every day last year (and even fed a grasshopper to, on one magical occasion). Look how difficult it is to spot the (full-sized) Kermy:
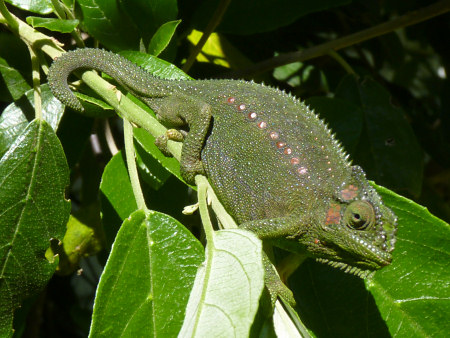
There he is! In dark colour mode:
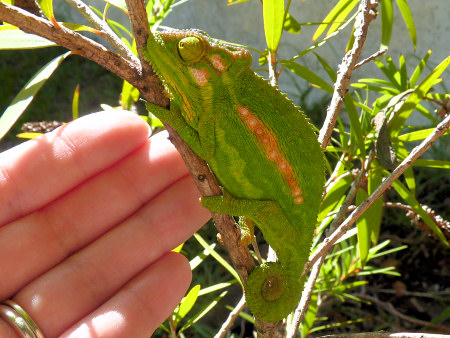
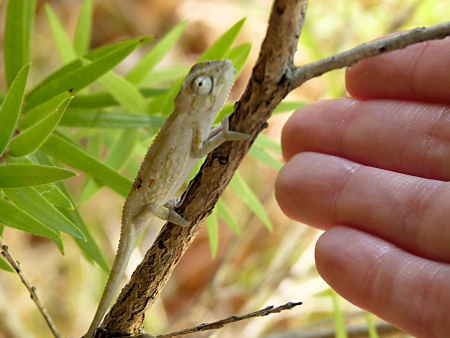
And in bright colour mode, with my hand for scale:
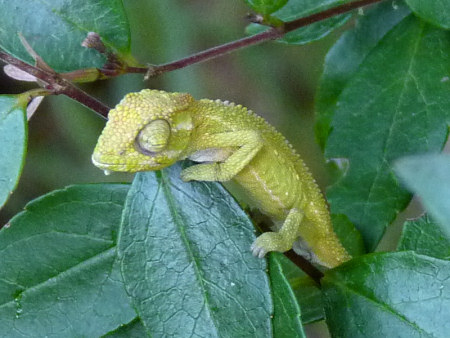
Now imagine how much more difficult the chameleon-spotting game is when they are teeny-tiny babies like this:
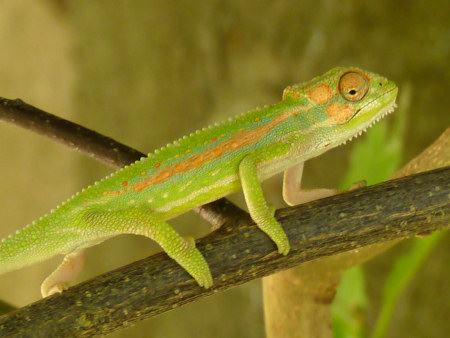
Awww! And it’s not just the size that makes it tricky; they change colour like crazy! Here’s another baby (these are all the same species btw, Cape Dwarf Chameleons):
Look at the amazing colours!
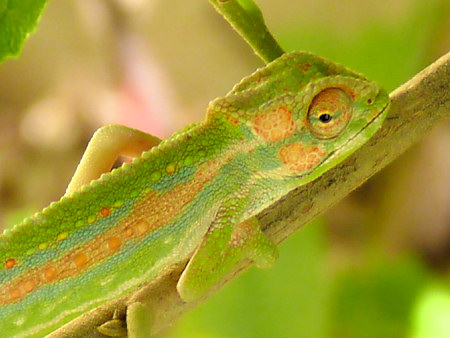
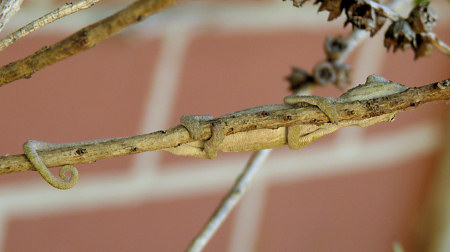
I was even more excited though, when I saw this completely different type of baby chameleon…
(who, incidentally, has a pretty neat way of hiding when he sees you coming…)
Where did he go?!
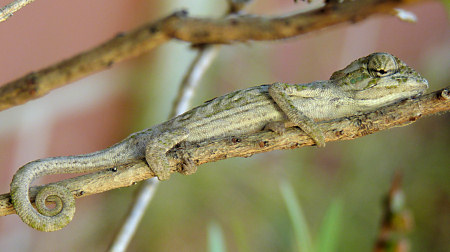
…only to discover the next day that his grey colouring was just skin getting ready to shed and he was a regular green chameleon all along! I could hardly believe it, but I have proof: here he is with just the nose skin left:
And then I spotted this very skinny orange baby on the same bush, so I know for sure that there are at least 2 of them:
The next day, I managed to catch one of them napping! Awwww….
Then I didn’t spot any for a couple of weeks until yesterday, when I found this one – he’s much bigger now, and starting to look more like his daddy, my old friend Kermy 🙂
You can probably tell that I’m pretty smitten with these little guys…
I almost wish I hadn’t already designed my chameleon crochet pattern last year, because I’m just not getting over this fascination, so I settled on the next best thing: I’ve designed a different lizard pattern to indulge in my newfound appreciation for reptiles. (It’s a cute one, and I’ll be revealing it very soon…)
I really hope you’ve enjoyed my chameleon photos – please leave me a comment if so. I promise I’ll try not to leave such a long gap until my next wildlife report 🙂
February 14, 2013 @ 2:49 pm
· Filed under CAL roundups
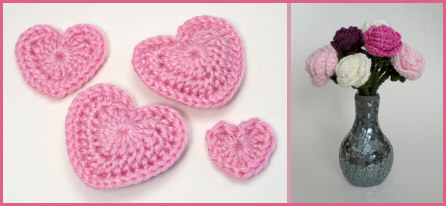
Happy Valentine’s Day! Whether or not you’re celebrating today, here are some pretty crocheted hearts to brighten your day from our Valentine’s mini-CAL. (Don’t forget to keep reading to the end – we have a new prize CAL starting tomorrow!)
February 11, 2013 @ 9:58 am
· Filed under Knitting
I actually wrote this post long before Christmas, but it’s been too hot to even consider modelling a warm hat until now, so let’s pretend I just finished it – I want to tell you the lemons-into-lemonade story of how I ended up with this lacy knitted hat instead of the cardigan or sweater I’d intended to make…
After the success of my first knitted cardigan, I needed to get another project started asap so I didn’t revert back to my exhausting pattern of working (crochet designing) while watching TV in the evenings.
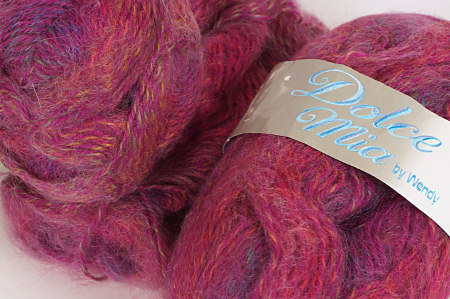
I looked through my stash and found this interesting yarn – it looks like mohair but it’s actually an acrylic/nylon blend… No, it’s not the loveliest yarn ever, but my Mum found it in a charity shop for next to nothing, and I thought I could use it up on some knitting practice before committing to the expense of buying yarn for a sweater. (As there are no big box craft stores here, no weekly sales, no 40% off coupons, I can’t get any bargain yarn any more, so working through my stash is suddenly more appealing to me!)
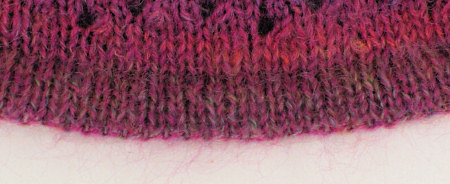
I wanted to try a built-in edge to prevent the stockinette curling this time, so I learnt how to start with a built-in facing and cast-on for the back of my unplanned sweater/cardigan:
Built-in facing (look how neat it makes the bottom edge look)
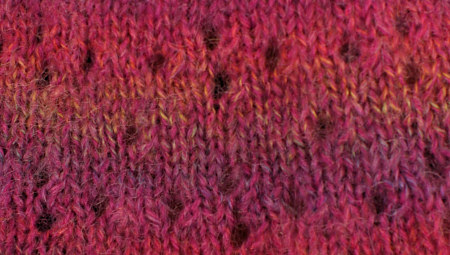
Feeling ambitious, I thought I’d find out how to make knitted lace (i.e. strategically placed holes), and invented a basic pattern to work with:
My very basic lace pattern
Disaster 1: After working through my 12-row lace pattern repeat three times (while watching TV and paying very little attention to what I was doing) I held my knitting up and noticed a couple of big mistakes in the position of my lace holes – one in the wrong place and one extra hole that shouldn’t have been there.
Solution 1: Here’s a big advantage of knitting over crochet: if you made a mistake, even many rows back, you can unravel that column of stitches down to the mistake like a ladder in a stocking, fix the mistake, and then zip all the stitches back up again with a crochet hook by hooking each through the last. Mine was a little trickier than fixing a mistake in stockinette, as I had to unravel some lace pattern stitches – decreases and yarn overs – but it worked! Which means that now I can confidently knit without paying much attention to it, knowing that I can fix a mistake later.
Disaster 2: I realised that a) I really don’t love this yarn enough to wear a sweater made from it, and b) knitting lace without making mistakes would take more concentration than I can afford to spend – the whole joy of my knitting is that I can do it mindlessly to stop myself from working on crochet designs out-of-hours, and that doesn’t really apply when getting into more complex stitches and patterns. What’s the point in completing an un-relaxing project to make an un-wearable sweater?
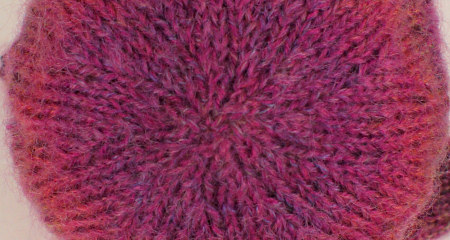
Solution 2: By luck, the bottom hem of my ‘sweater back’ was just the right length to be a hat band. (That’s only because my gauge was a bit off to begin with, and my planned 18″ back was actually 20″ wide – another reason not to continue with this project as a sweater.) So I stopped working my lace pattern and figured out a decrease pattern to make the top of a hat shape instead. I found out that I can extrapolate my crochet shaping knowledge to make knitted shaping pretty easily.
Decreases create the top of the hat
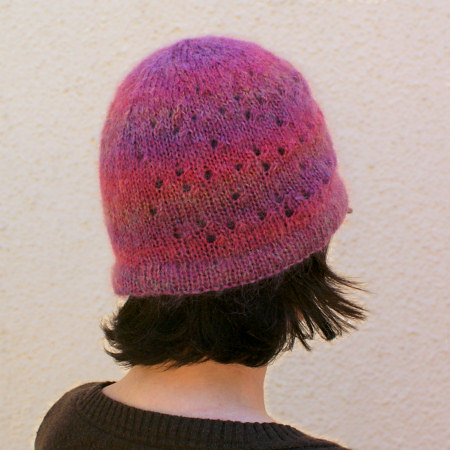
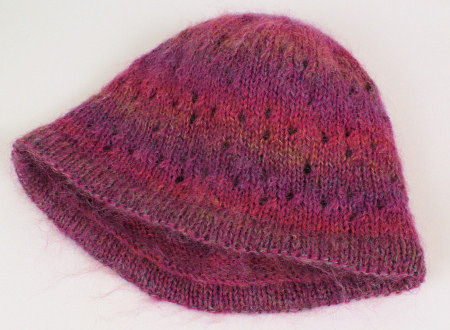
I seamed the two side edges together, and, voilà, a hat is born:
I knitted a hat – by accident!
And the bonus surprise from all this: I actually like the hat! I think I could get away with a small accessory in this yarn and colourway, whereas I know for a fact I would never have worn it as a sweater. I’ve never designed a hat before as I’m not really a hat person, but this has actually made me consider designing a crochet hat pattern at some point…
I’m avoiding getting fancy with my next knitting project (a sweater). I really like the look of stockinette, and the miles of pulling one loop through another to form a neat even fabric is very soothing to me. Yes, this fabric could be made in minutes on a knitting machine, but there’s still an advantage in making over buying: I can tailor my garments to fit me instead of having to settle for leaving the bottom of every cardigan unbuttoned to accommodate my hips.
Plus, it’s just relaxing to design things without writing anything down or worrying about how it’ll translate into a pattern. Yay for non-work crafting!
The Baby Cephalopods and other AquaAmi are already starting to multiply in the Ceph-Along (& friends) CAL thread on ravelry. There’s still plenty of time to join in – the CAL runs all month and you can make a cephalopod in an hour or so! One thing I love about these patterns is how few pieces they have; there’s almost no sewing to do (bliss when you’re used to having to stitch head, muzzle, body, 2 ears, 4 legs, and a tail for one animal…)
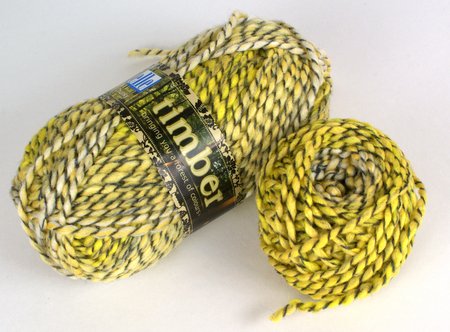
It’s rare that I’m still excited enough about a new pattern to want to make more immediately, but I really can’t resist the cephalopods – they’re just so quick and fun to make. I’ve just bought this insanely-coloured yarn that I think will make wonderful colour-changing cephalopods (I can’t imagine any other uses for it – no wonder the shop had only this colourway left):
I’ll be joining in the CAL myself, to see if my gut feeling is correct and I can turn this exuberance of colour into a set of amazing cephalopods….
And if you’re making hearts and roses from my free patterns, don’t forget to share them in the Valentine’s CAL thread before the 14th and I’ll include your photos in the roundup here!
Review and Win contest
January’s ‘Review and Win’ winner is Emily W, with her review of my ever-popular Baby Bunnies:
I ABSOLUTELY ADORE THIS PATTERN!!! As soon as I saw the bunny pictures on June’s blog, I was absolutely ecstatic!!! I had previously looked everywhere for a realistic bunny pattern, but hadn’t found anything that looked promising.
As soon as I bought the pattern, I was immediately swept up in a colony of bunnies – I just couldn’t stop making them! The pattern is SUPER easy, even with the odd increases and decreases needed for the shaping. June explains the concepts needed so well, such as the entire page devoted to explaining angora bunny-brushing techniques! I’m also really glad that, unlike some other designers, June always pays great attention to important details, such as: where to put the eyes and ears, and where to put the feet so the bunny doesn’t flop forward or look like it’s pregnant (I speak from experience from my own attempts at designing a bunny pattern… did NOT turn out well 😛 ) Most of all, I love the fact that the bunny pattern is so easy to customize to look like your own bunny.
Everyone I make bunnies from this pattern for loves the results. This pattern will DEFINITELY become my last-minute birthday present pattern! Thank you SO MUCH for yet another wonderful pattern, June!!!!
You’re welcome, Emily, and thanks for the lovely review – I’ll email you to find out which pattern you’d like as your prize 🙂
And for everyone else, Baby Bunnies will be part of the next PlanetJune CAL (Spring/Easter theme), starting Feb 15th, so get ready for BunnyFest 2013, coming soon to a ravelry group near you…
Or simply click through from my links before you shop at Amazon, Etsy, KnitPicks, LoveCrafts or Crochet.com, and I'll make a small commission on your purchase, at no cost to you! Start here: