January 31, 2012 @ 3:29 pm
· Filed under CAL roundups
Every month, the PlanetJune CALs get more and more fun, as our Ravelry group grows and our little community strengthens. It’s so nice to see! Let’s look at the roundup for January’s AquaAmi Crochet-Along – and keep reading to the end to find the February themes (Maybe you’d like to join in, if you haven’t before? All welcome!)
(For speed, I’m just giving credit with participants’ Ravelry usernames.) Here’s what happened in the January CAL!
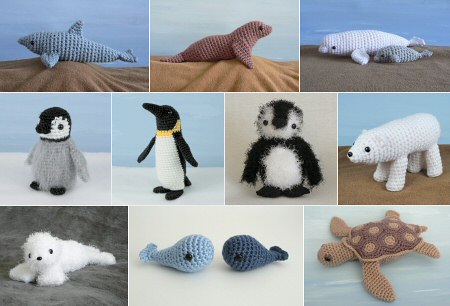
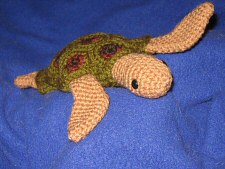
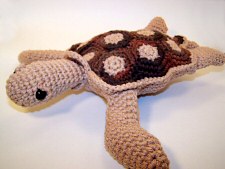
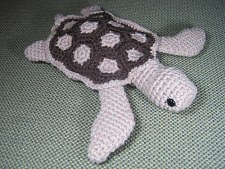
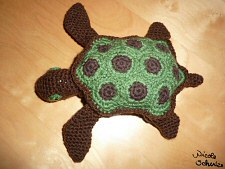
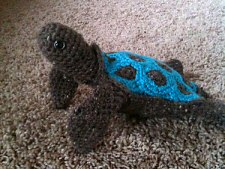
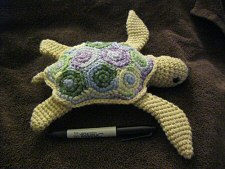
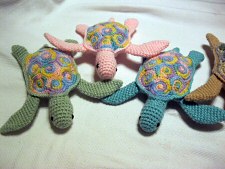
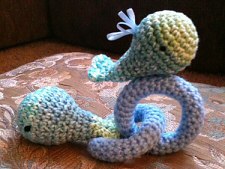
My Sea Turtle pattern is a big time commitment, with 26 separate pieces that make up the turtle, so I’m especially pleased to see how many people tackled it this month. It was really fun to see people’s photos of their piles of pre-assembled pieces, and seeing the lovely colours everyone chose:
PixyKayte & CrochetChrisie
camaharet & klopferli
AKmtnnymph & SunnyStrings (who made a car seat blanket to match her turtle)
theMarkofSMB & arbitrarily (whose turtle was made with a 1.25mm hook and is only 8cm long!)
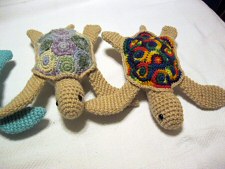
I have to give a special mention to Monica (theMarkofSMB) who, after making her sea turtle above, managed to put together another five sea turtles, in assorted colours:
all 5 by theMarkofSMB – an amazing achievement!
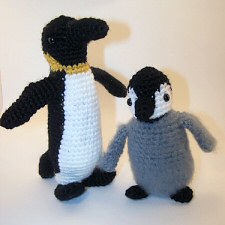
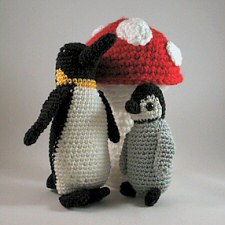
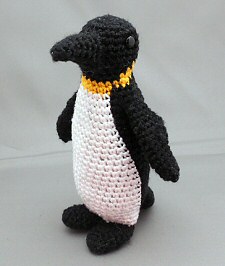
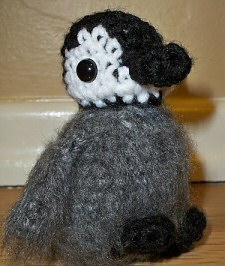
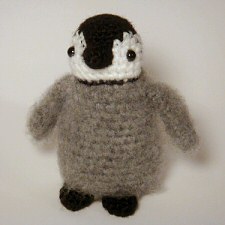
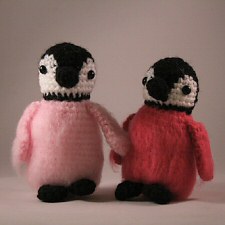
And then we have my Adult and Baby Emperor Penguin patterns:
CrochetChrisie & Fatals-attraction
Enphra & CranberryAmi
rastakt & Fatals-attraction (who made Valentine’s penguins in 2 shades of pink!)
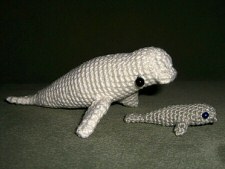
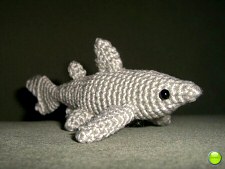
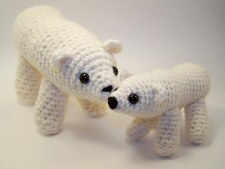
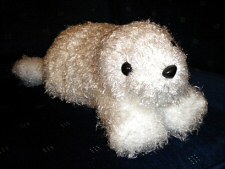
All the non-tiny aquatic mammals:
adult and baby Beluga Whales, and Dolphin, both by petrOlly
Sea Lion and a clever mod of my Dolphin into a shark, both by petrOlly
CrochetChrisie made sweet adult and baby pairs of both my Polar Bear and Sea Lion patterns, by changing the yarn thickness and hook size
And the only person brave enough to attempt a ‘fuzzy’ pattern this time around was jukatca, with her cute Fuzzy Seal!
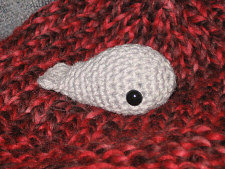
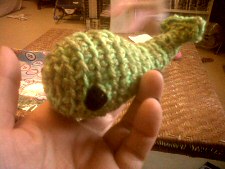
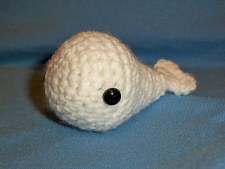
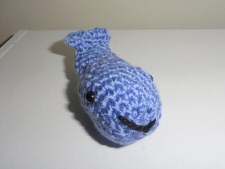
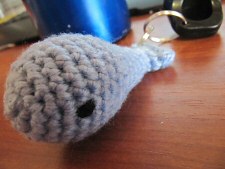
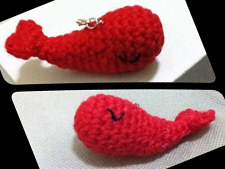
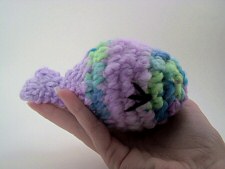
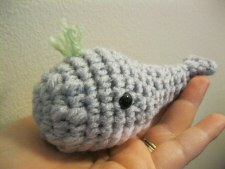
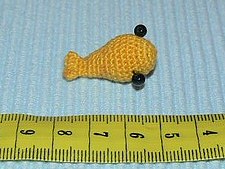
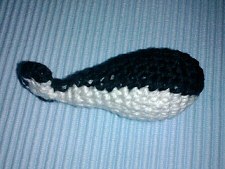
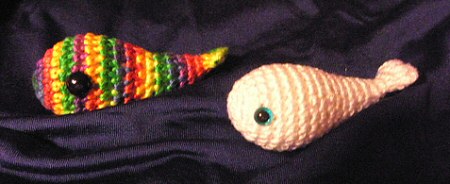
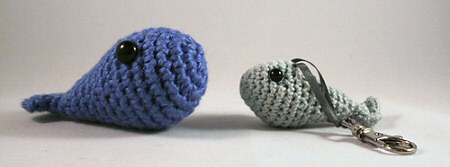
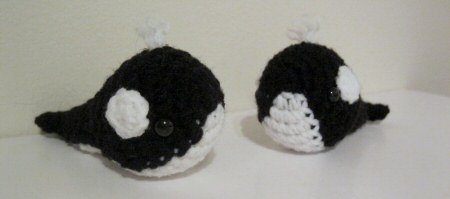
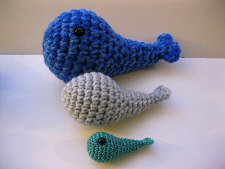
And finally, Tiny Whale was very popular this month, as nobody can possibly be too busy to find the time to make this little no-sew pattern. But we didn’t just see plain Tiny Whales: we have colourful whales, catnip-stuffed whales (cat toys), keychain whales, sets of counting whales (for kids), baby toy whales on rings, giant mega-whales, teeny-tiny miniature whales, and even whales modified into Humpbacks and Orcas! This is such a great example of how you can use your creativity to take a pattern, even one as simple as Tiny Whale, and make it your own:
PixyKayte & yasminlangley
both by CranberryAmi
knitwhy & kathykoo
sunshine1127 & yaney
CrochetChrisie & theMarkofSMB
both by petrOlly
CrochtColorJunkie
Fatals-attraction
theMarkofSMB
both by theMarkofSMB
theMarkofSMB and AKmtnnymph
the first 4 of 10 counting whales by saudistitcher
Another amazing roundup! Well done to everyone – they all look great 🙂 (If you’d like to make any of the patterns featured in this CAL, you’ll find them all under Aquatic Animals in my shop.)
If you missed out on the CAL fun, we have two CALs starting on February 1st (tomorrow!):
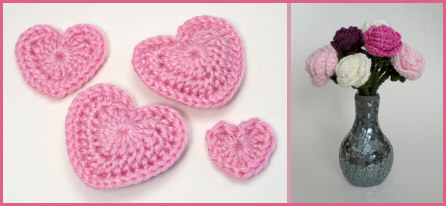
Firstly, a Valentine’s CAL (using my free Love Hearts and Basic Rose patterns) from Feb 1-14th…
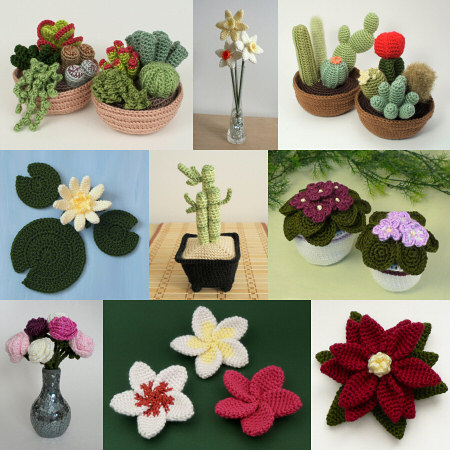
And secondly, a Plant-Along, which includes all my plant and flower patterns (including the new succulents!) from Feb 1-29th.
Today is Maui’s birthday! As the most important member of our household, and to celebrate his bravery at coping with a hugely traumatic trans-continental move last year, I wanted to get him an extra-special present. Unfortunately, the pet shops here are lucky to have a ball and a mouse as their cat toy selection, and Maui already has loads of each of those.
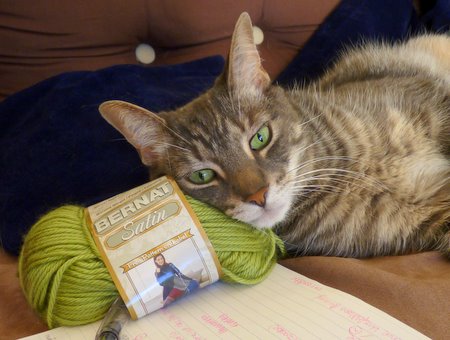
Maui also likes to supervise when I’m designing – here he makes sure that my yarn ball doesn’t get away from me while I crochet succulents…
The balls I crocheted for my Yarn Over vs Yarn Under comparison had a dual purpose – I added some catnip as I stuffed them, so they could double up as new toys for Maui.
Maui won’t care if I crocheted these with YO or YU, as long as there’s catnip inside!
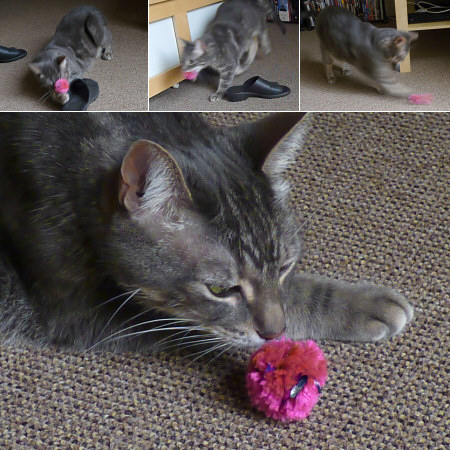
But that wasn’t good enough – he already has crocheted balls to play with, and I wanted to give him a really special treat. So I put on my creative thinking cap and the result was pretty amazing – I think I may have created the best cat toy ever! It turned my 8-years-young lazypuss into a kitten again, and held his attention for far longer than any store-bought toy has.
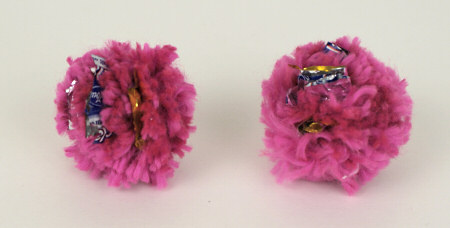
If you have, or know, a cat, and you like to craft, you must try this. It’s really easy, it only takes 5 minutes, you’ll have a valid excuse for eating chocolates while you craft, and you’ll have the happiest cat in the neighbourhood! The foil makes an irresistible crinkly noise when the ball is played with.
The ball on the right has been thoroughly quality-tested by Maui, and after half an hour of kitty football, stalking, pouncing and batting, being carried by mouth, dropped into shoes and being fished out again, you can see that it hasn’t fallen apart at all!
Note: this is my first donationware craft tutorial. As I’ve had requests for PDFs of other tutorials, I’ll also be converting some of my older tutorials to donationware, as I find the time, so there’ll be a handy printable option for them too. As always with my donationware, the full tutorial is available online for free, whether or not you choose to pay for the PDF version!
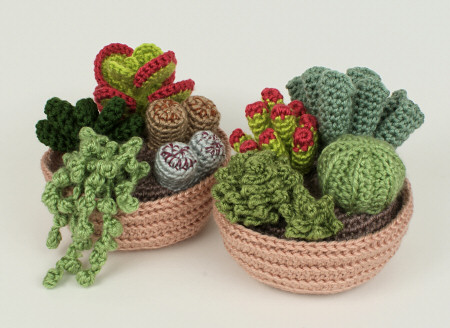
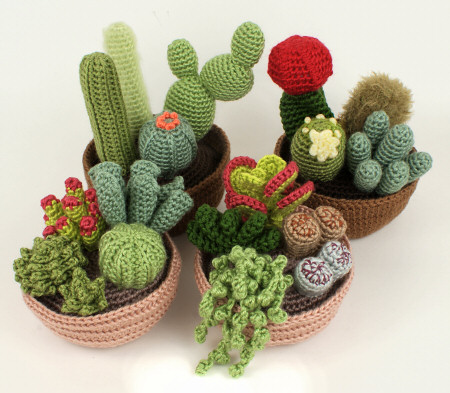
I can hardly believe I’ve finally reached this point – this has probably been my longest crochet design process to date – so I’m very happy to present to you my first patterns of 2012: Succulent Collections 1 & 2!
I spent weeks (during my break from designing in December) researching all the different types of succulents to try to find a selection that would look interesting and varied, are fairly common, and would work when translated into crochet. I narrowed it down to 10, to give me a little wiggle room if a couple of them didn’t work out the way I was hoping. And here are the final 8:
While I didn’t know this at the time I began my succulent project, I learned through my research that while cacti are a type of succulent, cacti come from the Americas, but other succulents come from Africa. And, beyond that, it turns out that 7 of the 8 species I ended up making are actually native to South Africa – such a coincidence! I had no idea, although I do see succulents all over the place here; it makes sense to have water-retaining plants in a predominantly hot dry environment.
I’ve come up with all kinds of new crochet tricks and techniques for these patterns, and, as always, they are explained in fully illustrated detail in the patterns, so you can feel confident about tackling these even if you’ve only made very simple amigurumi before. As with the cacti, each Succulent Collection is available separately for $8, or you can get the second collection for almost half price when you buy both together for the ridiculously low price of $12.50.
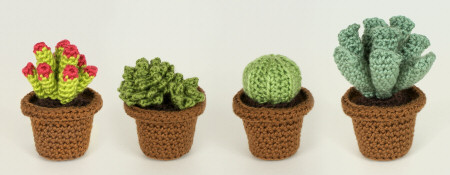
Just to make things even more exciting, as you can see from the picture above, I’ve made the Succulents on the same scale as my Cactus Collections 1 & 2, so now you can mix-and-match between all 4 plant collections to make a completely customized cactus/succulent garden, or a cute selection of mini pots with individual plants! (Or even a mini jungle like mine!)
And, in a case of excellent timing, the PlanetJune February CAL will be a Plant-Along, so please join us at the PlanetJune Ravelry group if you’d like to participate in the crochet-along and make succulents and cacti (and any of my other plant patterns) with the rest of the group! The CAL officially starts on Feb 1st, but if you want to pick up the patterns now and get a head start, I won’t tell 😉
I’ve spent a huge amount of time making these succulent patterns into something special, so I really hope you’ll enjoy them! Please let me know what you think of them…
After a long break, it’s time to resurrect my PlanetJune Stories series, and hear from more of my wonderful customers. Today’s story is from Judy Carlson of Boulder, CO, who is one of a handful of people who has bought pretty much everything I’ve ever published! So let’s find out what she does with all those PlanetJune amigurumi patterns…
Here’s a little sampling of what Judy has made with my patterns… impressive, huh? How many do you recognise?! Read Judy’s story, and then I’ll show more of her photos at the end of the post!
Judy writes:
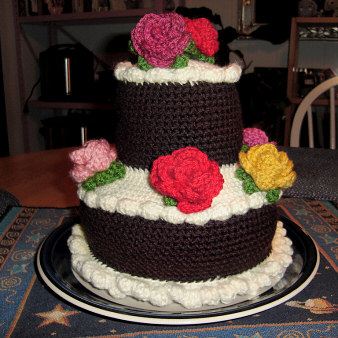
The first PlanetJune pattern that I ever used was her Basic Rose pattern. I crocheted a cake and wanted some roses for decoration and they were perfect!
Then I did a PlanetJune crochet-along project or two, but what really got me hooked on her patterns were her Cactus Collections: they are SO real looking and awesome! After that I have been NUTS for June’s patterns and now have almost all of them and have completed the majority of the patterns I own.
In addition to having really great patterns with easy to follow instructions and new techniques that result in nice crisp finished products with clean lines and incredible cuteness, she allows people to sell finished items as long as they credit her as the designer. Knowing this, in January 2011, I opened my Etsy shop, Judy’s Ami Shop.
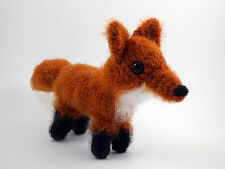
Currently, everything I have in stock is made from PlanetJune patterns. I am having so much fun with my shop! I love getting orders, boxing them up, and taking them to the post office. I have had a husband order a Chinchilla for an anniversary gift for his wife, an Alpaca ordered for a wedding gift, and recently I got an order for a Guinea Pig to be a companion to a real Guinea Pig whose brother died. (My customer reports that her Guinea Pig likes his new crocheted buddy!) The furthest away that I’ve gotten an order is from Japan – where my fuzzy Red Fox now lives.
All the money I have made from my store has gone into buying new PlanetJune patterns, yarn, and supplies. I can only expect that my Etsy shop will continue to grow! But I don’t put everything I crochet up for sale; some go to friends and family for gifts. And sometimes I am tempted to close my shop, surround myself with all of the amis and say, “mine all mine!”, as I laugh maniacally! After crocheting the Aardvark pattern, I decided that this Aardvark was my Aardvark – I love him so. I look forward to seeing June’s pattern store continue to grow and see what she comes up with next!
I hope most of my customers realise by now that you, like Judy, are allowed to sell as many items as you want, made from my patterns, provided you credit me as the designer and don’t share the patterns themselves!
(I’ll blog in more detail about this later, but if you have an online shop where you sell items you’ve made from my patterns, you might like to add your shop details to my list of PlanetJune-designed toy sellers. I refer anyone who enquires about finished items to this list, so it’s a great way to get a little free promotion for your shop!)
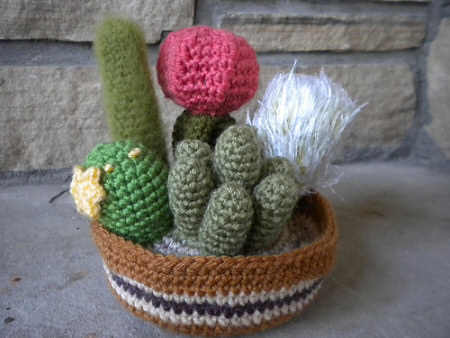
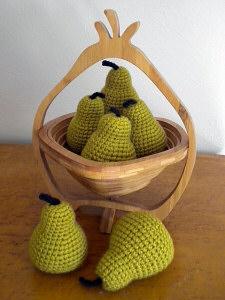
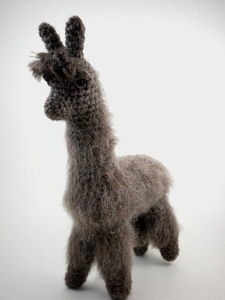
And now let’s look at a few more of Judy’s crocheted creations:
Cactus Collection
Amigurumi Pears; Alpaca
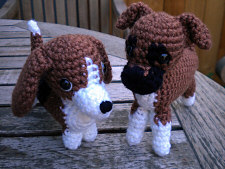
AmiDogs Basset Hound & Boxer; Fuzzy Guinea Pig
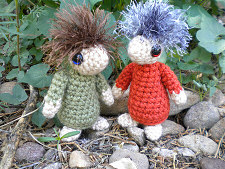
Red Fox; Mop Top Mascots
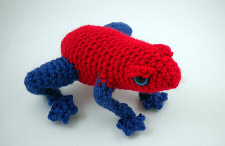
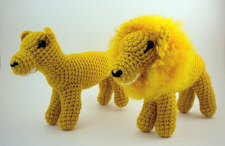
Poison Dart Frog; Lion and Lioness
Thank you so much, Judy, for sharing your story and lovely photos with us! Please leave Judy a comment if you’ve enjoyed this post, or visit Judy’s Ami Shop if you’d like to buy one of her lovely (and familiar-looking!) creations.
Do you have a PlanetJune Story you’d like to share? I’d love to hear it! Please email your story to june@planetjune.com, together with one or more high quality photos showing what you’ve made from PlanetJune patterns. If I choose your story to feature here on the blog, I’ll send you your choice of pattern from my shop to say thank you!
This is the eighth post in my monthly series on the fascinating nature I encounter here in South Africa.
My biggest problem right now is deciding which photos to show you this month – between our adventures over Christmas and adding a birdbath and a new bird feeder to our garden, I have enough wildlife pics for at least three posts! But I’ve decided that this month I want to talk about the lizards in my garden. (Please don’t be squeamish; these little guys are totally harmless, and they’re really helpful to have around because they eat bugs and stop my garden from being overrun with insects.)
It’s hard to believe there’s such a variety of wildlife in one small back garden – I’ve found three completely different types of lizard, and and they are all very small (5″ long or less) and non-threatening. I love having them around – it’s fascinating to be able to watch them.
PS – keep reading to the end; I’ve saved the best for last!
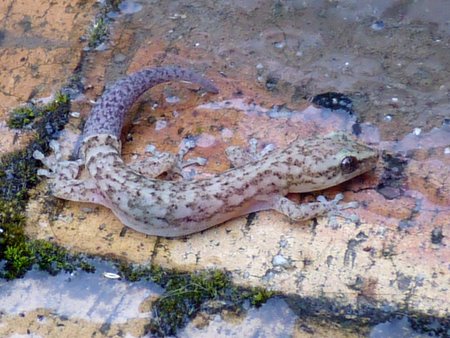
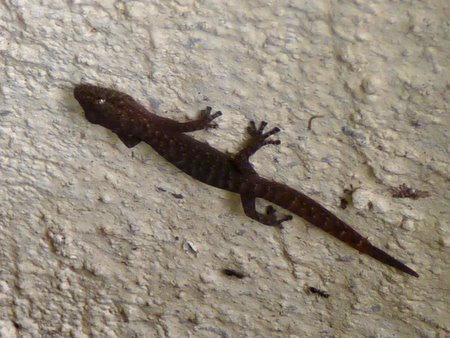
Geckos
There are lots of little geckos in the garden, although we usually only see them when we move something they were sitting behind or inside, and then they run like lightning to escape to safety! That makes them very difficult to photograph; these are the best photos I’ve managed so far.
As you can see from the pics above and below, their colouration is quite varied, so I’m not sure if they’re all Marbled Leaf-Toed Geckos, or if we actually have a second species too.
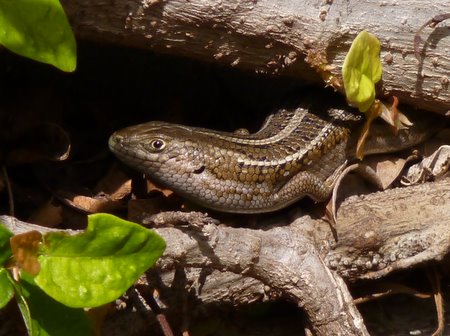
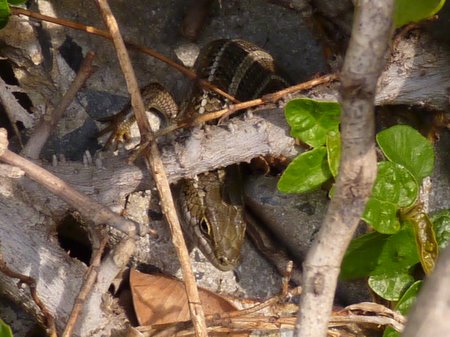
Skinks
Our Cape Skinks are a little more scary looking – they have long smooth snakelike bodies and flicky tongues. It’s only when you spot their tiny legs that you know you’re not looking at a snake! They also move lightning fast, but if you sit still for a while they get braver and come out to sunbathe or look for insects. Of course, they only do that when I don’t have my camera handy, so even in my best photos, they are half-hidden in foliage…
A Cape Skink – or is it a snake?!
No, it’s definitely a lizard – you can see the leg more clearly here.
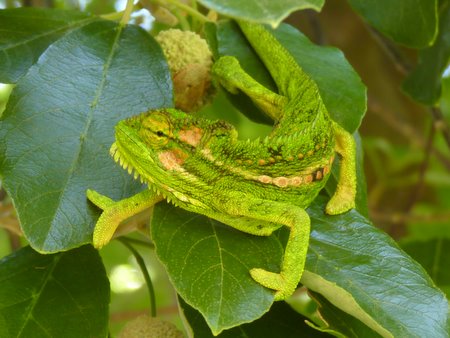
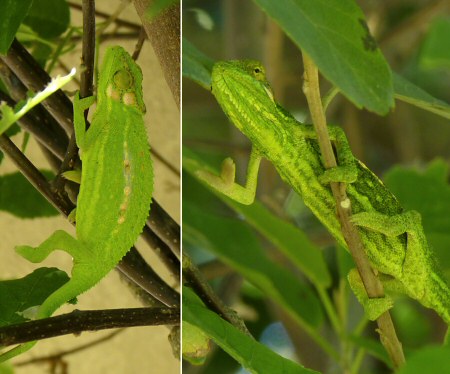
Chameleons
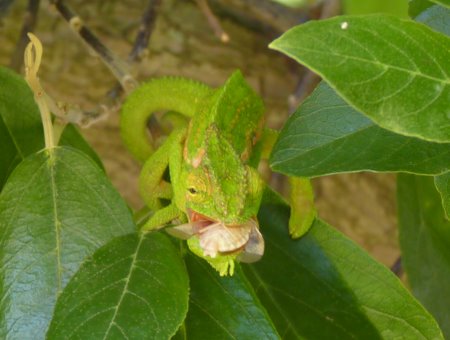
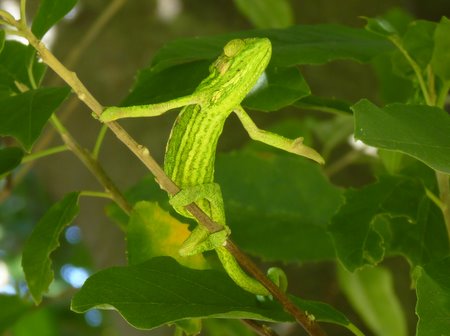
You can’t imagine my excitement when I looked at our wild peach tree one day and saw a bright green Cape Dwarf Chameleon looking back at me! Completely different from the other lizards, the chameleon’s camouflage involves moving veeeeeery slooooowly and swaying, so their motion looks like a leaf blowing in the wind. And it works! It’s very hard to spot, even when you know it’s there, but once you do, it’s great for taking photos. Just look at these:
How amazing is this?! Look at his two-toed feet.
Colour changing from bright green to blackish green (yep, it’s the same chameleon in both pics!)
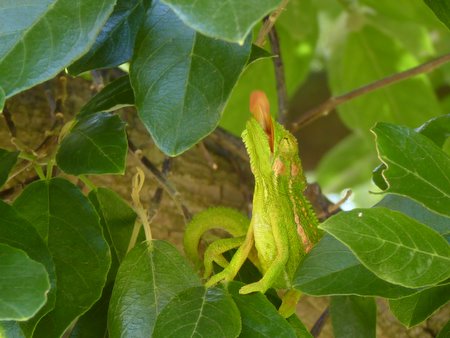
Tongue shooting out to catch food – his tongue is as long as his whole body, with a suction cup on the end…
Perfect accuracy with the tongue grab – tasty insect acquired.
This pic just made me laugh – I feel like he’s about to reach for his top hat and cane and break into ‘Hello, My Baby‘ 😉
I still can’t really believe I took these photos in my own garden – it’s like having my own private zoo! I think it’s partly because we have an older house (1920s) so the garden and our big tree are very established, and there are lots of wildlife habitats. And it’s partly because I go outside most days and actually look for wildlife in the garden – I bet that, if you have a garden, there’s more interesting wildlife in it than you realise! (Although you probably won’t find anything as cool as a chameleon, sorry…)
I hope you’ve enjoyed this month’s photos! Please leave me a comment if you did – I’ll stop posting if/when you get bored with seeing my pics, so I’d really like to know that you’re still interested.
***
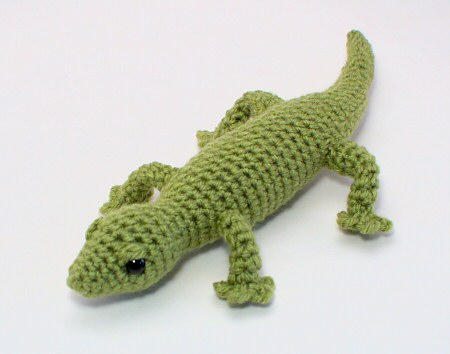
In case these pics have inspired you to crochet a lizard of your own, my Gecko pattern might be just what you’re looking for. And I’m pretty sure there’ll be a PlanetJune Chameleon coming at some point in the future! 🙂
For the first time ever (as far as I know) PayPal has taken the side of the seller in a dispute over the sale of a non-refundable digital item. This is a very encouraging step in the right direction on PayPal’s part, so I want to make as many digital sellers aware of it as possible!
Here’s the thing: PayPal offers a very nice Seller Protection package that covers sellers in the event of disputes or chargebacks. But, this Seller Protection only extends to sellers of tangible goods (i.e. items that can be shipped). PayPal’s user agreement specifies that items/transactions not eligible for PayPal Seller protection, include “Intangible items, including Digital Goods, and services.” So if you sell PDF files, eBooks, mp3 files, etc, there’s no Seller Protection for you.
Rules that govern the sale and refund of physical items cannot apply to digital items: there’s no way to ‘return’ a digital item in exchange for a refund. For that reason, most digital sellers state that all sales are final.
However, sometimes a buyer files a claim with PayPal that the item was not what was expected, usually because they didn’t read the item title or description, just looked at the picture and assumed they were buying a ridiculously inexpensive handcrafted item (with no shipping charges!) instead of a PDF file containing the instructions to make the item themselves…
In these cases, PayPal seems to invariably side with the buyer (in the case of everyone I’ve spoken to about it, at least). They remove the money from the seller’s account and refund it to the buyer, thus making a mockery of the seller’s ‘no refunds/all sales are final’ policy. In this situation, the seller has no comeback: the buyer has the pattern and their money back; the seller is left with nothing but bitterness. Has this happened to you? Please share your story in the comments! I’d love to know how prevalent this really is.
In early December, one of my Etsy customers neglected to read the title or description and asked for a refund after receiving the pattern. I referred the customer to my ‘final sale’ policy but they wouldn’t accept that and launched a “significantly not as described” dispute against me. It’s taken over a month for PayPal to resolve the case, during which time they withdrew the funds from my account, but today, they found in my favour and returned my money to me!
If you’re a digital seller, you may find yourself in the same situation, so here’s my advice:
1. Gather your evidence
Why is the buyer’s claim flawed? Make a list of facts (and figures, if possible) that support your side of the story.
Here’s mine. I ignored my main shop when gathering my figures, as this dispute was over an item in my Etsy shop, so adding sales numbers from my own shop would be misleading. In my Etsy shop (at the time of responding to the dispute):
I only sell crochet patterns
2919 crochet patterns already sold
88 other copies of the same item already sold (all 88 using the same photos and description) with no other misunderstandings
100% positive feedback
I state “CROCHET PATTERNS” (in capitals) in the item title and mention throughout the description that it’s a pattern that will be emailed as a PDF file
My Etsy seller policies clearly state that I sell crochet patterns, not finished items, and that all sales are final
The seller confirmation email from Etsy also states that the pattern will be emailed, giving the buyer the chance to contact me prior to my sending the patterns if they had made a mistake
Pretty solid evidence, I think, that “significantly not as described” was not something that can apply here!
2. Present your evidence
The key here is to be professional. Imagine you’re presenting evidence in a court case – the most compelling response is an objective account of the facts you’ve gathered.
You only get one chance to respond to PayPal, so make it count. Don’t hit ‘respond’ and begin typing directly within PayPal; compose your response in your text editor of choice, and save it. Then step away from the computer, do something else, and let yourself cool down.
When you look over it again, edit out any emotional phrases and any waffly bits, so it’s concise and to the point. Make sure you’ve included all the evidence that could count in your favour, and end with a short, clear conclusion. Read it over again, and only then paste it into the PayPal response box and submit it.
3. Wait…
It took over a month for the case to be resolved. During that time, I heard nothing more from PayPal, and I assumed the worst. Then, yesterday, I got the email:
We have concluded our investigation and have decided in your favor. The listing accurately described the item the buyer received. Any funds that may have been temporarily held have been returned to your account.
Victory! I don’t know if this is the start of a change of policy by PayPal, or my evidence was just too compelling for them to ignore, but please feel free to use my case as precedent if the same thing happens to you: PayPal case number PP-001-585-575-355 (or just share the link to this post).
Digital sellers are not a small minority group any more. Digital sales is a massive and fast-growing sector, as books and CDs are replaced by ebooks and mp3 downloads, and self-publishing becomes ever-more prevalent. PayPal would do well to look after their digital sellers; we’re making them a lot of money in commissions.
I hope that my victory this week is a sign of better things to come…
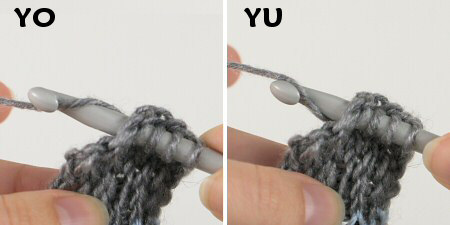
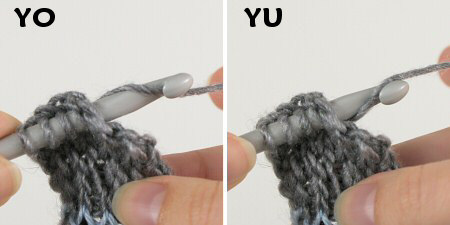
If you crochet, the humble yarn over (YO, or ‘yarn over hook’, YOH, in UK terminology) is a vital part of every single crochet stitch. But are you doing it correctly? There’s actually a right and a wrong way to wrap the yarn over your hook in crochet, and it’s such a basic move that you may have been doing it wrongly for years without realising!
Let’s look at the difference:
With a normal crochet YO, you place the hook underneath the yarn strand and then hook the yarn from below.
With a yarn under (YU), you put the hook over the yarn strand and then hook the yarn from above.
Here’s how they look, if you’re right-handed:
And if you’re left-handed:
I think the confusion may lie in the name yarn over. In crochet, you don’t really wrap the yarn over your hook at all: you use the hook to catch the yarn, so the phrase “yarn over (hook)” would be more accurately named “hook under (yarn)”…
I’ve put together a video to help clarify this – the first in my new Crochet Quickies series of short (around 1 minute) videos to explain very basic or brief crochet techniques. (I’ll still be making longer videos too, for techniques that would benefit from a little more explanation.)
Note: The videos may look a little small embedded in the blog: if so, you can fullscreen them or click through to YouTube to watch them in full HD resolution 🙂
If you are crocheting – and this applies to all standard and Tunisian crochet stitches – passing the yarn over the hook is always the correct way to do a YO.
If you’re not sure which way you do it, grab some yarn and a hook. Pause when you’ve hooked a loop of yarn, just before you draw it up through the stitch, and see which way the yarn lies across your hook, using the photos or videos above for reference – you may discover you’ve been crocheting incorrectly! To try to tell if you’re doing it right in future, remember it’s called yarn over, so the yarn goes over the hook, i.e. the hook should pass under the yarn before you hook the yarn.
Exception
Now here’s the exception, and one I’ve experienced first-hand: this does not necessarily apply for knooking (knitting with a special crochet hook – see my review of The Knook for more information). With knooking, the way that you position the yarn across your hook varies depending on whether you’re knitting or purling. When I first tried knooking, I used a standard YO for all my stitches and they ended up twisted. Why this difference? Because knooking, despite using a crochet hook, is not crochet, it’s knitting with an unusual technique.
There may be other exceptions that require you to wrap the yarn in a different way, but the stitch instructions should always inform you if that’s the case. If all you see is “yarn over” or “YO”, the standard way is the correct way.
Does it really matter?
Yes and no! The difference is more visible with some crochet stitches than with others. For knooking and Tunisian knit stitch, it’s extremely important to use the intended YO/YU. For other crochet stitches, there is a difference in the finished appearance, but it may be much less obvious.
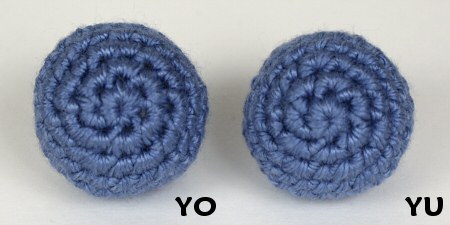
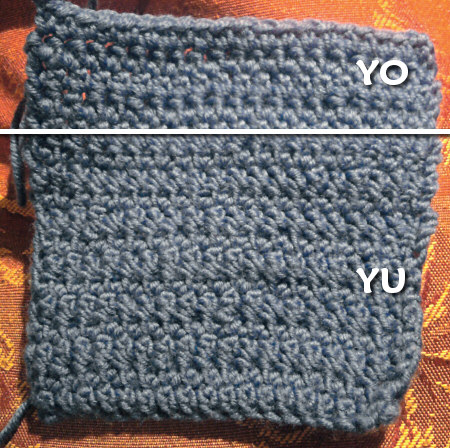
Simone from my Ravelry group worked up a test swatch in rows of sc, which shows a clear difference between the rows of YO and the rows of YU:
Rows of YO and YU (swatch and photo by Simone, used with permission)
You can see that there’s a definite slant/twist to the YU stitches compared with the YO stitches, and each YO stitch is more clearly defined – the YU stitches seem to blend more into a flatter finished surface. They both look attractive, but they are clearly not the same.
YU in amigurumi
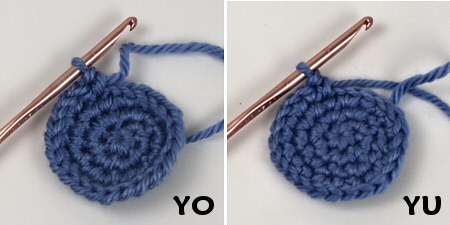
I thought it’d be interesting to see what, if any, difference you’d see if you worked amigurumi (single crochet, worked in the round without turning) with YU, so I made two small amigurumi balls, worked identically except for the YOs or YUs throughout.
Almost immediately, I noticed something unexpected: a flat circle is actually flatter when worked in YU! Normally, the backs of all the stitches are larger than the fronts (because we aren’t turning the work between rounds), which makes a flat circle want to curl up slightly into a bowl shape, with the right side on the inside of the bowl. You can see that slight curling at the edge of my YO sample, but it’s missing from the YU sample! Very interesting…
Left: YO edges are curved up (the ‘v’s around the edge face upwards)
Right: YU edges are perfectly flat (the ‘v’s around the edge face outwards)
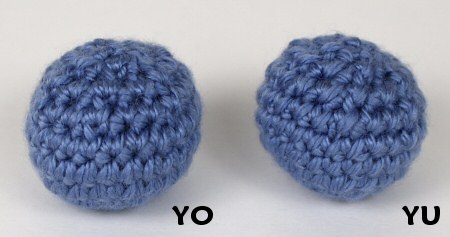
I found YO and YU equally easy to work, although of course I had to concentrate on every stitch with the YU sample to make sure I didn’t slip back into my usual automatic YO method. And now let’s look at the finished samples:
From the top (magic ring visible)
From the side (there are 2 rounds with no increases/decreases around the middle of each ball)
YO has more obvious texture, whereas YU is flatter. The twisting of the YU stitches seems to actually fill the gaps between the stitches better and each stitch is less clearly defined.
The twisting of the stitches is very subtle, but I can definitely see a diagonal slant visible within each YU stitch. The slant is more pronounced on the decreases – invisible decreases aren’t so invisible if you YU!
My YU sample is noticeably smaller. Although this could be a tension issue because of the unfamiliar YU hand movements, it could also contribute to the smaller gaps between stitches.
If your amigurumi stitches don’t look like other people’s, and you’re definitely not working inside out, this could be the reason!
Conclusion
The difference between YO and YU if you’re making amigurumi is slight, but it is noticeable if you’re looking for it. The difference can be more apparent with crochet stitches other than single crochet.
If you’ve just discovered that you’ve always worked in YU, I don’t think you necessarily need to change if you’re happy with the way you’ve been working. There’s no law that says you have to crochet in the same way as everyone else. You’re free to crochet in a non-standard fashion (unless you’re teaching crochet, or creating patterns, tutorials, or crocheted samples for patterns/books) – if you like the finished result, that’s all that matters.
I can confirm (from trying it in reverse) that it’s not easy to make the change, and you’ll probably need at least a few hours of heavy concentration before the different hand movements become natural, or maybe longer if you’ve been crocheting for many years. I would advise that you at least try working a small piece in YO, to try it out, and see how it feels and how the finished piece looks – you may find that you prefer it.
Whichever method you choose, the most important thing is to be consistent, and not switch between the two methods. It’ll only look like you’ve made a mistake if you suddenly switch from one to the other within a piece, which will make some of your stitches look different from others. But if you’d like your stitches to look like everyone else’s, YO is the way to go!
Do you find my tutorials helpful? If so, please consider making a contribution towards my time so I can continue to create clear and concise tutorials for you:
Thank you so much for your support! Now click below for loads more crochet video and photo tutorials (and do let me know what else you’d like me to cover in future tutorials…)
2012 is treating me well so far – I hope it’s going well for you too! I loved my holiday, but I’m enjoying getting back down to work just as much 🙂
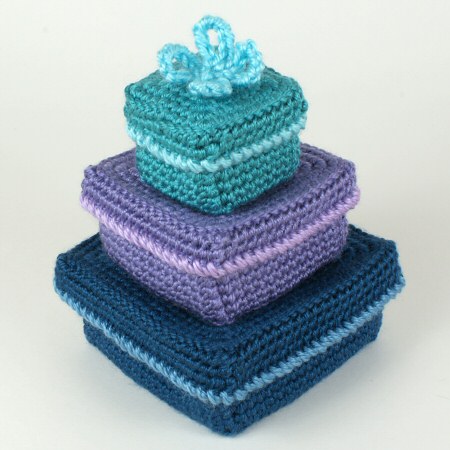
Review and Win contest
December’s ‘Review and Win’ winner is Rianne d, with her Gift Boxes review:
I’m really happy with this pattern, it does exactly what the description says; it’s like magic how the box really stays square instead of rounding up like most one-piece in-the-round cubes! The instructions are easy to follow and all the special stitches are explained really well with a nice photo tutorial, I had no trouble at all with making the corners. And the end result looks pretty, of course. 😀
Congrats Rianne – I’ll email you to find out which pattern you’d like as your prize 🙂
To be entered into this month’s draw for a free pattern of your choice, just write a review of any product in my shop – thank you!
After my month-long designing hiatus I feel newly inspired. I’m midway through an exciting, ambitious design to be released later this month, if all goes to plan. It’s great to get back to crocheting after such a long (although much needed) break, and I’m looking forward to having new designs and tutorials to share with you soon! Watch this space…
Or simply click through from my links before you shop at Amazon, Etsy, KnitPicks, LoveCrafts or Crochet.com, and I'll make a small commission on your purchase, at no cost to you! Start here: