PlanetJune Craft Blog

Latest news and updates from June

Archive for July, 2011

Shop update: eyes, tools and accessories

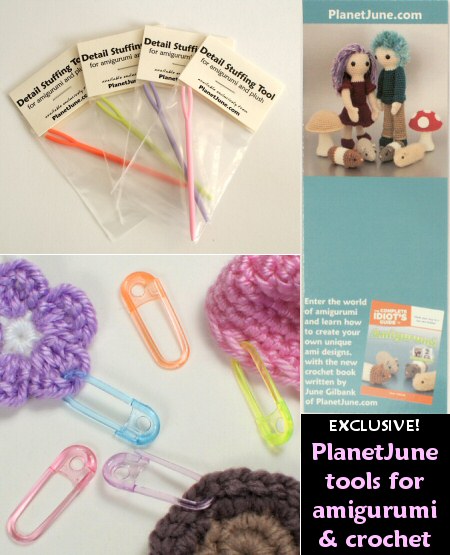
Good news: my shop has re-opened for sales of PlanetJune-exclusive products! I know some of you have been waiting (im)patiently for the all-important Detail Stuffing Tools and my cute and practical Stitch Markers for crochet to be available again, and now they are.

PlanetJune exclusive tools for amigurumi and crochet

When you order, you can also request a FREE signed PlanetJune bookmark to keep with your copy of my Complete Idiot’s Guide to Amigurumi – it’s almost as good as getting your copy signed, and a lot less expensive than mailing it to me in South Africa so I can add my signature 😉 (Note: you can also order the free bookmark alone, and just pay for the shipping.)

Eyes for amigurumi

Did you know that many of the eyes you can buy on Etsy and at other online stores are of inferior quality? Up close, the plastic looks cheap and shiny, there are little plastic burrs where the eyes haven’t been moulded smoothly, and the washers are next-to impossible to attach. It’s difficult to tell this from product photos online, but if you compare the actual eyes side by side, the differences are horribly obvious.

I’ve always sold only the highest quality eyes at PlanetJune, and I refuse to compromise that and to jeopardise the trust I’ve built with my customers. This has been a very difficult decision to make, but due to logistical difficulties I’ve decided to stop selling eyes and noses. Don’t worry though, I won’t leave you hanging: Michelle of Suncatcher Eyes has agreed to look after you for me!

Suncatcher Craft Eyes

In addition to her beautiful handpainted eyes, Michelle now carries a full range of black and clear animal eyes for your amigurumi. These are the same high quality eyes you’ve bought from PlanetJune. Like me, Michelle prioritises quality and customer service, and Suncatcher Eyes ship worldwide (with very reasonable shipping costs).

Getting Focused

PlanetJune is a one-woman show: I am the pattern designer, writer, publisher, layout and graphics designer, technical editor, photographer, technical illustrator, web developer, accountant, administrator, and envelope stuffer. I set very high standards for myself and for my business, but there are only so many hours in the day and I have to prioritise firstly my health (I’m still suffering with my damaged ribs) and secondly the directions I’d like to concentrate in for my business.

I’m no good to anyone if I push myself so hard that I burn out. Making this decision means I’ll have more time to concentrate on my designs and tutorials, my technical editing services, and my exclusive products. This hasn’t been an easy decision to make, but I can already feel that it was the right one. I just hope that you, my wonderful customers, don’t feel let down, but I know I’m leaving you in safe hands with Michelle.

Thanks for your understanding!

Comments (7)

AmiDogs Basset Hound crochet pattern

Before I do anything else, I want to thank you for all the comments on my amigurumi Columbo post – what an amazing reaction! I guess I’m not the only Columbo fan out there…

amigurumi Columbo by PlanetJune

I was really nervous about showing him to you: I always get a bit nervous before publishing something new, but it’s so much more scary to publish an ‘art’ project that I’ve invested a huge amount of time and love into. I only have time to create one art piece per year, so I choose subjects that make me happy, and they feel very personal to me. I don’t kid myself that I’m the world’s most talented artist; there’s nothing deep and meaningful about my creations, but if my work brightens your day for just a moment, that’s good enough for me. So your lovely comments really do mean a lot to me – thank you 🙂

AmiDogs Basset Hound amigurumi crochet pattern by PlanetJune

Okay, back to the pattern! If you like Columbo, or loveable hound dogs, you might want to crochet a Basset Hound of your own – and how could you resist those mournful eyes and long floppy ears? AmiDogs Basset Hound is the 19th breed in my AmiDogs pattern collection:

AmiDogs Basset Hound amigurumi crochet pattern by PlanetJune

As you can see, my handpainted blue sky backdrop luckily survived the trip from Canada and is back in action, which means I’ve also finally been able to photograph AmiDogs Set 6 (Akita, Greyhound [or Whippet] and Border Collie).

AmiDogs Set 6 (Akita, Greyhound/Whippet, Border Collie) amigurumi crochet patterns by PlanetJune

(In case you’re wondering, there’s really nothing linking the three breeds of Set 6 together; they were all commissioned designs. I only make the numbered sets for my Etsy store these days – almost all of my PlanetJune customers take advantage of my AmiDogs Custom Set offer and mix and match any 3 of my AmiDogs breeds for the same price as the pre-selected sets.)

Here are the other 18 AmiDogs breeds:


So if you’d like to buy the new Basset Hound pattern, you might want to also pick up a couple more AmiDogs as a custom set of three and take advantage of the savings…

Comments (12)

amigurumi Lt Columbo & Dog

Columbo has always been my favourite TV detective. I love how the show turned the detective genre on its head by showing the murder at the start, so you never had to guess whodunnit as you watched (something I never manage with my other favourite detective, Poirot), and how dishevelled, disarming Columbo always got the better of the arrogant, affluent murderers. I have all the box sets on DVD and still think that watching Columbo makes for a perfect cosy Sunday afternoon at home.

When I heard that Peter Falk had passed away I decided to make an amigurumi Columbo as a tribute to all the years of brilliance he brought to his most famous role. And here it is:

amigurumi Columbo by PlanetJune
Please click through to see the larger version!

I used the Boy pattern from my own book, The Complete Idiot’s Guide to Amigurumi. If you’ve seen my book, you’ll know that I made my Boy and Girl patterns fairly generic so it’s easy to customize and embellish them (using the techniques I explain throughout the book) to create any character. For ami-Columbo, I shortened the legs and added a belt, shirt collar and tie. I made the arms thinner so that the raincoat would fit over the top, I changed the hair, and I added the cigar. Apart from that, ami-Columbo is worked exactly as the Boy pattern.

“Excuse me, sir?”

amigurumi Lt Columbo by PlanetJune
Reproducing Columbo’s crumpled old raincoat took a long time of trying different hooks and stitch patterns until I found one that would give a flexible fabric without any lacey holes, so it wouldn’t hang too straight and perfect or look too ‘pretty’. I was going to make the raincoat fully removeable, but I decided that, as I wanted him to have jointed, poseable arms, I should work the arms (including raincoat sleeves) separately, and then attach them over the body of the raincoat. This way, the arms of the raincoat can move with his arms, so the fabric doesn’t bunch when I change his arm positions.

“Sorry to bother you, ma’am…”

amigurumi Columbo by PlanetJune
Ami-Columbo’s hair is crocheted from 2 strands of curly eyelash yarn worked together (the black yarn alone was too stark, and the brown too light) with a side parting, and shaping at the back. Even his ever-present cigar is crocheted!

“What did you pay for those shoes?”

amigurumi Columbo by PlanetJune
Of course, Columbo wears his scuffed old brown shoes, and, were you to peek under his trouser cuffs, he’s wearing black socks too.

“Alright, now stay! Don’t go running around. You see? This dog could be a lethal weapon; he’s already partly trained.”

amigurumi Dog from Columbo by PlanetJune
And how could I make Columbo without also crocheting Dog, his pet basset hound and sometime sidekick (talents: eating ice cream and staying in the car). By the way, if you’d like to make your own Dog, look out for my AmiDogs Basset Hound crochet pattern, coming next week…

UPDATE: AmiDogs Basset Hound crochet pattern is now available for purchase!

“Just one more thing…”

I did consider crocheting Columbo’s other great supporting character: his battered old Peugeot car. Then I calculated how large it would need to be, to be in scale with ami-Columbo… Peter Falk was 5’6″ (let’s say 5’8″ including shoes and hair); the Peugeot 403 was 176″ long. Ami-Columbo is 11″ tall, so at that scale, his car would have to be 28.5″ (72cm) long! I definitely don’t have enough time or yarn to make something that size, although it would have made for an amazing crocheted diorama 🙂

I hope you enjoyed my little tribute to Lieutenant Columbo and to Peter Falk – I hope he would have appreciated it! Please leave me a comment if you liked it…

UPDATE: I’m adding this due to the massive amount of requests I’ve received for Columbo commissions or a Columbo pattern. Thank you so much for your interest, but:

  • Please don’t ask me to make you a Columbo – I’m a busy designer and just don’t have the time to take commissions for finished pieces.
  • If you’d like to make your own amigurumi characters, you can use the Boy (or Girl) pattern from my book, The Complete Idiot’s Guide to Amigurumi, together with the customization and embellishment techniques I explain throughout the book, to create any character. That’s how I made my Ami-Columbo, so there is no pattern to replicate Columbo exactly (although, if you’d like to make one too, there are some notes on my customizations in the post above). Use my techniques and your creativity to customize my basic Boy/Girl patterns into any character you choose!

Comments (63)

review: The Knook

You may remember my knooking experiment from last year. Knooking (or knitting with a crochet hook) is a clever way to form real knitted stitches, by passing the live stitches onto a cord at the ‘wrong’ end of the crochet hook and then working back into them. The finished fabric is indistinguishable from a knitted fabric.

The main obstacle to knooking was the lack of proper equipment available. I used a locker hook, which worked well enough, but is only available in one size (approx G equivalent). The only other alternatives were to buy an expensive circular crochet hook set, or to hack a crochet hook into a knook yourself.

The Knook kit from LeisureArts

Now, finally, LeisureArts have come to the rescue with their new knooking kit, called simply The Knook. I should mention that LeisureArts kindly sent me a kit to review, but I’m not being compensated for this review in any other way, and the following is based on my honest opinions!

If you’d like to buy one, The Knook is currently available from Walmart stores. If you’re looking for it, don’t assume, as I did from the pictures online, that this is a full-sized book: the knook hooks are the same length as a standard crochet hook (about 6″/15cm), and the booklet is the same height, so you’ll have to keep your eyes peeled to find the kit (it should be located with the other knitting and crochet tools), as it’s fairly small.

UPDATE 20 Sep 2011: Great news! The Knook kit is now available for pre-order on Amazon, and will be released on October 1st 🙂

UPDATE 6 January 2012: Even better news: LeisureArts have now released more knooking books! Here’s what’s currently available:

  • The Knook kit (that’s what I’ve reviewed here; includes 3 knook hooks and basic instructions)
  • Learn to Knook (includes instructions for decreases and increases, finishing seams, changing colors, making cables, knitting in the round, and more)
  • Several knooking pattern books for hats and other items (although you can use any knitting patterns once you’ve learnt how to make the knitted stitches with your knook!).

The Equipment

The kit comes with 3 knooks, in sizes G/4mm, H/5mm, and I/5.5mm, and three coloured cords (there’s no difference between the cords except the colours, btw). The knooks themselves are made from bamboo, so they are very light and look quite stylish. There’s a slight depression for the thumbrest, which makes it more pleasant to hold than the locker hook I used for my previous knooking attempt. The hook tapers towards the bottom, to allow the doubled cord to pass through your stitches more easily, and the cords are smooth and shiny, which should make them ideal to slide through your stitches.

The ends of the cords are melted (so they won’t fray), and that rigidity made it slightly tricky to thread through the eye of the knook, but I found that by gently twisting the cord as I pushed, it slid through the eye easily enough.

The Book

The provided booklet includes step by step instructions for casting on and off, knit and purl stitches, and includes both right-handed and left-handed photos for every step (I heartily approve!). At the end of the book are 4 patterns (a scarf, washcloth, and two blankets.)

The Knook kit from LeisureArts

When I learnt to knook previously, I had obviously misunderstood something, because knitters looked at my Shaun the Sheep case and told me that my stitches were twisted. (I don’t mind – it still looks good!) I haven’t touched a knook since then and really don’t remember how to do it, so I can test these instructions as a beginner, and hopefully learn the correct method in the process…

The Instructions

I only had internet on my phone when I was testing the instructions, so I couldn’t access the accompanying YouTube videos. If you’re learning to knook, I suggest you use the videos in addition to the booklet to help you learn.

The Knook kit from LeisureArts

To knit, “insert the Knook from right to left into the first stitch”. What?! This motion felt entirely alien to me: it’s like working backwards (I’m left-handed), and the photo didn’t help. After watching the video later, I see that they inserted the hook under the cord too (not shown in the book), which is far easier than the clumsy way I did it to try to match the book’s photo – I had to hold the cord vertically (as you would a knitting needle) to get my hook into the stitch. So, watch the video too if you’re going to learn using this booklet; it really helps. After trying the video method, my knooking speed is now much faster.

first steps in knooking
My first steps: stitches picked up along the chain; stitches slid onto the cord; working back into the stitches

After a few rows of awkwardness, I moved onto the purl instructions. This was much easier than the knit stitch for me and I conquered it in no time.

I did a few rows in stockinette and then checked my swatch, only to find that I was twisting the stitches of every other row. I checked back with the book and noticed a very important highlighted box right at the beginning of the instructions:

If you already know how to crochet, please study the photos closely. From this point on, you will NOT be using the same yarn over typically used in crochet.

Oops… I read the instructions again and realised I’d been twisting the knit stitches by yarning over in my usual crochet way. I re-learned the knit stitch properly, then finished my swatch using the supplied bind-off method (although I had to do it twice because it didn’t mention that you have to bind off loosely and so my stitches ended up being too tight on my first attempt).

Using the Knooks

With my stitches down, I was ready to put the knooks and cords through their paces with a test project. The patterns in the booklet were all too large for impatient me (except the washcloth, which I knew I’d never use) so I decided to improvise. I used the H hook and teal Bernat Satin yarn to knook up a mug cosy of my own improvised design.

One of my knook hooks was slightly rough around the notch cut to make the hook shape, but I polished the bamboo smooth by rubbing it against my jeans so it wouldn’t catch on the yarn. (If you had a very rough knook tip, I’d recommend sanding it with fine sandpaper first.)

After smoothing, the knooks themselves worked very well – the non-hook end was far easier to pull through completed rows than the bulkier locker hook had been, and the silky cords slid through my stitches easily too.

knooked mug cozy

I completed my mug cozy in the time it took to watch a Lord of the Rings movie (so, 3 hours or so), and I’m happy with the result. It’s all knooked apart from the cord over the top of the mug handle, which I foundation single crocheted (still using the knook hook though – you can crochet with a knook too, of course). I expect I could make another mug cozy in about half the time now I’ve seen the video and know to knit by inserting my hook under the cord – live and learn!

Verdict

I highly recommend this kit for the knook hooks and cords. If you want to knook, this is definitely a worthwhile purchase and very inexpensive (people have reported paying around $7 for one at Walmart – well worth it). The booklet is useful too, and the inclusion of left-handed instruction earns it bonus points from me, although I’d recommend that you use the videos too (also available for left-handers). I found that the book photos are very useful to keep on hand as an instant reference for the yarn over directions (I had to check a few times to make sure I hadn’t reverted back to my crochet-style yarn overs, but it worked: no more twisted knit stitches for me).

The Knook kit gets a definite thumbs up from me.

What Next?

knooked Sampler Scarf from LeisureArtsOnce you have the equipment, the world is your knooking oyster! If you have any questions about knooking, I always recommend the Knooking group on Ravelry, which is full of knooking experts and newcomers alike.

LeisureArts are publishing more knooking patterns on their website, but I understand you can also knook (almost?) any knitting pattern.

On the LeisureArts site, I’m most excited about the Sampler Scarf pattern pictured to the right note: it’s free, but you do have to register and provide a billing address in order to download it. It includes instructions for combining (knooked) knitted sections with crocheted stitches, which isn’t as easy at it sounds, because crochet stitches are wider than knit stitches. The pattern has sections worked in Knit Check, Knit Diagonal Rib, Knit Basketweave, and Knit Pennant, with instructions for each, so that’s another 4 knooked stitch patterns I’m looking forward to trying out.

I’ll definitely be knooking more often now that I have a set of proper knooks! What do you think: are you tempted to try knitting the crochet way?

Comments (54)

Cape Town wildlife II

This is the second post in my monthly series on the fascinating nature I encounter here in South Africa.

Fair warning: if you hate all insects and reptiles, you might want to close this window and not read the rest of my post.

Although I already have some interesting birds lined up for my next post, I’m going to focus today on cold-blooded creatures I’ve spotted in my new garden. Don’t worry, there are no spiders or snakes in this post, I promise! But I’d like to share a few very cool and unusual creatures with you, if you’re up for it.

Ready to continue?

First up, something very exciting to me: geckos! Of course, I have a crocheted one already, but that’s not the same as this:

left-toed gecko
I think this is a Marbled Leaf-toed Gecko. They are very small; only about 3 or 4 inches long. We have at least 3 of them (and probably more) living at the bottom of our garden. They eat lots of small insects, so I’m very happy to have them around! This one is a bit camouflaged hiding amongst the fallen leaves in the above photo, but it’s the best I’ve been able to get so far – they usually scuttle for cover before I can get into range, so we hear them more than we see them.

And next… you won’t believe this one…

praying mantis

A Praying Mantis!! Amazing! (She’s on the outside of the window, by the way, or I might be a little less excited and a little more freaked out.) She’s quite small, as mantids go; only about 2 or 3 inches long, and she mostly just sits around on the palm fronds outside our window, like this:

praying mantis

One day we saw her devour, over several hours, a baby gecko almost as long as she is – that was fascinatingly horrifying to see, but we couldn’t stop checking back to see how much of the poor gecko was left. I did take a photo, but you mustn’t look unless you’re sure you want to… Sure? Okay, but don’t say I didn’t warn you: praying mantis eating.

And finally, when we first moved in, I wondered what these disgusting-looking blobs were up under the eaves of our roof:

garden acraea chrysalises

The answer is quite magical: it turns out we have a butterfly pupation station on one wall of our house! These spiky-looking Garden Acraea (acraea horta) caterpillars (below, left) climb up the wall to the safety of the eaves, where they pupate and develop a patterned chrysalis (below, right) while they undergo their metamorphosis:

garden acraea caterpillar and chrysalis

After a time, they abandon their cocoons and emerge as beautiful butterflies:

garden acraea butterfly

Apparently these Garden Acraea are one of the most common butterflies in Cape Town, but that doesn’t make it any less special for me to be able to watch their transformation in my own garden! In the photo below, you can see that their top wings are transparent and only the lower set have the spotted patterning – cool, huh? On my to do list: find a native butterfly-friendly plant so we can encourage more pretty butterflies to visit.

garden acraea butterfly

I hope this post hasn’t made you too squeamish! I just thought these wild visitors to my garden were too interesting to ignore. I’ll be back to the pretty warm-blooded animals and birds for my next wildlife report, I promise 🙂

Comments (11)

inspiration/influence vs copying: drawing the line

This isn’t the post I wanted to write today, but thanks to recent events, I’d like to discuss the difference between inspiration/influence and copying when creating designs (I’m talking specifically about my crochet patterns, but the same applies to any designer in any field, whether they produce patterns or sell finished items based on their designs).

Many times in my almost 5 years as an amigurumi designer, I’ve experienced other ‘designers’ copying my designs and selling the resulting patterns. I’m not talking about the outright theft where a person buys a pattern, copies it, and then sells it as their own work: my experience is a less obvious, less tangible theft, where people look at my photos and replicate my design without ever having seen the pattern.

For those designers, I’m giving you the benefit of the doubt by assuming that you may not yet realise you’ve done anything wrong, and I hope that this blog post will help to clarify the distinction between inspiration/influence (acceptable) and copying (not acceptable).

My design process

To start, I’ll talk you through the design process of one of my most distinctive designs: my Pteranodon (a type of Pterosaur). I spent many hours doing research before I could begin to create my design:
(Image attribution: all images below are links to the sites I found them on.)

  1. I read up all about Pterosaurs and viewed photos of skeletons and pictures of artist’s renditions.
  2. I looked at commercially-produced Pteranodon/Pterosaur/Pterodactyl toys, both plush and plastic/rubber type.
  3. I looked for existing knit and crochet Pterosaur patterns, so I could make sure my design would be original.
  4. I checked to see if there are any Pterosaurs in popular culture (books, movies, TV shows, etc) that may influence people’s perceptions.
  5. Now, armed with all my research, I could begin my design process. I figured out what, to me, are the essential characteristics for my design, and what I could omit and still have it be recognisably a Pteranodon.
  6. I interpreted those features to create shapes and an overall look that would fit in with my ‘PlanetJune’ style.
  7. I worked out elegant methods to build those features into an amigurumi design.
  8. I created a sketch of what I envisioned my final Pteranodon would look like.

amigurumi pteranodon: from sketch to design

Finally, after going through all those steps, I could pick up my crochet hook and begin to crochet my sample and to create my pattern. As you can see from my sketch (sorry about the quality, it was never intended for anyone other than me to see!), 90% of the design was created before I ever picked up a hook – I just refined the proportions while I was crocheting to make it more elegant.

Two Scenarios (Designers A and B)

Now, let’s say that a couple of fellow designers (for the sake of simplicity in writing I’ll assume both are female) see my dinosaur patterns and are inspired to create their own.
Is this acceptable? YES, of course. I am not the first person to crochet a dinosaur, and I wouldn’t want to be the last.

Designer A does some research of her own and creates her own interpretation of a Pterosaur in her own design style. Maybe it’s crocheted in more than one colour; maybe it has an open beak; maybe it has legs; maybe its proportions are more realistic (or more cute’n’cuddly) than mine; maybe it has embroidered detail or crocheted textures; maybe it has felt accessories glued on; maybe it has big cartoon eyes, or any of a million other differences that make it her own design. Yes, it’s a Pterosaur, but it’s clearly a ‘Designer A Pterosaur’ – it fits in with the style of her other designs, and naturally any resemblance to mine will be based on the fact that we both used a real animal as our inspiration. Designer A decides to sell her Pterosaur pattern.
Is this acceptable? YES, unquestionably. I’m happy if I can inspire another designer in this way.

Designer B looks at my Pterosaur, figures out what crochet shapes and stitches she would need to replicate it, and makes a close copy of her own.
Is this acceptable? Let’s say MAYBE. I’m not thrilled, but if people have the talent to replicate my work without purchasing my pattern, for their own personal use, I can’t stop them. It happens. I’ll survive. Those people would never have bought my pattern anyway, so I’m not out of any money as a result.

Designer B now decides to sell the pattern for ‘her’ Pterosaur.
Is this acceptable? NO, absolutely not.

What’s the distinction between A and B selling their pattern? Let me explain:

  • Designer B has copied my design. No, she hasn’t copied my pattern, but those design elements that I created in my research and development process listed above produced a design that is my artistic creation and my intellectual property; it’s my interpretation of a Pterosaur. She has directly copied that without going through any of the work I went through to create it in the first place. If you show a picture of my Pterosaur to anyone who is familiar with the field of amigurumi, they’ll know it’s mine and will recognise my style.
  • Designer B is harming my income. By replicating my design style, she has cut into my market: anyone who wanted to buy a pattern for a Pterosaur and likes my style now has two choices for who to buy from. If she decides to sell at a lower price point, how many unwitting Etsy customers will choose my pattern over an almost-identical cheaper version? Designer A’s Pterosaur does not harm my income: a customer will either like my style or hers, or both, and will buy the one they like best, or both. But nobody would choose to buy two patterns for practically the same design.

I’d like to make it clear that although events of this week have precipitated this post (and thank you to everyone who notified me of the copying in question), my intent is not to single out any one person – I’ve experienced copycats for years now, but I’m intentionally not showing any specific examples. It is possible that some cases of ‘Designer B’ that I have experienced are purely coincidental, but the more identical design elements that exist between the two patterns, the less likely it is that we reached the same point independently.

In Conclusion…

Recreating an existing design serves only one person: the person who has recreated it. Pattern buyers gain nothing from the addition of a second copy of the design, and the original designer only loses by the existence of the copy. If you’re looking to build a career (or even a hobby business), then getting yourself known as a copycat is not the best long-term strategy.

If you instead put the effort into creating your own style and your own original designs, you can build a loyal following and, in time, become known and respected as an artist and a designer. It’s not the easiest path, but it is, ultimately, the most rewarding.

Comments (40)

book review: Crochet Compendium

Let’s get this out of the way first: I was given a copy of this book to review. But I’m not being compensated for this review in any other way, and the following is based on my honest opinions!

Overview

Annie’s Attic say, about their new book Crochet Compendium: The Ultimate Collection of Crochet Techniques:

We’ve combined our best-selling technique books into the ultimate reference book of crochet techniques – great for newcomers and expert crocheters too!


Crochet Compendium front and back covers

While I’m not sure that this is the ultimate reference book (it’s hard to imagine any book that could cover every crochet technique, and especially one with less than 140 pages!), what this book does include is a collection of a variety of lesser-known crochet techniques, some of which, I was happy to see, were brand new to me.

Each technique is covered with between 1 and 10 pages of illustrated instructions, followed by one or two projects using the technique. In all, this book includes 16 techniques (plus the ubiquitous crochet basics) and 20 projects. It provides an overview of many crochet techniques that you may not be familiar with, including:

  • beaded crochet
  • broomstick lace
  • doilies
  • double-ended crochet
  • felting, filet crochet
  • crocheting with fleece
  • mosaic crochet
  • hairpin lace
  • intarsia
  • slip-stitch crochet
  • crocheting socks
  • symbol crochet
  • Tunisian crochet
  • waffle-weave
  • wiggly crochet

Annie’s Attic previously published each of these techniques as separate booklets, and in this book you get all the instructions from those booklets (but fewer patterns for each than if you bought the individual booklets), so it’s a very good deal if you’re interested in learning new techniques – you get a lot of value for money here.


Part of the extensive hairpin lace instructions

Tucked away at the very end of the book, there’s a 31-page section on crochet basics, which seems like a strange place to hide it, as it’s not referenced anywhere else in the book. Most of this is the general “how to sc”, “how to dc” etc, but the final few pages include tables of standard abbreviations, metric conversions and international hook size conversions (and knitting needles too – oops!), skill levels, and yarn weights – this is actually useful reference information to keep handy, as now I won’t need to keep looking it up at yarnstandards.com! The final page is a one-page stitch guide covering abbreviations (again), international stitch conversions, and basic stitch instructions (again), but it’s in a nice single-page format.

The various techniques require and provide differing amounts of well-illustrated instruction before jumping into the project(s): crochet with fleece, for example, needs no more than a page on how to cut and join fleece strips to make your ‘yarn’, while hairpin lace includes 10 pages of braid variations and methods for joining them together.

My Experience

For my review, I thought I’d trying jumping in as a beginner to see how I’d cope with a totally new (to me) technique: Mosaic Crochet. I started out like a good little student, by reading the 4 pages of provided instructions. It seems very thorough, but I wasn’t at all clear what the fabric would look like: there are no photos of the wrong side of the fabric in either the technique or project instructions. I assumed (as the provided project is a scarf) that this technique produces a double-sided fabric – it would be strange to have a scarf that you have to keep flipping over to make sure that only the ‘right’ side shows! – but I thought from what I’d read that there would be strands of chains visible on the back of the project… What would that look like? Why hasn’t the book shown me, so I can tell if I’m doing it right..?!

Clearly, I was overthinking: time to jump in and start the project so I could see how it really works! I decided to make a swatch sized such that I could turn it into a slip case for my lifeline (aka my BlackBerry). I chose two blackberry-ish shades of Patons Grace and a C hook. I followed the ‘charts with repeats’ sample on p50-51, using 2 repeats instead of 3 to fit the width of my BlackBerry.


The pattern I followed for my sample

Mosaic crochet is not a simple technique to learn. The chart looks very easy to follow, but each square represents two rows, not one, and you have to either sc, dc, or chain into/over each stitch, depending on both the colour of the stitch and the colour of the stitch in the row below – so there’s a lot to get your head around. Luckily, the sample includes both the chart and row by row written instructions, so you can check you’ve understood the ‘rules’ when interpreting the chart.

By Row 5, I was starting to think I’d got the hang of it, but then the written instructions disagreed with what I understood from the chart. I followed my instincts and went with my interpretation of the chart, and it turns out that the written instructions were wrong (it said “sc in each of next 6 sts” instead of “dc, sc in next 4 st, dc”). After that, I figured I had the technique down and followed the chart up to the top (Row 14), ignoring the text. Luckily I checked the text again as I finished my first repeat – it turns out that none of the included charts include any rows that are all one solid colour (Rows 15-16 in this case), so you do have to follow the written pattern instructions as well as the chart.


Finished sample (right side)

I had the technique and the stitch pattern figured out by this point, and so I could complete the case without any more problems. (To make my sample rectangle into a case, I just folded the top down by a small amount and the bottom up to meet it, and then single crocheted the front and back together along each side.)


My BlackBerry case

I’m really happy to have learnt the technique (although I do feel that I could have explained it more clearly than these instructions did). The result looks really cool, don’t you think? I love the patterning. And FYI, the reverse side looks like this (below): not the same as the front, but the chains look like slight wavy bumps against the stripes, so it forms its own interesting pattern.


Mosaic crochet (wrong side)

Peeves

In my cursory glance through the book, I did spot a couple of other errors (e.g. the double-ended crochet instructions had two photos showing the first vertical bar, where one should have shown the first horizontal bar). This was surprising as the book is excerpted from other, previously-published books, so I’d have thought the instructions would have gone through 2 technical editing processes and be super-accurate as a result. [If any publishers are reading this, I’m a qualified and thorough technical editor and an experienced crocheter and I’d love to improve your crochet books for you!]

This book feels disjointed – it is a compilation, and that’s very obvious: the style is varied throughout (colour or black and white photography and/or dimensional or flat illustrations), and no chapter references any other. In some cases one chapter even contradicts another, e.g. US slip stitch is given as equivalent to UK slip stitch (p86) and to UK single crochet (p134). In practice, though, you probably wouldn’t even notice these inconsistencies, as you’d only be working with one technique/chapter at a time. The wealth of information included here definitely makes up for the lack of cohesion.

Final Thoughts

If you view Crochet Compendium as a collection of booklets in one convenient binding, you won’t be disappointed. I really enjoyed browsing the variety of lesser-known techniques that are included, and I’ll definitely return to this book in future; I can tell that it’s going to be a useful title to add to my reference collection.

For non-crocheters, I wouldn’t recommend this as your learn-to-crochet book, as the crochet basics section is instruction only: there are no basic projects to practice on. But if you’ve conquered amigurumi and granny squares and are wondering where to go from here, Crochet Compendium: The Ultimate Collection of Crochet Techniques would be a great book to whet your appetite for some very interesting crochet techniques – I’m sure you’ll find something that’s new to you inside!

Comments (7)

how to make a seamless join in amigurumi

Link easily to this tutorial in your patterns: www.planetjune.com/join

After winning the 2011 Flamie Award for Best Crochet Video (Amateur), I feel a little pressure to make my next videos even better, to live up to that honour, especially as I only started the channel last year and have very few videos as yet. So, from now on, my crochet tutorial videos will all be in HD quality, and I hope you’ll be able to see my demonstrations even more clearly. My first HD video is below; I hope you’ll leave me a comment if you liked it!

Amigurumi Seamless Join

Stitching the pieces of an amigurumi together has always been my least favourite part of making amigurumi, as it’s so time-consuming – you have to be extremely neat and careful to stop your stitches from showing and spoiling the look of the ami. That irk led me to develop and refine this new method that will easily create a practically seamless join between your pieces.

amigurumi seamless join by planetjune

My Amigurumi Seamless Join technique allows you to create an almost invisible join in amigurumi when you stitch an open-ended piece to a closed piece. This is the type of join you’ll use for almost all amigurumi joining, for example: joining a muzzle and ears to a head; or joining a head, legs, and a tail to a body. (The only time you can’t use this method is when a pattern calls for you to join two open pieces together; in that case, whipstitching makes the best join.)

I hope you’ll watch the video and then give my Seamless Join method a try on your next amigurumi: I guarantee that your joins will look smoother and neater, with much less time and effort on your part.

Amigurumi Seamless Join (right-handed)

Click to watch this video on YouTube.

Amigurumi Seamless Join (left-handed)

Click to watch this video on YouTube.

Note: The videos may look a little small embedded in the blog: if so, you can fullscreen them or click through to YouTube to watch them full-sized 🙂

If you enjoy my crochet tutorial videos, please help to spread the word about them, and/or subscribe to the PlanetJune YouTube channel.

crocheted dinosaurs by planetjune

And, in case you missed my announcement last week, the crochet pattern for the Dimetrodon dino featured in this video is now available in my shop, both individually, and as part of my new pattern set: Dinosaurs Set 3.


Do you find my tutorials helpful? If so, please consider making a contribution towards my time so I can continue to create clear and concise tutorials for you:

Thank you so much for your support! Now click below for loads more crochet video and photo tutorials (and do let me know what else you’d like me to cover in future tutorials…)

See more helpful PlanetJune crochet tips and technique tutorials

Comments (37)

« Previous entries
  • Quick Links: Crochet

    navigation: arrow

    buy crochet patterns and accessories from my online store

    'Everyday Crochet' and 'The Essential Guide to Amigurumi' crochet books by June Gilbank

    Crochet video tutorials and step-by-step photo tutorials

    Free PlanetJune crochet patterns

    Frequently Asked Questions

    Quick Links: Crafts

    navigation: arrow

    Punchneedle Embroidery information, ebook & patterns

    Papercraft ebook & tutorials

    Free PlanetJune craft projects & tutorials

  • Blog Post Categories

  • Blog Archives

  • Welcome to PlanetJune!

    June Gilbank

    Hi, I'm June. Welcome to my world of nature-inspired crochet and crafting. I hope you enjoy your visit!

    If you'd like to get in touch, you can contact me here.
    crocheted Canadian flag by PlanetJune
  • A fanned-out pile of the books Everyday Crochet and The Essential Guide to Amigurumi, with text 'The answers to all your crochet questions at your fingertips - find out more'
  • Support PlanetJune!

    Want to say thanks? You can send me money in seconds at paypal.me/planetjune (over $20) or paypal.me/planetjune2 (under $20) or send me a donation through my shop.

    Or simply click through from my links before you shop at Amazon, Etsy, KnitPicks, LoveCrafts or Crochet.com, and I'll make a small commission on your purchase, at no cost to you! Start here:

    ♥ Support PlanetJune ♥

    Tip: This link is also in the footer of every page!

    Thank you so much for your support!