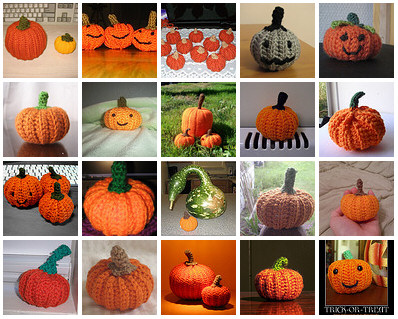
Happy Halloween! I thought I’d celebrate by showing off some of the wonderful pumpkins that ravelry and flickr users have made from my free Pumpkin crochet pattern:
Aren’t they cute? Credit for these pumpkin pics go to the following ravelers: Yorpy, ines-chan, Calophi, Taya, dr-evi, joliet, Jain, craftygamergrl, ohthatashley, suzette100, Annkari, arpelia, LilGrape, salohlee, leelersinc, ShayeDKnits, BekahJan, sunnydaze, zsyrinx, mickeygurl2. Great job, all!
This post was originally published on my old papercraft site, Folding Trees.
Tea bag folding is a paper craft that originated in Holland, where many tea bags come wrapped individually in paper packets. By cutting each bag down to a square, the bags can be folded and then combined into a geometric shape, just like in 2D modular origami. But don’t let the name ‘tea bag folding’ put you off – you can perform this craft with any small squares of coloured paper. The resulting medallions can be used to decorate handmade greeting cards, embellish your wrapped gifts, or you could try adding a hanging loop (glue the units together first!) to make an unusual Christmas decoration.
In this tutorial, to give you an idea of the techniques, I’ll demonstrate a simple fold pattern and its assembly into a medallion. I’ll also show you an interesting variant on the basic fold, and two ways to combine the variant units to make different medallions.
Introduction
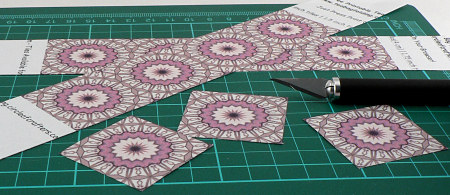
To give a more authentic result, your paper squares should be patterned, and each square should have the same pattern. There are many online resources that provide printable sheets of repeating patterns to cut into squares, and folddiagrams to produce different shapes; Google ‘tea bag folding’ to find more links.
Instructions
You will need 8 squares of paper per medallion. If you’re printing your tea bag papers, cut them into squares, otherwise assemble 8 squares of origami paper. You can use squares of any size; here I’ve used 1.5″ (3.8cm) squares:
Note: As with all origami, this works best if you strongly crease each fold. You can do this with a bone folder, or just by running your thumbnail along the crease of each fold before moving on to the next step.
Basic Unit
Glossary:
A mountain fold is made by folding the edges away from you (creating a mountain shape).
A valley fold is made by folding the edges towards you (creating a valley shape).
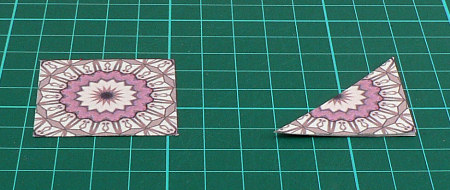
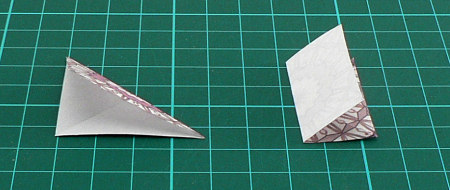
For each square, place it patterned side up (below, left). Mountain fold in half diagonally (below, right):
Open up and mountain fold along the other diagonal (below, left). Now valley fold the square in half (below, right):
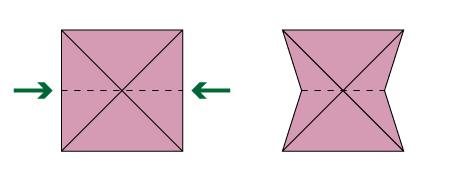
Open up again and, by pushing the edges of paper towards each other at the points marked by the arrows below, you’ll start to fold the square down into a triangle along the creases you’ve just made.
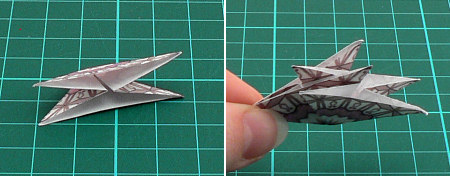
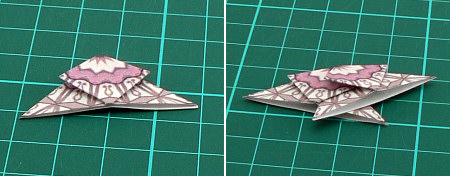
The basic fold is now complete (below, left). Take 2 of your triangles and slot them together so the points are interleaved (below, right):
Continue to add triangles to assemble the shape. They won’t stay together unless you glue them down; you can glue them as you go, or assemble them very carefully and then glue them all together at the end.
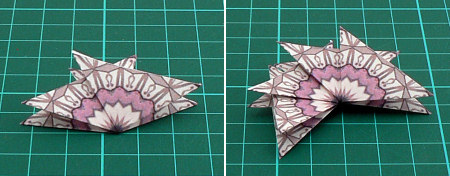
Here’s the completed basic medallion:
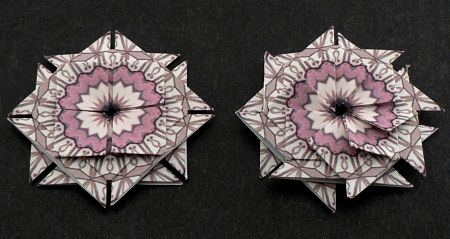
Variant
For a more interesting variant, when you’ve completed the basic unit, mountain fold each of the two front points of the triangle up to meet the top point. This will leave you with the triangle shape with a diamond shape on top. Interleave the units as before:
By varying the order of assembly, you can create different patterns. In the photo below, the medallion on the left is formed by interleaving one unit above, one unit below, around the circle. The medallion on the right is formed so each unit is half over and half under the neighbouring units:
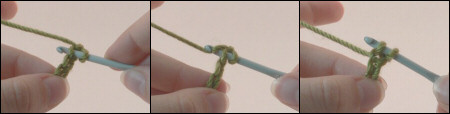
I wrote up these basic instructions as a teaching aid for my class last week. I’m sure there are others out there who would like to try crocheting some amigurumi but just don’t know the basic crochet stitches. Well, that’s no longer an obstacle with my clear step by step instructions to guide you through all the basics you need to get started.
Now you have no excuse not to try crochet… So find yourself a 3.5mm crochet hook and some worsted weight yarn, and you’ll soon see how simple and fun crocheting can be!
You probably get the idea by now from all my crochet designs that I’m an animal lover. This post isn’t crochet related, but it’s so lovely I had to share it.
A baby beluga whale has been born at the Vancouver Aquarium and the aquarium have installed a webcam pointed at the tank, so you can see the adorable sight of the mother beluga, Qila, and her baby swimming through the tank!
I’ve embedded the video feed below, but if it doesn’t work or you’d like more info, see the Vancouver Aquarium Beluga Cam.
UPDATED: The feed was slowing my site down to a crawl (oops!) so please click through to see the Vancouver Aquarium Beluga Cam. It’s worth a click!
Isn’t that a wonderful sight?!
If you see an adult beluga swimming past with no baby, don’t worry – that’s probably baby’s grandmother, Aurora. Keep watching, and Qila and her baby will come past shortly. (Oh, and Vancouver is on Pacific Time, so if the webcam is dark when you read this, it’s probably night time for the belugas, so please remember to take another look tomorrow – I promise it’s worth it!)
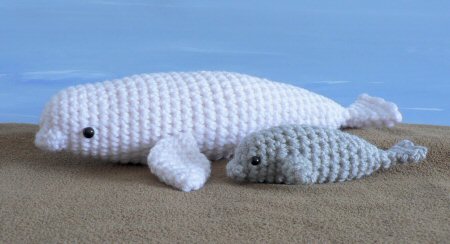
And don’t they look exactly like my AquaAmi Beluga Whales come to life? I’ve never had the opportunity to see a beluga whale in real life so this webcam is the next best thing for me. Thanks to the Vancouver Aquarium for making it possible for us to catch a rare glimpse of a baby beluga swimming with her mummy!
If I met you at the show yesterday, hello again, and welcome to PlanetJune.com! Don’t forget to check out my crochet tutorials if you need some help with techniques. I’ll be posting the Crochet Basics tutorials from my class notes up here in the next few days too.
I taught my crochet class yesterday at the Creativ Festival – my first experience of trying to teach more than one person at once. And it was a trial by fire: I had 20 students, and most had never crocheted before! Luckily I had prepared some step-by-step photo tutorials to show the basic crochet stitches, which helped a lot, as 20 people can’t all watch my hands at once as I demonstrate. My students were all lovely and very understanding as I ran around the room answering questions and helping where needed. It was a short class – only an hour and a half – so only a few students actually finished their toys in class, but I think by the end everyone understood the techniques well enough to complete their PocketAmi Bunny or Mouse toys (and they know to e-mail me if they have any difficulties)!
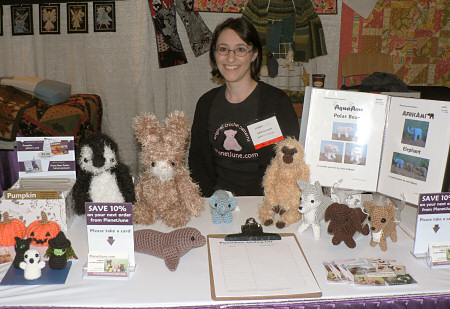
I spent the rest of the day at the A Needle Pulling Thread magazine booth (and Carla: thank you again for giving me this opportunity). My table looked similar to last time, but with some improvements (clipboard for mailing list sign-ups, business card holders, and cute postcard sets for sale). Here’s me at my display:
That white rectangle on my shirt is my super-large instructor’s badge
The seasonal corner (bottom left of pic) got a lot of attention. The pumpkins are the perfect size to fit in a hand, so everyone picked them up and gave them a squeeze! I’d sewn the three Halloween PocketAmi to a decorative cardboard base so they wouldn’t fall over or get lost, and that worked well.
Immediately after this photo was taken, just before the show opened to the public, my much-thicker-than-last-time portfolio/catalogue slid off its easel because it was too heavy to balance there. It turned out to be serendipitous though – laying the catalogue down flat on the table encouraged more people to flip through it. My new business card holders and signs did their job perfectly, and I gave out about 150 cards, so I’m hoping for some more business in the coming weeks.
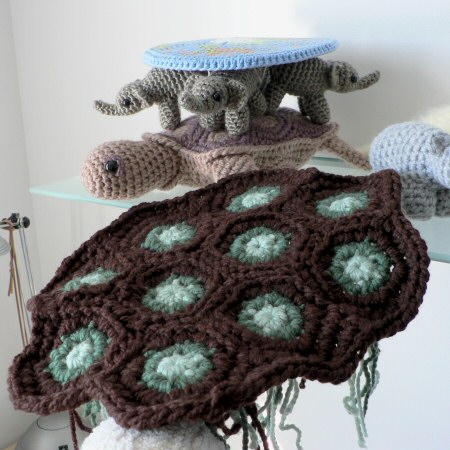
In the (rare) downtime at the booth, I started a new project. I’m doubling my bulky weight yarn and using a huge L hook to make a giant version of my sea turtle. I got as far as making the shell top yesterday. For comparison, here’s a pic of the shell top next to the original sea turtle:
It’s already about 12″ long and that’s without the shell edging or the head and tail, so that’s at least half as large again as the original turtle. I can’t wait to see what the finished giant turtle will look like!
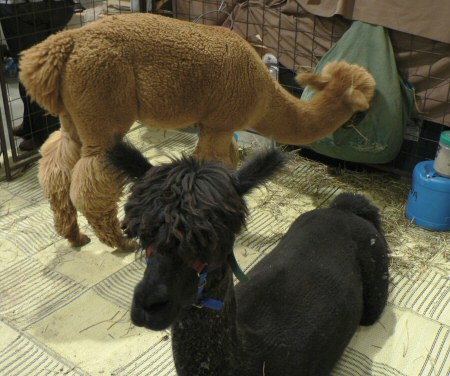
The one disappointment of the day was that I didn’t have a chance to check out all the other booths. There was a whole papercraft supplies area that I didn’t even see (missing out on some new inspiration for Folding Trees), and I’d hoped to get some more needlefelting supplies from the Bears and Bedtime booth. But I did get to meet some alpacas! They seemed unperturbed at spending a whole day in the busy convention centre:
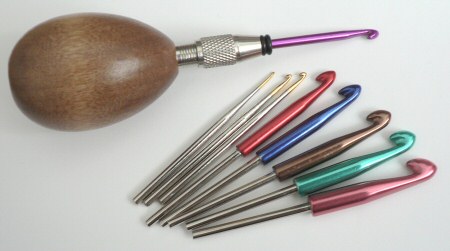
And I treated myself to a set of ergonomic crochet hooks from Eleggant Hooks. Long-time readers will know of my hand pain problems, so I’ll be very interested to see how these work out for me – I’ll report back when I’ve tested them out!
All told, it was a huge success for me, although it was a veeery long day including the drive from Waterloo to Toronto and back. But I’m very happy I went and got to meet so many great people, and I’m already wondering if I should apply to teach again at next spring’s show…
It’s nearly here! The Creativ Festival begins tomorrow (Friday), and I’ll be there on Saturday. I’ve been really busy assembling my display and my class supply kits and I’m still not quite ready… but I will be!
The show now even has a video trailer (sorry, it takes a while to load, so be prepared to wait for a minute):
I think it’s fair to say that this show is going to be amazing. If you don’t live near Toronto, don’t you wish you did? If I wasn’t going as an instructor (or should I say ‘industry expert’ 🙂 ), I would definitely be there to check out all those craft supply booths. Maybe I’ll be able to steal a few minutes to peruse the aisles…
And if you are going on Saturday, this is your last reminder: don’t forget to come and see me at the A Needle Pulling Thread booth – that’s booth #1005.
With the cold Canadian winter approaching, I thought it was about time I tried crocheting another wearable. I thought the Tweedle Dee Jacket (Crochet World magazine, August 2008) would be easy, but I just can’t stop myself from making modifications to anything I make…
This is the only pic I can find of the original jacket – sorry it’s not more representative! I googled and checked on ravelry, but it looks like I may be the only person in the world using this pattern…
I didn’t like the length of the jacket or sleeves (waist length and awkward-looking 7/8 sleeves – all too short) but I figured it would be easy enough to add a few rows to get the length right for me. I decided to modify the pattern as I go, to (hopefully) end up with a good fit.
I also substituted Bernat Softee Chunky Twists for the titular Tweedle Dee yarn. It’s a similar weight, softer, washable, and 1/3 of the price. I couldn’t quite get gauge without going up to an N hook, which produced a really holey, open fabric that I didn’t like, so I stuck with an L hook and prepared to fudge the numbers a bit for fit.
I crocheted the back and one side of the front, lengthening the bottom of each by 3″. The sleeve instructions gave me a hugely wide sleeve, so I threw out the pattern and improvised, using a shop-bought sweater as a guide to the sleeve width I needed. I tried stitching all the pieces together for fit, and I saw that the armhole was now 3″ too deep for my fitted sleeve. So I unravelled the top 1/3 of the front and back pieces and made the bottom of the armhole 3″ higher. (Have you spotted my mistake yet? No? Neither had I…)
Now happy with the way the sleeve fitted into the sleeve opening, I crocheted the other front piece and the second sleeve. I sewed it all together, crocheted on the collar, added the edging, wove in all the ends (I was on a roll), and tried it on:
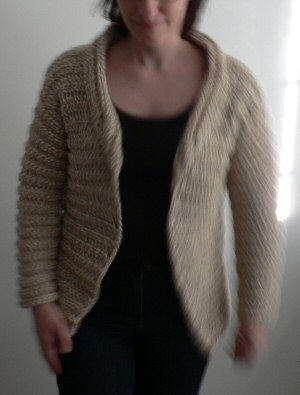
‘Artistically’ motion-blurred pic because I am too embarrassed to show it in focus
Oh. Somehow it was very very long and all stretched out over my hips – a horrible length for a pear-shape like me. It was about 3″ too long… Does that number sound familiar? Yes, only now did I see the mistake. Now, when it’s all finished apart from the buttons. *sigh*
I had added the extra length I wanted to the measurement below the armhole. Then I added another 3″ to that length when I raised the armhole, when I should actually have lowered the shoulder by the 3″ (which would also have been a lot simpler and required a lot less unravelling)! And to make it worse, the cardigan was worked bottom up, so removing length from the top would have been easy, but to remove length from the bottom? Not simple. Crochet can easy be unravelled from the top edge, but not from the starting edge.
What to do now? I didn’t want to start again… and I refused to give up when I was so close! So I figured out a way to remove rows from the starting edge. It’s actually not that difficult, but you have to be brave to do it. I discovered that you can snip through the row below the new bottom row, pull out each stitch in turn, and then pick up both loops at the bottom of each stitch in turn, to form a new sl st edging. You have to unravel the last couple of stitches though (not cut through them) to leave you a long ‘starting’ end to weave in – you don’t want all your work to come undone later!
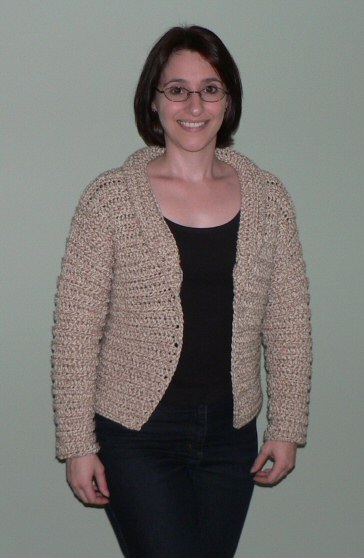
The fix worked like magic – you really can’t tell that there was ever a mistake. I’m much happier with the length now (still have to add those buttons at some point though):
By the way, it’s not really wonky along the side there – it’s just the angle in the pic
I’ve learned my lesson about modifying patterns – think carefully before you make any changes! It’s just like ‘measure twice, cut once’ in sewing.
I’ve decided that, as the sleeve that I designed myself is the most successful part of the cardigan, I’m going to try to make my next sweater without using a pattern at all… Am I ambitious or just crazy? I don’t know yet, but I like a challenge!
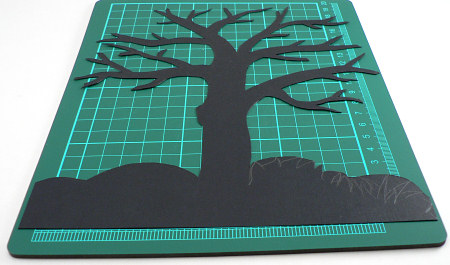
You may have noticed the black papercut trees I made for the background of my Halloween design photos. I was wondering if I could reuse them somehow to create a new tutorial for Folding Trees, and I came up with the idea of using a candle to create a large shadow silhouette of the tree on a wall. The trees I had cut before weren’t suitable as I had cut them as background pieces at the edge of the scene (so there was only half a tree in each case!), so I drew and cut a new complete tree from black cardstock for this project:
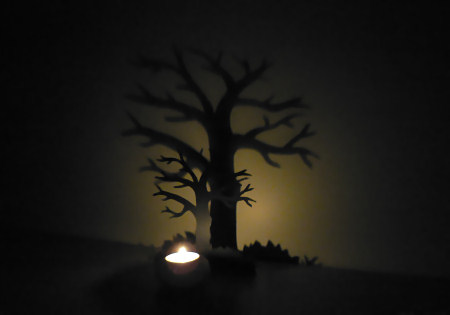
And here it is by the flickering light of a candle:
What a transformation! I’m so happy with how it turned out! My papercutting attempts are getting better each time I try it, and I’m finding it easier to do simple freehand drawing without a reference photo too.
Oh, and if you’d like to see the finished tutorial, you can now find it below!
This tutorial was originally published on my old papercraft site, Folding Trees.
Use the magical effect of candlelight to turn a papercut template:
…into a striking shadow decoration:
In the following tutorial I’ll show you how to make a stylish decoration like the one I made above, using only cardstock and a simple tealight candle…
I drew my tree freehand onto black cardstock. To draw a tree, you need to remember two basic things:
Tree branches are thicker at their bases
Side branches are usually offset from each other
Firstly, draw the trunk and a few main branches, then add thinner branches coming off the main branches. Keep adding branches and twigs until you like the overall shape and effect.
Easy option: If you’re not comfortable with drawing, you could use a stencil to trace a shape onto the cardstock, or print a shape directly onto your cardstock (the card doesn’t have to be black; it just has to be thick enough to cast a good shadow). I think the branches of my tree make for a very effective shadow shape, but you could keep it really simple: cut out the silhouette of a cat or a pumpkin and just cut holes for the eyes (and mouth for the pumpkin) to give you some easy Halloween decorations.
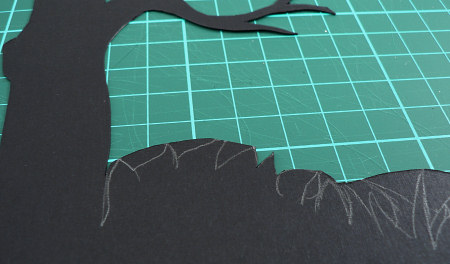
Remember to give your shape a wide base (grass/bushes in this example, but it could be a plain horizontal band) to help it to stand up securely. Carefully cut out your shape with a sharp knife, being careful not to chop off any of the details!
Papercutting tip: In the close up photo below, you can see how I cut out the overall shape (the rounded shape of the bush) before cutting the fine detail (the leaves). From this stage, it’s easy to cut out each small triangular shape. I find this method much easier and faster than trying to cut the whole outline in one step.
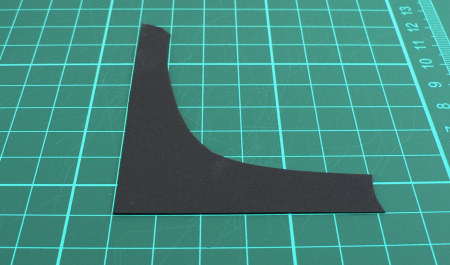
Make a stand for your template by cutting a modified L-shape or a right-angled triangle from some card. Make sure it is tall and wide enough to support your shape. I used a leftover corner of my piece of card to make this simple stand shape:
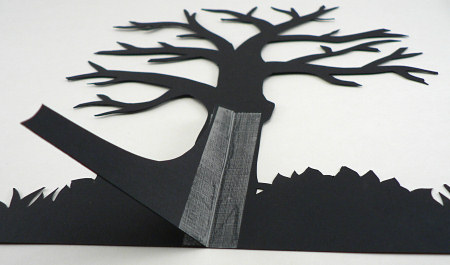
Position the stand so the bottom is level with the base of your design, and the vertical edge is in the middle of the design. If you still have visible pencil marks on your design, make sure that side is face up for this stage, so the pencil marks will be on the back of the finished decoration! Tape one side to the back of the template:
Flip the stand over, and tape the other side to the template.
Now when you stand the shape up, the stand should stick out behind it and keep it upright.
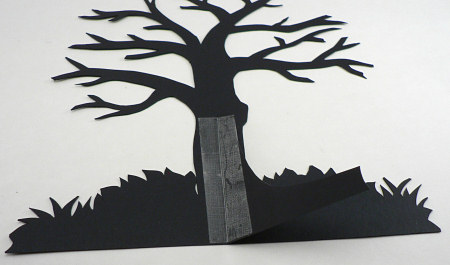
Here is the finished papercut tree:
Now stand your template up on a table close to a wall, but not touching it. Place a tealight in front of it, dim the lights, and watch out for the shadow on the wall! You can alter the size and definition of the shadow by moving the candle and/or the template towards or away from the wall.
CAUTION: Candle flames and paper are not safe playmates! Never leave a burning candle unattended, and make sure your paper template is secure and will not fall or bend forwards towards the candle flame. For maximum safety, use an LED tealight (although you may find that it is not bright enough to cast a strong shadow).
Or simply click through from my links before you shop at Amazon, Etsy, KnitPicks, LoveCrafts or Crochet.com, and I'll make a small commission on your purchase, at no cost to you! Start here:

 This is the only pic I can find of the original jacket – sorry it’s not more representative! I googled and checked on ravelry, but it looks like I may be the only person in the world using this pattern…