PlanetJune Craft Blog

Latest news and updates from June

Archive for October, 2006

diet coke cakes

I heard about this idea a while ago – making a low fat cake from a packet of cake mix by replacing the usual added ingredients (water, eggs, oil) with a can of diet carbonated beverage of choice. So tonight I tried it out for myself.

Ingredients:

  • 1 packet cake mix (I used Dr. Oetker Added Touch Chocolate Cake Mix)
  • 1 can diet cola (my preference is Diet Pepsi)

That’s it! Mix and bake for the time and temperature given on the cake mix packet. I used half the packet of cake mix and half a can of Diet Pepsi (so I wouldn’t waste as much if the recipe was a disaster) and it made 9 cupcakes (baked in a muffin pan pre-greased with spray oil). I baked them for 20 mins at 350°F (180°C) et voila:
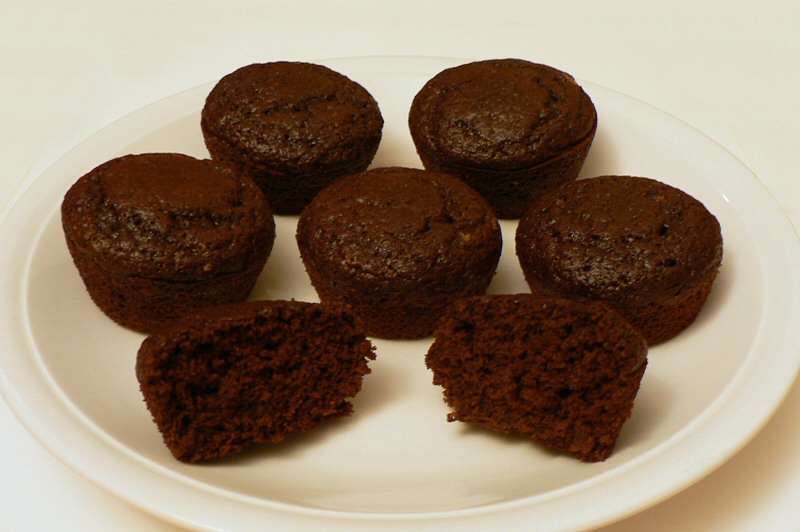
chocolate cake made from packet cake mix and diet cola
Mmm, cake…

I am pleasantly surprised: it looks just like regular cake and the texture is light and moist. The flavour is a little different from a regular chocolate cake, but it is GOOD. And considering that the finished cakes have 100 calories each and less than 1g of fat, it’s amazing.

You can use any flavour of cake mix and any flavour of diet soda – I think lemon or golden cake with diet 7-up would work well. And if you iced them they’d be even better.

Verdict: quick, easy, good value, yummy, AND not too sinful!

Comments (22)

the incredible shrinking plastic

I remember Shrinkydinks from when I was a kid, but only had a chance to try it once, at my cousins’ house. In case you haven’t heard of it, it’s a sheet of clear plastic that you draw on, cut into a shape and then put in the oven, where it rapidly shrinks to 1/3 the size. The picture you drew on it also shrinks down, giving you a detailed miniature image. I bought myself a pack from Michaels a few months ago, and finally had a chance to try it out this weekend. I have to say that Shrinkydinks are MAGICAL…

I rubber-stamped a bird image a few times, and coloured the images with regular coloured pencils. I also tried stamping my website logo. I bought a 1/8″ hole punch to make holes around the edges. Here’s the result (click for larger version):

bird shrinkydinks, rubber stamped, coloured and punched

The stamped image on the left came out too faintly. I’m happiest with the middle image because the coloured highlights I added really stand out. It looks like bright colours have the best effect. By the way, for scale, here’s the size of the original rubber stamp:

rubber stamp and shrinkydink plastic 

My website logo isn’t as pretty as the birds. You’re supposed to stamp/draw onto the rough side (the underside) of the plastic, but that means the image gets reversed when you turn it over to the smooth side, so anything with text has to use the rough side of the plastic as the finished side. So, out of interest, I tried stamping onto the smooth side of the plastic:

smudged stamp images on shrinkydinks

Yeah, not so good. 1) the ink doesn’t dry, and 2) even putting it in the oven doesn’t set it. I suppose the only way would be to stamp it, bake it carefully without smudging the ink, and then use a spray fixative.

Now I’ve finished the experiments, I’m looking forward to actually making something with Shrinkydinks! It’s so much fun watching the pieces of plastic curl up and shrink in the oven, and then flatten back down as much thicker, but much smaller pieces.

Comments (2)

autumn bracelet

October’s whiplash theme is Accessories; a really broad theme with a lot of scope. I have been crocheting a lot recently, so I reluctantly (but only temporarily!) put my crochet hook down and decided to go with a different craft this month.

Autumn has always been my favourite season. My birthday is in October, and I love the colours of autumn. Especially since I moved to Canada, the ‘fall’ colours are something I look forward to every year. I decided to make a bracelet with all my favourite autumn elements, so I’d have a little piece of autumn to keep with me all year round.

I made seven signature beads from FIMO polymer clay: a crisp red apple, a bunch of purple grapes, a deep pink rose, a glossy acorn, a pumpkin, an ear of corn, and a red leaf (for scale, the acorn is exactly 1cm tall).

polymer clay apple bead polymer clay grapes bead polymer clay rose bead
polymer clay acorn bead polymer clay pumpkin bead polymer clay corn bead
polymer clay leaf bead

After baking and varnishing them, I glued a bugle bead through the hole in each polymer clay bead for added strength and to give each bead the same width. I strung them on Stretch Magic bead cord with golden bugle beads to space them out and amber coloured glass beads as accents. Here is the finished bracelet (click to see a bigger version):

FIMO polymer clay autumn themed bracelet

UPDATE: Here’s a photo of the bracelet in use!

polymer clay autumn bracelet

Comments (4)

afghan progress

My 63 squares afghan is progressing… I’ve added the navy border to 19 squares, and have another 16 squares waiting for their navy border to be added:

63 afghan squares in progress

Status: 35/63 squares (56%) completed

Comments

  • Quick Links: Crochet

    navigation: arrow

    buy crochet patterns and accessories from my online store

    'Everyday Crochet' and 'The Essential Guide to Amigurumi' crochet books by June Gilbank

    Crochet video tutorials and step-by-step photo tutorials

    Free PlanetJune crochet patterns

    Frequently Asked Questions

    Quick Links: Crafts

    navigation: arrow

    Punchneedle Embroidery information, ebook & patterns

    Papercraft ebook & tutorials

    Free PlanetJune craft projects & tutorials

  • Blog Post Categories

  • Blog Archives

  • Welcome to PlanetJune!

    June Gilbank

    Hi, I'm June. Welcome to my world of nature-inspired crochet and crafting. I hope you enjoy your visit!

    If you'd like to get in touch, you can contact me here.
    crocheted Canadian flag by PlanetJune
  • A fanned-out pile of the books Everyday Crochet and The Essential Guide to Amigurumi, with text 'The answers to all your crochet questions at your fingertips - find out more'
  • Support PlanetJune!

    Want to say thanks? You can send me money in seconds at paypal.me/planetjune (over $20) or paypal.me/planetjune2 (under $20) or send me a donation through my shop.

    Or simply click through from my links before you shop at Amazon, Etsy, KnitPicks, LoveCrafts or Crochet.com, and I'll make a small commission on your purchase, at no cost to you! Start here:

    ♥ Support PlanetJune ♥

    Tip: This link is also in the footer of every page!

    Thank you so much for your support!